© 2017 The original authors.
Coming Soon
|
This guide is still under development, check back soon! |
1. Java API for RESTful Web Services (JAX-RS)
1.1. Content
1.2. Tutorial Overview
This chapter describes the Java API for RESTful web services (JAX-RS, defined in JSR331). RESTEasy is an portable implementation of this specification which can run in any Servlet container. Tight integration with JBoss Application Server is available for optimal user experience in that environment. While JAX-RS is only a server-side specification, RESTeasy has innovated to bring JAX-RS to the client through the RESTEasy JAX-RS Client Framework.
Detailed documentation on RESTEasy is available
here.
The source for this tutorial is in github repository
git://github.com/tdiesler/javaee-tutorial.git
OpenShift, is a portfolio of portable cloud services for deploying and managing applications in the cloud. This tutorial shows how to deploy a RESTful web service on the free OpenShift Express JavaEE cartridge that runs JBossAS 7.
An application running on Android shows how to leverage JBoss technology on mobile devices. Specifically, we show how use the RESTEasy client API from an Android device to integrate with a RESTful service running on a JBossAS 7 instance in the cloud.
The following topics are addressed
-
What are RESTful web services
-
Creating a RESTful server endpoint
-
Deploying a RESTful endpoint to a JBossAS instance in the cloud
-
RESTEasy client running on an Android mobile device
1.3. What are RESTful Web Services?
Coming Soon
| This section is still under development. |
RESTful web services are designed to expose APIs on the web. REST stands for Representational State Transfer. It aims to provide better performance, scalability, and flexibility than traditinoal web services, by allowing clients to access data and resources using predictable URLs. Many well-known public web services expose RESTful APIs.
The Jakarta specification for RESTful services is JAX-RS. It is covered by JSR-311 ( http://jcp.org/jsr/detail/311.jsp). In the REST model, the server exposes APIs through specific URIs (typically URLs), and clients access those URIs to query or modify data. REST uses a stateless communication protocol. Typically, this is HTTP.
The following is a summary of RESTful design principles:
-
A URL is tied to a resource using the
@Pathannotation. Clients access the resource using the URL. -
Create, Read, Update, and Delete (CRUD) operations are accessed via
PUT,GET,POST, andDELETErequests in the HTTP protocol.-
PUTcreates a new resource. -
DELETEdeletes a resource. -
GETretrieves the current state of a resource. -
POSTupdates a resources’s state.
-
-
Resources are decoupled from their representation, so that clients can request the data in a variety of different formats.
-
Stateful interactions require explicit state transfer, in the form of URL rewriting, cookies, and hidden form fields. State can also be embedded in response messages.
1.4. Creating a RESTful endpoint
A RESTful endpoint is deployed as JavaEE web archive (WAR). For this tutorial we use a simple library application to manage some books. There are two classes in this application:
-
Library
-
Book
The Book is a plain old Java object (POJO) with two attributes. This is a simple Java representation of a RESTful entity.
public class Book {

    private String isbn;
    private String title;

    ...
}
The Library is the RESTful Root Resource. Here we use a set of standard JAX-RS annotations to define
-
The root path to the library resource
-
The wire representation of the data (MIME type)
-
The Http methods and corresponding paths
@Path("/library")
@Consumes({ "application/json" })
@Produces({ "application/json" })
public class Library {

    @GET
    @Path("/books")
    public Collection<Book> getBooks() {
    ...
    }

    @GET
    @Path("/book/{isbn}")
    public Book getBook(@PathParam("isbn") String id) {
    ...
    }

    @PUT
    @Path("/book/{isbn}")
    public Book addBook(@PathParam("isbn") String id, @QueryParam("title") String title) {
    ...
    }

    @POST
    @Path("/book/{isbn}")
    public Book updateBook(@PathParam("isbn") String id, String title) {
    ...
    }

    @DELETE
    @Path("/book/{isbn}")
    public Book removeBook(@PathParam("isbn") String id) {
    ...
    }
}
The Library root resource uses these JAX-RS annotations:
| Annotation | Description |
|---|---|
@Path |
Identifies the URI path that a resource class or class method will serve requests for |
@Consumes |
Defines the media types that the methods of a resource class can accept |
@Produces |
Defines the media type(s) that the methods of a resource class can produce |
@GET |
Indicates that the annotated method responds to HTTP GET requests |
@PUT |
Indicates that the annotated method responds to HTTP PUT requests |
@POST |
Indicates that the annotated method responds to HTTP POST requests |
@DELETE |
Indicates that the annotated method responds to HTTP DELETE requests |
For a full description of the available JAX-RS annotations, see the JAX-RS API documentation.
1.5. Package and build the endpoint
To package the endpoint we create a simple web archive and include a web.xml with the following content
Review
| AS7-1674 Remove or explain why web.xml is needed for RESTful endpoints |
<web-app version="2.4" xmlns="http://java.sun.com/xml/ns/j2ee"
         xmlns:xsi="http://www.w3.org/2001/XMLSchema-instance"
         xsi:schemaLocation="http://java.sun.com/xml/ns/j2ee http://java.sun.com/xml/ns/j2ee/web-app_2_4.xsd">
    <servlet-mapping>
        <servlet-name>javax.ws.rs.core.Application</servlet-name>
        <url-pattern>/*</url-pattern>
    </servlet-mapping>
</web-app>
The root context is defined in jboss-web.xml
<jboss-web>
  <context-root>jaxrs-sample</context-root>
</jboss-web>
The code for the JAX-RS part of this tutorial is available on https://github.com/tdiesler/javaee-tutorial/tree/master/jaxrs. In this step we clone the repository and build the endpoint using maven. There are a number of JAX-RS client tests that run against a local JBossAS 7 instance. Before we build the project, we set the JBOSS_HOME environment variable accordingly.
Arquillian, the test framework we use throughout this tutorial, can manage server startup/shutdown. It is however also possible to startup the server instance manually before you run the tests. The latter allows you to look at the console and see what log output the deployment phase and JAX-RS endpoint invocations produce.
$ git clone git://github.com/tdiesler/javaee-tutorial.git
Cloning into javaee-tutorial...

$ cd javaee-tutorial/jaxrs
$ export JBOSS_HOME=~/workspace/jboss-as-7.0.1.Final
$ mvn install
...
[INFO] ------------------------------------------------------------------------
[INFO] Reactor Summary:
[INFO]
[INFO] JavaEE Tutorial - JAX-RS .......................... SUCCESS [1.694s]
[INFO] JavaEE Tutorial - JAX-RS Server ................... SUCCESS [2.392s]
[INFO] JavaEE Tutorial - JAX-RS Client ................... SUCCESS [7.304s]
[INFO] ------------------------------------------------------------------------
[INFO] BUILD SUCCESS
[INFO] ------------------------------------------------------------------------
[INFO] Total time: 12.142s
1.6. Deploy the endpoint to OpenShift
First we need to create a free OpenShift Express account and select the JavaEE cartridge that runs JBossAS 7. Once we have received the confirmation email from OpenShift we can continue to create our subdomain and deploy the RESTful endpoint. A series of videos on the OpenShift Express page shows you how to do this. There is also an excellent quick start document that you have access to after login.
For this tutorial we assume you have done the above and that we can continue by creating the OpenShift application. This step sets up your JBossAS 7 instance in the cloud. Additionally a Git repository is configured that gives access to your deployed application.
$ rhc-create-app -a tutorial -t jbossas-7.0
Password:

Attempting to create remote application space: tutorial
Successfully created application: tutorial
Now your new domain name is being propagated worldwide (this might take a minute)...

Success!  Your application is now published here:

      http://tutorial-tdiesler.rhcloud.com/

The remote repository is located here:

    ssh://79dcb9db5e134cccb9d1ba33e6089667@tutorial-tdiesler.rhcloud.com/~/git/tutorial.git/
Next, we can clone the remote Git repository to our local workspace
$ git clone ssh://79dcb9db5e134cccb9d1ba33e6089667@tutorial-tdiesler.rhcloud.com/~/git/tutorial.git
Cloning into tutorial...
remote: Counting objects: 24, done.
remote: Compressing objects: 100% (14/14), done.
remote: Total 24 (delta 0), reused 0 (delta 0)
Receiving objects: 100% (24/24), 21.84 KiB, done.

ls -1 tutorial
deployments
pom.xml
README
src
Because we want to deploy an already existing web application, which we’ll build in the next step, we can safely remove the source artefacts from the repository.
$ rm -rf tutorial/src tutorial/pom.xmlNow we copy the JAX-RS endpoint webapp that we build above to the 'deployments' folder and commit the changes.
$ cp javaee-tutorial/jaxrs/server/target/javaee-tutorial-jaxrs-server-1.0.0-SNAPSHOT.war tutorial/deployments
$ cd tutorial; git commit -a -m "Initial jaxrs endpoint deployment"
[master be5b5a3] Initial jaxrs endpoint deployment
 7 files changed, 0 insertions(+), 672 deletions(-)
 create mode 100644 deployments/javaee-tutorial-jaxrs-server-1.0.0-SNAPSHOT.war
 delete mode 100644 pom.xml
 delete mode 100644 src/main/java/.gitkeep
 delete mode 100644 src/main/resources/.gitkeep
 delete mode 100644 src/main/webapp/WEB-INF/web.xml
 delete mode 100644 src/main/webapp/health.jsp
 delete mode 100644 src/main/webapp/images/jbosscorp_logo.png
 delete mode 100644 src/main/webapp/index.html
 delete mode 100644 src/main/webapp/snoop.jsp

$ git push origin
Counting objects: 6, done.
...
remote: Starting application...Done
You can now use curl or your browser to see the JAX-RS endpoint in action. The following URL lists the books that are currently registered in the library.
$ curl http://tutorial-tdiesler.rhcloud.com/jaxrs-sample/library/books
[
{"title":"The Judgment","isbn":"001"},
{"title":"The Stoker","isbn":"002"},
{"title":"Jackals and Arabs","isbn":"003"},
{"title":"The Refusal","isbn":"004"}
]
1.7. Building the mobile client
The source associated with this tutorial contains a fully working mobile client application for the Android framework. If not done so already please follow steps described in Installing the SDK. In addition to the Android SDK, I recommend installing the m2eclipse and the EGit plugin to Eclipse.
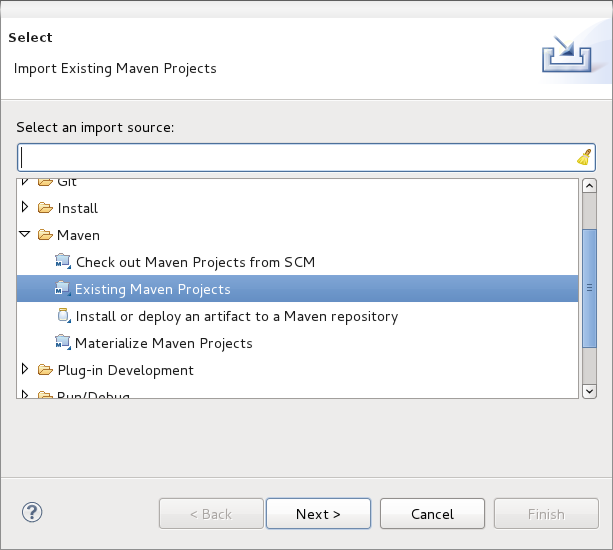
First, go to File|Import… and choose "Existing Maven Projects" to import the tutorial sources
You project view should look like this

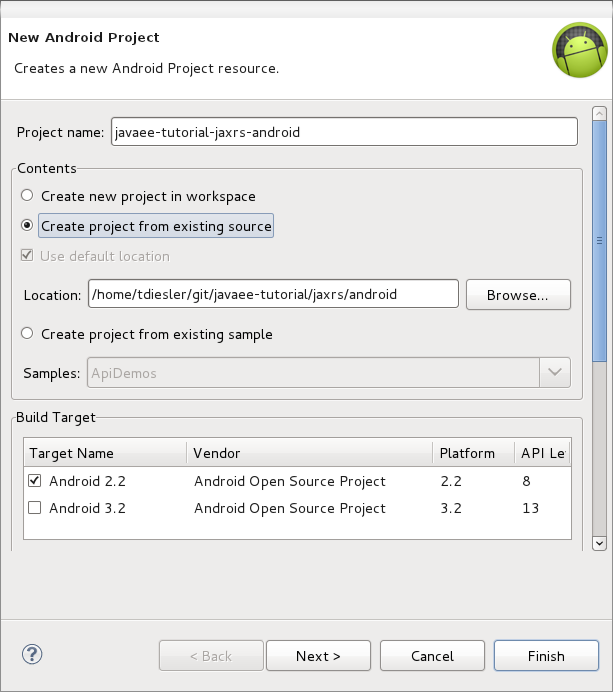
Then go to File|New|Android Project and fill out the first wizard page like this
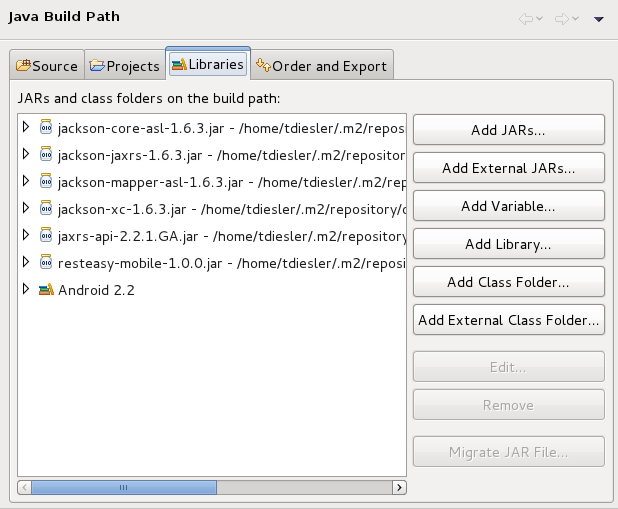
Click Finish. Next, go to Project|Properties|Build Path|Libraries and add these external libraries to your android project.
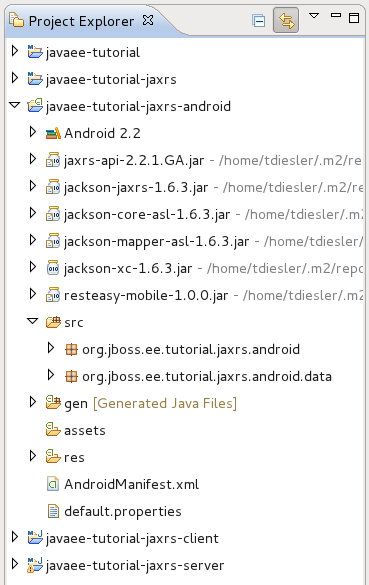
You final project view should look like this
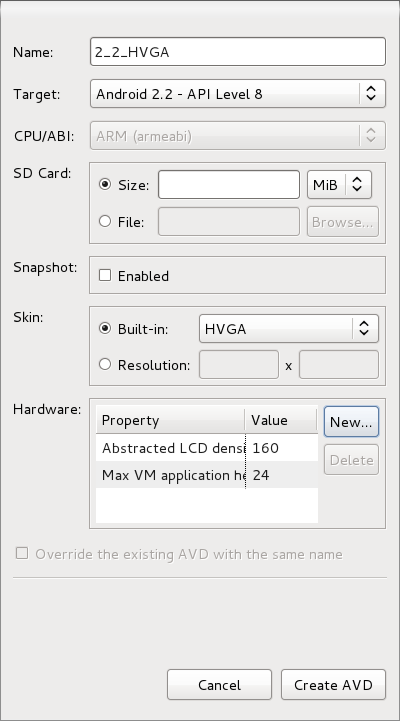
To run the application in the emulator, we need an Android Virtual Device (AVD). Go to Window|Android SDK and AVD Manager and create a new AVD like this
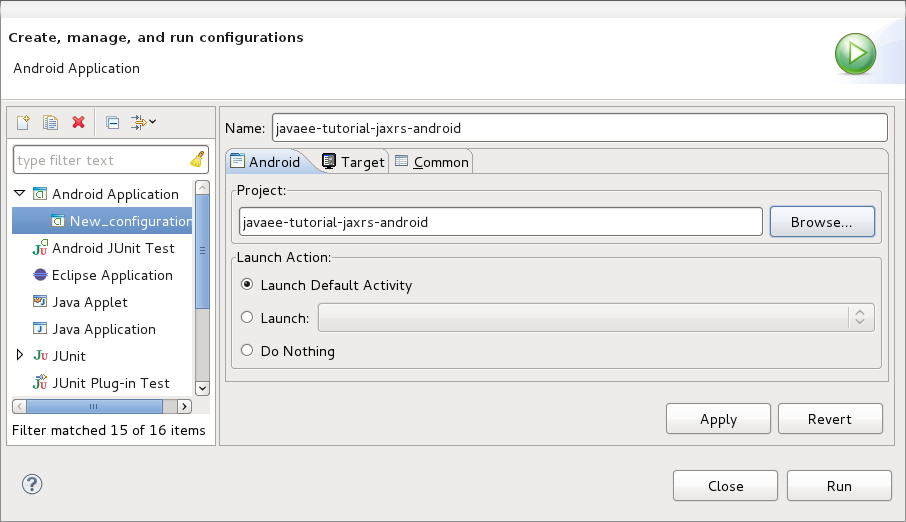
Now go to Run|Configuration to create a new run configuration for the client app.
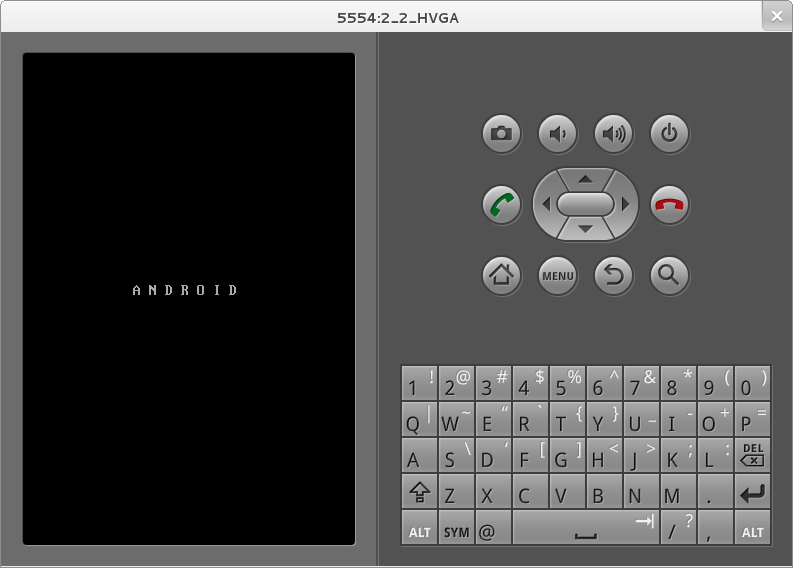
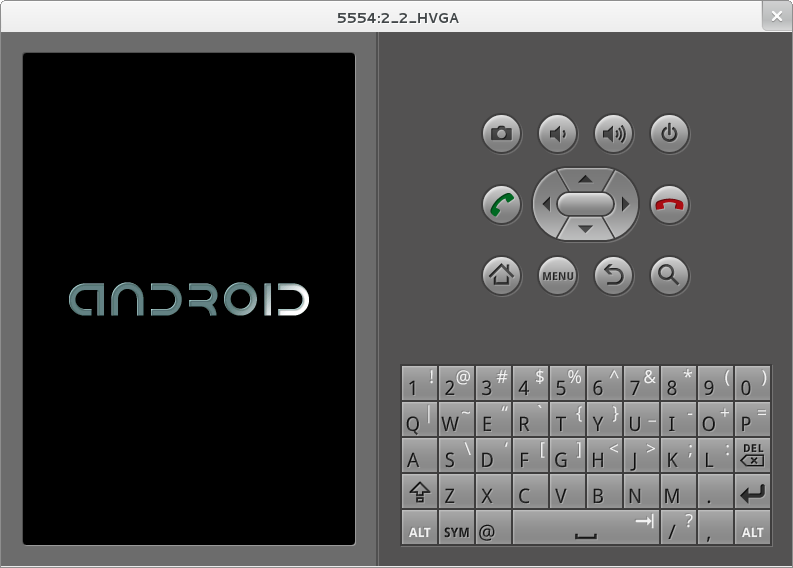
Now you should be able to launch the application in the debugger. Right click on the javaee-tutorial-jaxrs-android project and select Debug As|Android Application. This should launch the emulator, which now goes though a series of boot screens until it eventually displays the Android home screen. This will take a minute or two if you do this for the first time.
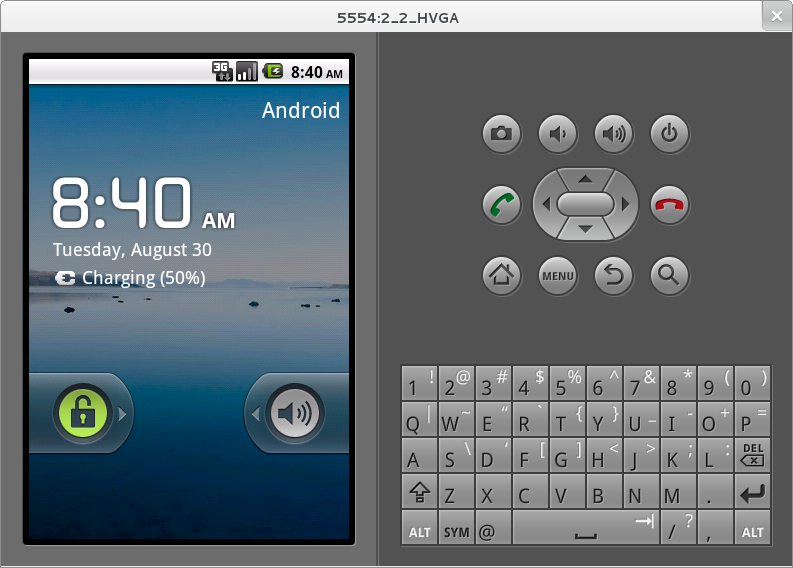
When you unlock the home screen by dragging the little green lock to the right. You should see the the running JAX-RS client application.
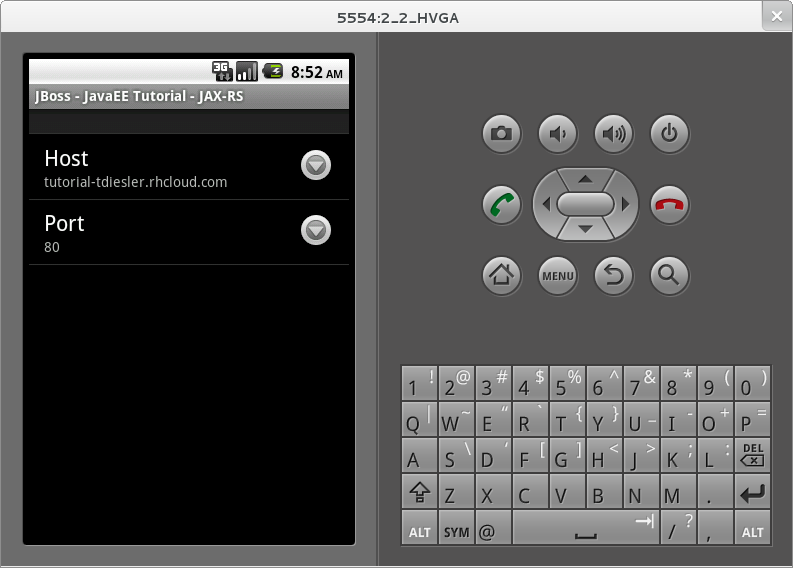
Finally, you need to configure the host that the client app connects to. This would be the same as you used above to curl the library list. In the emulator click Menu|Host Settings and enter the host address of your OpenShift application.
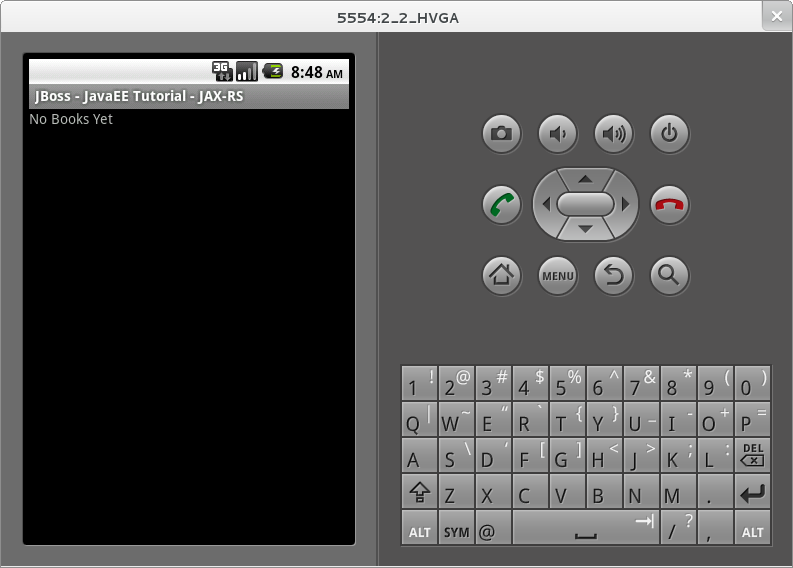
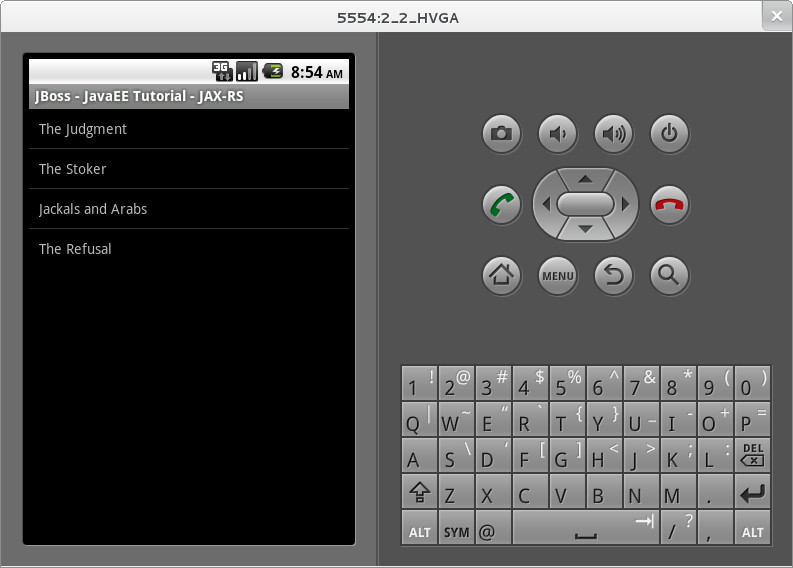
When going back to the application using the little back arrow next to Menu, you should see a list of books.
You can now add, edit and delete books and switch between your browser and the emulator to verify that the client app is not cheating and that the books are in fact in the cloud on your JBossAS 7 instance.
In Eclipse you can go to the Debug perspective and click on the little Android robot in the lower right corner. This will display the LogCat view, which should display log output from that Android system as well as from this client app
08-30 09:05:46.180: INFO/JaxrsSample(269): removeBook: Book [isbn=1234, title=1234]
08-30 09:05:46.210: INFO/JaxrsSample(269): requestURI: http://tutorial-tdiesler.rhcloud.com:80/jaxrs-sample/library
08-30 09:05:46.860: INFO/global(269): Default buffer size used in BufferedInputStream constructor. It would be better to be explicit if an 8k buffer is required.
08-30 09:05:46.920: INFO/JaxrsSample(269): getBooks: [Book [isbn=001, title=The Judgment], Book [isbn=002, title=The Stoker], Book [isbn=003, title=Jackals and Arabs], Book [isbn=004, title=The Refusal]]
1.8. Exploring the mobile client
There is a lot to writing high quality mobile applications. The goal of this little application is to get you started with JBossAS 7 / Android integration. There is also a portable approach to writing mobile applications. A popular one would be through PhoneGap. With PhoneGap you write your application in HTML+CSS+Java Script. It then runs in the browser of your mobile device. Naturally, not the full set of mobile platform APIs would be available through this approach.
The JAX-RS client application uses an annotated library client interface
@Consumes({ "application/json" })
@Produces({ "application/json" })
public interface LibraryClient {

    @GET
    @Path("/books")
    public List<Book> getBooks();

    @GET
    @Path("/book/{isbn}")
    public Book getBook(@PathParam("isbn") String id);

    @PUT
    @Path("/book/{isbn}")
    public Book addBook(@PathParam("isbn") String id, @QueryParam("title") String title);

    @POST
    @Path("/book/{isbn}")
    public Book updateBook(@PathParam("isbn") String id, String title);

    @DELETE
    @Path("/book/{isbn}")
    public Book removeBook(@PathParam("isbn") String id);
}
There are two implementations of this interface available.
-
LibraryHttpclient
-
LibraryResteasyClient
The first uses APIs that are available in the Android SDK natively. The code is much more involved, but there would be no need to add external libraries (i.e. resteasy, jackson, etc). The effect is that the total size of the application is considerably smaller in size (i.e. 40k)
    @Override
    public List<Book> getBooks() {
        List<Book> result = new ArrayList<Book>();
        String content = get("books");
        Log.d(LOG_TAG, "Result content:" + content);
        if (content != null) {
            try {
                JSONTokener tokener = new JSONTokener(content);
                JSONArray array = (JSONArray) tokener.nextValue();
                for (int i = 0; i < array.length(); i++) {
                    JSONObject obj = array.getJSONObject(i);
                    String title = obj.getString("title");
                    String isbn = obj.getString("isbn");
                    result.add(new Book(isbn, title));
                }
            } catch (JSONException ex) {
                ex.printStackTrace();
            }
        }
        Log.i(LOG_TAG, "getBooks: " + result);
        return result;
    }

    private String get(String path) {
        try {
            HttpGet request = new HttpGet(getRequestURI(path));
            HttpResponse res = httpClient.execute(request);
            String content = EntityUtils.toString(res.getEntity());
            return content;
        } catch (Exception ex) {
            ex.printStackTrace();
            return null;
        }
    }
The second implementation uses the fabulous RESTEasy client proxy to interact with the JAX-RS endpoint. The details of Http connectivity and JSON data binding is transparently handled by RESTEasy. The total size of the application is considerably bigger in size (i.e. 400k)
    @Override
    public List<Book> getBooks() {
        List<Book> result = new ArrayList<Book>();
        try {
            result = getLibraryClient().getBooks();
        } catch (RuntimeException ex) {
            ex.printStackTrace();
        }
        Log.i(LOG_TAG, "getBooks: " + result);
        return result;
    }
Stay tuned for an update on a much more optimized version of the RESTEasy mobile client. Feasible is also a RESTEasy JavaScript library that would enable the portable PhoneGap approach.
2. Java Servlet Technology
Coming Soon
| This guide is still under development, check back soon! |
2.1. Content
2.2. Asynchronous Support
[[Java_Server_Faces_Technology_(JSF)]] = Java Server Faces Technology (JSF)
[[Java_Persistence_API_(JPA)]] = Java Persistence API (JPA)
[[Java_Transaction_API_(JTA)]] = Java Transaction API (JTA)
Coming Soon
| This guide is still under development, check back soon! |
3. Managed Beans
[[Contexts_and_Dependency_Injection_(CDI)]] = Contexts and Dependency Injection (CDI)
4. Bean Validation
[[Java_Message_Service_API_(JMS)]] = Java Message Service API (JMS)
Coming Soon
| This guide is still under development, check back soon! |
4.1. Configure JBossAS for Messaging
Currently, the default configuration does not include the JMS subsystem. To enable JMS in the standalone server you need to add these configuration items to standalone.xml or simply use standalone-full.xml.
<extension module="org.jboss.as.messaging"/>

<subsystem xmlns="urn:jboss:domain:messaging:1.0">
    <!-- Default journal file size is 10Mb, reduced here to 100k for faster first boot -->
    <journal-file-size>102400</journal-file-size>
    <journal-min-files>2</journal-min-files>
    <journal-type>NIO</journal-type>
    <!-- disable messaging persistence -->
    <persistence-enabled>false</persistence-enabled>

    <connectors>
       <netty-connector name="netty" socket-binding="messaging" />
       <netty-connector name="netty-throughput" socket-binding="messaging-throughput">
          <param key="batch-delay" value="50"/>
       </netty-connector>
       <in-vm-connector name="in-vm" server-id="0" />
    </connectors>

    <acceptors>
       <netty-acceptor name="netty" socket-binding="messaging" />
       <netty-acceptor name="netty-throughput" socket-binding="messaging-throughput">
          <param key="batch-delay" value="50"/>
          <param key="direct-deliver" value="false"/>
       </netty-acceptor>
        <acceptor name="stomp-acceptor">
         <factory-class>org.hornetq.core.remoting.impl.netty.NettyAcceptorFactory</factory-class>
         <param key="protocol" value="stomp" />
         <param key="port" value="61613" />
       </acceptor>
       <in-vm-acceptor name="in-vm" server-id="0" />
    </acceptors>

    <security-settings>
       <security-setting match="#">
           <permission type="createNonDurableQueue" roles="guest"/>
           <permission type="deleteNonDurableQueue" roles="guest"/>
            <permission type="consume" roles="guest"/>
            <permission type="send" roles="guest"/>
       </security-setting>
    </security-settings>

    <address-settings>
       <!--default for catch all-->
       <address-setting match="#">
          <dead-letter-address>jms.queue.DLQ</dead-letter-address>
          <expiry-address>jms.queue.ExpiryQueue</expiry-address>
          <redelivery-delay>0</redelivery-delay>
          <max-size-bytes>10485760</max-size-bytes>
          <message-counter-history-day-limit>10</message-counter-history-day-limit>
          <address-full-policy>BLOCK</address-full-policy>
       </address-setting>
    </address-settings>

    <!--JMS Stuff-->
   <jms-connection-factories>
      <connection-factory name="InVmConnectionFactory">
         <connectors>
            <connector-ref connector-name="in-vm"/>
         </connectors>
         <entries>
            <entry name="java:/ConnectionFactory"/>
         </entries>
      </connection-factory>
      <connection-factory name="RemoteConnectionFactory">
         <connectors>
            <connector-ref connector-name="netty"/>
         </connectors>
         <entries>
            <entry name="RemoteConnectionFactory"/>
         </entries>
      </connection-factory>
      <pooled-connection-factory name="hornetq-ra">
         <transaction mode="xa"/>
         <connectors>
            <connector-ref connector-name="in-vm"/>
         </connectors>
         <entries>
            <entry name="java:/JmsXA"/>
            <!-- Global JNDI entry used to provide a default JMS Connection factory to EE application -->
            <entry name="java:jboss/DefaultJMSConnectionFactory"/>
         </entries>
      </pooled-connection-factory>
   </jms-connection-factories>

   <jms-destinations>
      <jms-queue name="testQueue">
         <entry name="queue/test"/>
      </jms-queue>
      <jms-topic name="testTopic">
         <entry name="topic/test"/>
      </jms-topic>
   </jms-destinations>
</subsystem>

<socket-binding name="messaging" port="5445" />
<socket-binding name="messaging-throughput" port="5455"/>
Alternatively run the server using the preview configuration
$ bin/standalone.sh --server-config=standalone-preview.xml4.2. Adding the message destinations
For this tutorial we use two message destinations
-
BidQueue - The queue that receives the client bids
-
AuctionTopic - The topic that publishes the start of a new auction
You can either add the message destinations by using the Command Line Interface (CLI)
$ bin/jboss-admin.sh --connect
Connected to standalone controller at localhost:9999
[standalone@localhost:9999 /] jms-queue add --queue-address=BidQueue --entries=queue/bid
[standalone@localhost:9999 /] jms-topic add --topic-address=AuctionTopic --entries=topic/auction
[standalone@localhost:9999 /] exit
Closed connection to localhost:9999
or by adding them to the subsytem configuration as shown above.
[[JavaEE_Connector_Architecture_(JCA)]] = JavaEE Connector Architecture (JCA)
5. JavaMail API
[[Java_Authorization_Contract_for_Containers_(JACC)]] = Java Authorization Contract for Containers (JACC)
In order to register your own JACC Module, you’ll need to create a server module containing the required classes, and then set three system properties for WildFly to take it. Such a module would depend on the "javax.api" and "javaee.api" modules.
An example module.xml for such a module could be:
<module xmlns="urn:jboss:module:1.1" name="com.example.customjacc">
  <resources>
    <resource-root path="customjacc.jar"/>
  </resources>
  <dependencies>
    <module name="javax.api"/>
    <module name="javaee.api"/>
  </dependencies>
</module>
The specified JAR needs to contain at least two classes, as mandated by the JACC spec:
-
A
PolicyProviderimplementation: in our example, it’ll becom.example.customjacc.CustomPolicy. -
A
PolicyConfigurationFactoryimplementation:com.example.customjacc.CustomPolicyConfigurationFactoryin our case.
The spec requires two system properties to be set for the server to register the JACC Module.
For a server running in standalone mode, put the following commands in the JBoss CLI:
[standalone@localhost:9990 /] /system-property=javax.security.jacc.policy.provider:add(value=com.example.customjacc.CustomPolicy)
[standalone@localhost:9990 /] /system-property=javax.security.jacc.PolicyConfigurationFactory.provider:add(value=com.example.customjacc.CustomPolicyConfigurationFactory)
Another property is needed to make WildFly know where to load the classes from:
[standalone@localhost:9990 /] /system-property=org.jboss.as.security.jacc-module:add(value=com.example.customjacc)[[Java_Authentication_Service_Provider_Interface_for_Containers_(JASPIC)]] = Java Authentication Service Provider Interface for Containers (JASPIC)
JASPI is not available by default for deployments, and a specific
Security Domain must be created to use it. For a simplified developer
experience, a default JASPI Domain is already bundled, called
jaspitest.
To make use of it, a Web Application only needs to specifiy the desired
security domain in the jboss-web.xml deployment descriptor. This file
should be located under the WEB-INF directory. An example
jboss-web.xml enabling the default JASPI domain:
<?xml version="1.0"?>
<jboss-web xmlns="http://www.jboss.com/xml/ns/javaee"
    xmlns:xsi="http://www.w3.org/2001/XMLSchema-instance"
    xsi:schemaLocation="http://www.jboss.com/xml/ns/javaee http://www.jboss.org/j2ee/schema/jboss-web_10_0.xsd"
    version="10.0">
    <security-domain>jaspitest</security-domain>
</jboss-web>
For EAR deployments, a jboss-app.xml like the following should be used
instead, placed under the root META-INF directory:
<?xml version="1.0" encoding="UTF-8"?>
<jboss-app xmlns="http://www.jboss.com/xml/ns/javaee"
    xmlns:xsi="http://www.w3.org/2001/XMLSchema-instance"
    version="7.0">
    <security-domain>jaspitest</security-domain>
</jboss-app>
[[Enterprise_JavaBeans_Technology_(EJB)]] = Enterprise JavaBeans Technology (EJB)
In this section we’ll look at the two main types of beans (Session Beans and Message Driven Beans), the methods to access and the packaging possibilities of beans.
Coming Soon
| This guide is still under development, check back soon! |
5.1. Session Beans
5.1.1. Stateful Session Beans
5.1.2. Stateless Session Beans
5.1.3. Singleton Session Beans
5.2. Message Driven Beans
5.3. How can Enterprise JavaBeans can be accessed?
5.3.1. Remote call invocation
5.3.2. Local call invocation
5.3.3. Web Services
5.4. Packaging
[[Java_API_for_XML_Web_Services_(JAX-WS)]] = Java API for XML Web Services (JAX-WS)
JBossWS uses the JBoss Application Server as its target container. The following examples focus on web service deployments that leverage EJB3 service implementations and the JAX-WS programming models. For further information on POJO service implementations and advanced topics you need consult the user guide.
5.5. Developing web service implementations
JAX-WS does leverage annotations in order to express web service meta data on Java components and to describe the mapping between Java data types and XML. When developing web service implementations you need to decide whether you are going to start with an abstract contract (WSDL) or a Java component.
If you are in charge to provide the service implementation, then you are probably going to start with the implementation and derive the abstract contract from it. You are probably not even getting in touch with the WSDL unless you hand it to 3rd party clients. For this reason we are going to look at a service implementation that leverages JSR-181 annotations.
| Even though detailed knowledge of web service meta data is not required, it will definitely help if you make yourself familiar with it. For further information see |
5.5.1. The service implementation class
When starting from Java you must provide the service implementation. A valid endpoint implementation class must meet the following requirements:
-
It must carry a
javax.jws.WebServiceannotation (see JSR 181) -
All method parameters and return types must be compatible with the JAXB 2.0
Let’s look at a sample EJB3 component that is going to be exposed as a web service.
Don’t be confused with the EJB3 annotation @Stateless. We concentrate
on the @WebService annotation for now.
Implementing the service
package org.jboss.test.ws.jaxws.samples.retail.profile;

import javax.ejb.Stateless;
import javax.jws.WebService;
import javax.jws.WebMethod;
import javax.jws.soap.SOAPBinding;

@Stateless                                                             (1)
@WebService(                                                           (2)
   name="ProfileMgmt",
   targetNamespace = "http://org.jboss.ws/samples/retail/profile",
   serviceName = "ProfileMgmtService")
@SOAPBinding(parameterStyle = SOAPBinding.ParameterStyle.BARE)         (3)
public class ProfileMgmtBean {

   @WebMethod                                                          (4)
   public DiscountResponse getCustomerDiscount(DiscountRequest request) {
      return new DiscountResponse(request.getCustomer(), 10.00);
   }
}
1. We are using a stateless session bean implementation 2. Exposed a web service with an explicit namespace 3. It's a doc/lit bare endpoint 4. And offers an 'getCustomerDiscount' operation
What about the payload?
The method parameters and return values are going to represent our XML payload and thus require being compatible with JAXB2. Actually you wouldn’t need any JAXB annotations for this particular example, because JAXB relies on meaningful defaults. For the sake of documentation we put the more important ones here.
Take a look at the request parameter:
package org.jboss.test.ws.jaxws.samples.retail.profile;

import javax.xml.bind.annotation.XmlAccessType;
import javax.xml.bind.annotation.XmlAccessorType;
import javax.xml.bind.annotation.XmlType;

import org.jboss.test.ws.jaxws.samples.retail.Customer;

@XmlAccessorType(XmlAccessType.FIELD)
@XmlType(                                                  (1)
  name = "discountRequest",
  namespace="http://org.jboss.ws/samples/retail/profile",
  propOrder = { "customer" }
)
public class DiscountRequest {

   protected Customer customer;

   public DiscountRequest() {
   }

   public DiscountRequest(Customer customer) {
      this.customer = customer;
   }

   public Customer getCustomer() {
      return customer;
   }

   public void setCustomer(Customer value) {
      this.customer = value;
   }

}
1. In this case we use @XmlType to specify an XML complex type name and override the namespace.
| If you have more complex mapping problems you need to consult the JAXB documentation. |
5.5.2. Deploying service implementations
Service deployment basically depends on the implementation type. As you may already know web services can be implemented as EJB3 components or plain old Java objects. This quick start leverages EJB3 components, that’s why we are going to look at this case in the next sections.
EJB3 services
Simply wrap up the service implementation class, the endpoint interface and any custom data types in a JAR and drop them in the deployment directory. No additional deployment descriptors required. Any meta data required for the deployment of the actual web service is taken from the annotations provided on the implementation class and the service endpoint interface. JBossWS will intercept that EJB3 deployment (the bean will also be there) and create an HTTP endpoint at deploy-time.
The JAR package structure
jar -tf jaxws-samples-retail.jar
org/jboss/test/ws/jaxws/samples/retail/profile/DiscountRequest.class
org/jboss/test/ws/jaxws/samples/retail/profile/DiscountResponse.class
org/jboss/test/ws/jaxws/samples/retail/profile/ObjectFactory.class
org/jboss/test/ws/jaxws/samples/retail/profile/ProfileMgmt.class
org/jboss/test/ws/jaxws/samples/retail/profile/ProfileMgmtBean.class
org/jboss/test/ws/jaxws/samples/retail/profile/ProfileMgmtService.class
org/jboss/test/ws/jaxws/samples/retail/profile/package-info.class
| If the deployment was successful you should be able to see your endpoint in the application server management console. |
5.6. Consuming web services
When creating web service clients you would usually start from the WSDL. JBossWS ships with a set of tools to generate the required JAX-WS artefacts to build client implementations. In the following section we will look at the most basic usage patterns. For a more detailed introduction to web service client please consult the user guide.
5.6.1. Creating the client artifacts
Using wsconsume
The wsconsume tool is used to consume the abstract contract (WSDL) and produce annotated Java classes (and optionally sources) that define it. We are going to start with the WSDL from our retail example (ProfileMgmtService.wsdl). For a detailed tool reference you need to consult the user guide.
wsconsume is a command line tool that generates
portable JAX-WS artifacts from a WSDL file.

usage: org.jboss.ws.tools.jaxws.command.wsconsume [options] <wsdl-url>

options:
    -h, --help                  Show this help message
    -b, --binding=<file>        One or more JAX-WS or JAXB binding files
    -k, --keep                  Keep/Generate Java source
    -c  --catalog=<file>        Oasis XML Catalog file for entity resolution
    -p  --package=<name>        The target package for generated source
    -w  --wsdlLocation=<loc>    Value to use for @WebService.wsdlLocation
    -o, --output=<directory>    The directory to put generated artifacts
    -s, --source=<directory>    The directory to put Java source
    -q, --quiet                 Be somewhat more quiet
    -t, --show-traces           Show full exception stack traces
Let’s try it on our sample:
~./wsconsume.sh -k -p org.jboss.test.ws.jaxws.samples.retail.profile ProfileMgmtService.wsdl  (1)

org/jboss/test/ws/jaxws/samples/retail/profile/Customer.java
org/jboss/test/ws/jaxws/samples/retail/profile/DiscountRequest.java
org/jboss/test/ws/jaxws/samples/retail/profile/DiscountResponse.java
org/jboss/test/ws/jaxws/samples/retail/profile/ObjectFactory.java
org/jboss/test/ws/jaxws/samples/retail/profile/ProfileMgmt.java
org/jboss/test/ws/jaxws/samples/retail/profile/ProfileMgmtService.java
org/jboss/test/ws/jaxws/samples/retail/profile/package-info.java
-
As you can see we did use the
-pswitch to specify the package name of the generated sources.
The generated artifacts explained
| File | Purpose |
|---|---|
ProfileMgmt.java |
Service Endpoint Interface |
Customer.java |
Custom data type |
Discount*.java |
Custom data type |
ObjectFactory.java |
JAXB XML Registry |
package-info.java |
Holder for JAXB package annotations |
ProfileMgmtService.java |
Service factory |
Basically wsconsume generates all custom data types (JAXB annotated classes), the service endpoint interface and a service factory class. We will look at how these artifacts can be used the build web service client implementations in the next section.
5.6.2. Constructing a service stub
Web service clients make use of a service stubs that hide the details of a remote web service invocation. To a client application a WS invocation just looks like an invocation of any other business component. In this case the service endpoint interface acts as the business interface. JAX-WS does use a service factory class to construct this as particular service stub:
import javax.xml.ws.Service;
[...]
Service service = Service.create(                                 (1)
new URL("http://example.org/service?wsdl"),
new QName("MyService")
);
ProfileMgmt profileMgmt = service.getPort(ProfileMgmt.class);     (2)

// do something with the service stub here... (3)-
Create a service factory using the WSDL location and the service name
-
Use the tool created service endpoint interface to build the service stub
-
Use the stub like any other business interface
5.6.3. Appendix
Sample wsdl contract
<definitions
    name='ProfileMgmtService'
    targetNamespace='http://org.jboss.ws/samples/retail/profile'
    xmlns='http://schemas.xmlsoap.org/wsdl/'
    xmlns:ns1='http://org.jboss.ws/samples/retail'
    xmlns:soap='http://schemas.xmlsoap.org/wsdl/soap/'
    xmlns:tns='http://org.jboss.ws/samples/retail/profile'
    xmlns:xsd='http://www.w3.org/2001/XMLSchema'>

   <types>

      <xs:schema targetNamespace='http://org.jboss.ws/samples/retail'
                 version='1.0' xmlns:xs='http://www.w3.org/2001/XMLSchema'>
         <xs:complexType name='customer'>
            <xs:sequence>
               <xs:element minOccurs='0' name='creditCardDetails' type='xs:string'/>
               <xs:element minOccurs='0' name='firstName' type='xs:string'/>
               <xs:element minOccurs='0' name='lastName' type='xs:string'/>
            </xs:sequence>
         </xs:complexType>
      </xs:schema>

      <xs:schema
          targetNamespace='http://org.jboss.ws/samples/retail/profile'
          version='1.0'
          xmlns:ns1='http://org.jboss.ws/samples/retail'
          xmlns:tns='http://org.jboss.ws/samples/retail/profile'
          xmlns:xs='http://www.w3.org/2001/XMLSchema'>

         <xs:import namespace='http://org.jboss.ws/samples/retail'/>
         <xs:element name='getCustomerDiscount'
                     nillable='true' type='tns:discountRequest'/>
         <xs:element name='getCustomerDiscountResponse'
                     nillable='true' type='tns:discountResponse'/>
         <xs:complexType name='discountRequest'>
            <xs:sequence>
               <xs:element minOccurs='0' name='customer' type='ns1:customer'/>

            </xs:sequence>
         </xs:complexType>
         <xs:complexType name='discountResponse'>
            <xs:sequence>
               <xs:element minOccurs='0' name='customer' type='ns1:customer'/>
               <xs:element name='discount' type='xs:double'/>
            </xs:sequence>
         </xs:complexType>
      </xs:schema>

   </types>

   <message name='ProfileMgmt_getCustomerDiscount'>
      <part element='tns:getCustomerDiscount' name='getCustomerDiscount'/>
   </message>
   <message name='ProfileMgmt_getCustomerDiscountResponse'>
      <part element='tns:getCustomerDiscountResponse'
            name='getCustomerDiscountResponse'/>
   </message>
   <portType name='ProfileMgmt'>
      <operation name='getCustomerDiscount'
                 parameterOrder='getCustomerDiscount'>

         <input message='tns:ProfileMgmt_getCustomerDiscount'/>
         <output message='tns:ProfileMgmt_getCustomerDiscountResponse'/>
      </operation>
   </portType>
   <binding name='ProfileMgmtBinding' type='tns:ProfileMgmt'>
      <soap:binding style='document'
                    transport='http://schemas.xmlsoap.org/soap/http'/>
      <operation name='getCustomerDiscount'>
         <soap:operation soapAction=''/>
         <input>

            <soap:body use='literal'/>
         </input>
         <output>
            <soap:body use='literal'/>
         </output>
      </operation>
   </binding>
   <service name='ProfileMgmtService'>
      <port binding='tns:ProfileMgmtBinding' name='ProfileMgmtPort'>

         <soap:address
             location='http://<HOST>:<PORT>/jaxws-samples-retail/ProfileMgmtBean'/>
      </port>
   </service>
</definitions>