© 2017 The original authors.
1. Target Audience
This document is a guide to the setup, administration, and configuration of WildFly.
1.1. Prerequisites
Before continuing, you should know how to download, install and run WildFly. For more information on these steps, refer here: Getting Started Guide.
1.2. Examples in this guide
The examples in this guide are largely expressed as XML configuration file excerpts, or by using a representation of the de-typed management model.
2. Core management concepts
2.1. Operating mode
WildFly can be booted in two different modes. A managed domain allows you to run and manage a multi-server topology. Alternatively, you can run a standalone server instance.
2.1.1. Standalone Server
For many use cases, the centralized management capability available via
a managed domain is not necessary. For these use cases, a WildFly
instance can be run as a "standalone server". A standalone server
instance is an independent process, much like an JBoss Application
Server 3, 4, 5, or 6 instance is. Standalone instances can be launched
via the standalone.sh or standalone.bat launch scripts.
If more than one standalone instance is launched and multi-server management is desired, it is the user’s responsibility to coordinate management across the servers. For example, to deploy an application across all of the standalone servers, the user would need to individually deploy the application on each server.
It is perfectly possible to launch multiple standalone server instances and have them form an HA cluster, just like it was possible with JBoss Application Server 3, 4, 5 and 6.
2.1.2. Managed Domain
One of the primary new features of WildFly is the ability to manage multiple WildFly instances from a single control point. A collection of such servers is referred to as the members of a "domain" with a single Domain Controller process acting as the central management control point. All of the WildFly instances in the domain share a common management policy, with the Domain Controller acting to ensure that each server is configured according to that policy. Domains can span multiple physical (or virtual) machines, with all WildFly instances on a given host under the control of a special Host Controller process. One Host Controller instance is configured to act as the central Domain Controller. The Host Controller on each host interacts with the Domain Controller to control the lifecycle of the application server instances running on its host and to assist the Domain Controller in managing them.
When you launch a WildFly managed domain on a host (via the domain.sh
or domain.bat launch scripts) your intent is to launch a Host
Controller and usually at least one WildFly instance. On one of the
hosts the Host Controller should be configured to act as the Domain
Controller. See Domain Setup for details.
The following is an example managed domain topology:
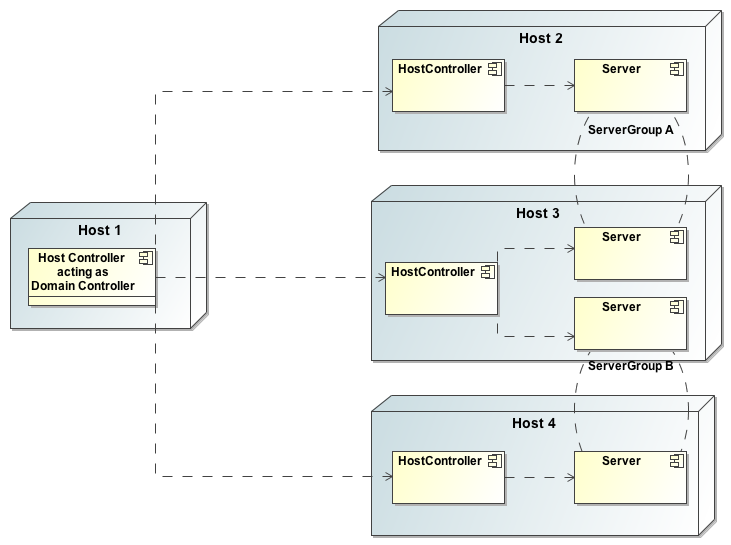
Host
Each "Host" box in the above diagram represents a physical or virtual host. A physical host can contain zero, one or more server instances.
Host Controller
When the domain.sh or domain.bat script is run on a host, a process known as a Host Controller is launched. The Host Controller is solely concerned with server management; it does not itself handle application server workloads. The Host Controller is responsible for starting and stopping the individual application server processes that run on its host, and interacts with the Domain Controller to help manage them.
Each Host Controller by default reads its configuration from the
domain/configuration/host.xml file located in the unzipped WildFly
installation on its host’s filesystem. The host.xml file contains
configuration information that is specific to the particular host.
Primarily:
-
the listing of the names of the actual WildFly instances that are meant to run off of this installation.
-
configuration of how the Host Controller is to contact the Domain Controller to register itself and access the domain configuration. This may either be configuration of how to find and contact a remote Domain Controller, or a configuration telling the Host Controller to itself act as the Domain Controller.
-
configuration of items that are specific to the local physical installation. For example, named interface definitions declared in
domain.xml(see below) can be mapped to an actual machine-specific IP address inhost.xml. Abstract path names indomain.xmlcan be mapped to actual filesystem paths inhost.xml.
Domain Controller
One Host Controller instance is configured to act as the central
management point for the entire domain, i.e. to be the Domain
Controller. The primary responsibility of the Domain Controller is to
maintain the domain’s central management policy, to ensure all Host
Controllers are aware of its current contents, and to assist the Host
Controllers in ensuring any running application server instances are
configured in accordance with this policy. This central management
policy is stored by default in the domain/configuration/domain.xml
file in the unzipped WildFly installation on Domain Controller’s host’s
filesystem.
A domain.xml file must be located in the domain/configuration
directory of an installation that’s meant to run the Domain Controller.
It does not need to be present in installations that are not meant to
run a Domain Controller; i.e. those whose Host Controller is configured
to contact a remote Domain Controller. The presence of a domain.xml
file on such a server does no harm.
The domain.xml file includes, among other things, the configuration of
the various "profiles" that WildFly instances in the domain can be
configured to run. A profile configuration includes the detailed
configuration of the various subsystems that comprise that profile (e.g.
an embedded JBoss Web instance is a subsystem; a JBoss TS transaction
manager is a subsystem, etc). The domain configuration also includes the
definition of groups of sockets that those subsystems may open. The
domain configuration also includes the definition of "server groups":
Server Group
A server group is set of server instances that will be managed and configured as one. In a managed domain each application server instance is a member of a server group. (Even if the group only has a single server, the server is still a member of a group.) It is the responsibility of the Domain Controller and the Host Controllers to ensure that all servers in a server group have a consistent configuration. They should all be configured with the same profile and they should have the same deployment content deployed.
The domain can have multiple server groups. The above diagram shows two server groups, "ServerGroupA" and "ServerGroupB". Different server groups can be configured with different profiles and deployments; for example in a domain with different tiers of servers providing different services. Different server groups can also run the same profile and have the same deployments; for example to support rolling application upgrade scenarios where a complete service outage is avoided by first upgrading the application on one server group and then upgrading a second server group.
An example server group definition is as follows:
<server-group name="main-server-group" profile="default">
    <socket-binding-group ref="standard-sockets"/>
    <deployments>
        <deployment name="foo.war_v1" runtime-name="foo.war" />
        <deployment name="bar.ear" runtime-name="bar.ear" />
    </deployments>
</server-group>
A server-group configuration includes the following required attributes:
-
name — the name of the server group
-
profile — the name of the profile the servers in the group should run
In addition, the following optional elements are available:
-
socket-binding-group — specifies the name of the default socket binding group to use on servers in the group. Can be overridden on a per-server basis in
host.xml. If not provided in theserver-groupelement, it must be provided for each server inhost.xml. -
deployments — the deployment content that should be deployed on the servers in the group.
-
deployment-overlays — the overlays and their associated deployments.
-
system-properties — system properties that should be set on all servers in the group
-
jvm — default jvm settings for all servers in the group. The Host Controller will merge these settings with any provided in
host.xmlto derive the settings to use to launch the server’s JVM. See JVM settings for further details.
Server
Each "Server" in the above diagram represents an actual application server instance. The server runs in a separate JVM process from the Host Controller. The Host Controller is responsible for launching that process. (In a managed domain the end user cannot directly launch a server process from the command line.)
The Host Controller synthesizes the server’s configuration by combining
elements from the domain wide configuration (from domain.xml ) and the
host-specific configuration (from host.xml ).
2.1.3. Deciding between running standalone servers or a managed domain
Which use cases are appropriate for managed domain and which are appropriate for standalone servers? A managed domain is all about coordinated multi-server management — with it WildFly provides a central point through which users can manage multiple servers, with rich capabilities to keep those servers' configurations consistent and the ability to roll out configuration changes (including deployments) to the servers in a coordinated fashion.
It’s important to understand that the choice between a managed domain and standalone servers is all about how your servers are managed, not what capabilities they have to service end user requests. This distinction is particularly important when it comes to high availability clusters. It’s important to understand that HA functionality is orthogonal to running standalone servers or a managed domain. That is, a group of standalone servers can be configured to form an HA cluster. The domain and standalone modes determine how the servers are managed, not what capabilities they provide.
So, given all that:
-
A single server installation gains nothing from running in a managed domain, so running a standalone server is a better choice.
-
For multi-server production environments, the choice of running a managed domain versus standalone servers comes down to whether the user wants to use the centralized management capabilities a managed domain provides. Some enterprises have developed their own sophisticated multi-server management capabilities and are comfortable coordinating changes across a number of independent WildFly instances. For these enterprises, a multi-server architecture comprised of individual standalone servers is a good option.
-
Running a standalone server is better suited for most development scenarios. Any individual server configuration that can be achieved in a managed domain can also be achieved in a standalone server, so even if the application being developed will eventually run in production on a managed domain installation, much (probably most) development can be done using a standalone server.
-
Running a managed domain mode can be helpful in some advanced development scenarios; i.e. those involving interaction between multiple WildFly instances. Developers may find that setting up various servers as members of a domain is an efficient way to launch a multi-server cluster.
2.2. General configuration concepts
For both a managed domain or a standalone server, a number of common configuration concepts apply:
2.2.1. Extensions
An extension is a module that extends the core capabilities of the
server. The WildFly core is very simple and lightweight; most of the
capabilities people associate with an application server are provided
via extensions. An extension is packaged as a module in the modules
folder. The user indicates that they want a particular extension to be
available by including an <extension/> element naming its module in
the domain.xml or standalone.xml file.
<extensions>
    [...]
    <extension module="org.jboss.as.transactions"/>
    <extension module="org.jboss.as.webservices" />
    <extension module="org.jboss.as.weld" />
    [...]
    <extension module="org.wildfly.extension.undertow"/>
</extensions>
2.2.2. Profiles and Subsystems
The most significant part of the configuration in domain.xml and
standalone.xml is the configuration of one (in standalone.xml) or
more (in domain.xml) "profiles". A profile is a named set of subsystem
configurations. A subsystem is an added set of capabilities added to the
core server by an extension (see "Extensions" above). A subsystem
provides servlet handling capabilities; a subsystem provides an EJB
container; a subsystem provides JTA, etc. A profile is a named list of
subsystems, along with the details of each subsystem’s configuration. A
profile with a large number of subsystems results in a server with a
large set of capabilities. A profile with a small, focused set of
subsystems will have fewer capabilities but a smaller footprint.
The content of an individual profile configuration looks largely the
same in domain.xml and standalone.xml. The only difference is
standalone.xml is only allowed to have a single profile element (the
profile the server will run), while domain.xml can have many profiles,
each of which can be mapped to one or more groups of servers.
The contents of individual subsystem configurations look exactly the
same between domain.xml and standalone.xml.
2.2.3. Paths
A logical name for a filesystem path. The domain.xml, host.xml and
standalone.xml configurations all include a section where paths can be
declared. Other sections of the configuration can then reference those
paths by their logical name, rather than having to include the full
details of the path (which may vary on different machines). For example,
the logging subsystem configuration includes a reference to the "
`jboss.server.log.dir`" path that points to the server’s " `log`"
directory.
<file relative-to="jboss.server.log.dir" path="server.log"/>WildFly automatically provides a number of standard paths without any need for the user to configure them in a configuration file:
-
jboss.home.dir - the root directory of the WildFly distribution -
user.home- user’s home directory -
user.dir- user’s current working directory -
java.home- java installation directory -
jboss.server.base.dir- root directory for an individual server instance -
jboss.server.config.dir- directory the server will use for configuration file storage -
jboss.server.data.dir- directory the server will use for persistent data file storage -
jboss.server.log.dir- directory the server will use for log file storage -
jboss.server.temp.dir- directory the server will use for temporary file storage -
jboss.controller.temp.dir- directory the server will use for temporary file storage -
jboss.domain.servers.dir- directory under which a host controller will create the working area for individual server instances (managed domain mode only)
Users can add their own paths or override all except the first 5 of the
above by adding a <path/> element to their configuration file.
<path name="example" path="example" relative-to="jboss.server.data.dir"/>The attributes are:
-
name— the name of the path. -
path— the actual filesystem path. Treated as an absolute path, unless the 'relative-to' attribute is specified, in which case the value is treated as relative to that path. -
relative-to— (optional) the name of another previously named path, or of one of the standard paths provided by the system.
A <path/> element in a domain.xml need not include anything more
than the name attribute; i.e. it need not include any information
indicating what the actual filesystem path is:
<path name="x"/>Such a configuration simply says, "There is a path named 'x' that other
parts of the domain.xml configuration can reference. The actual
filesystem location pointed to by 'x' is host-specific and will be
specified in each machine’s host.xml file." If this approach is used,
there must be a path element in each machine’s host.xml that specifies
what the actual filesystem path is:
<path name="x" path="/var/x" />A <path/> element in a standalone.xml must include the specification
of the actual filesystem path.
2.2.4. Interfaces
A logical name for a network interface/IP address/host name to which
sockets can be bound. The domain.xml, host.xml and standalone.xml
configurations all include a section where interfaces can be declared.
Other sections of the configuration can then reference those interfaces
by their logical name, rather than having to include the full details of
the interface (which may vary on different machines). An interface
configuration includes the logical name of the interface as well as
information specifying the criteria to use for resolving the actual
physical address to use. See Interfaces
and ports for further details.
An <interface/> element in a domain.xml need not include anything
more than the name attribute; i.e. it need not include any information
indicating what the actual IP address associated with the name is:
<interface name="internal"/>Such a configuration simply says, "There is an interface named
'internal' that other parts of the domain.xml configuration can
reference. The actual IP address pointed to by 'internal' is
host-specific and will be specified in each machine’s host.xml file." If
this approach is used, there must be an interface element in each
machine’s host.xml that specifies the criteria for determining the IP
address:
<interface name="internal">
   <nic name="eth1"/>
</interface>
An <interface/> element in a standalone.xml must include the
criteria for determining the IP address.
See Interface declarations for full details.
2.2.5. Socket Bindings and Socket Binding Groups
A socket binding is a named configuration for a socket.
The domain.xml and standalone.xml configurations both include a
section where named socket configurations can be declared. Other
sections of the configuration can then reference those sockets by their
logical name, rather than having to include the full details of the
socket configuration (which may vary on different machines).
See Socket Binding Groups
for full details.
2.2.6. System Properties
System property values can be set in a number of places in domain.xml,
host.xml and standalone.xml. The values in standalone.xml are set
as part of the server boot process. Values in domain.xml and
host.xml are applied to servers when they are launched.
When a system property is configured in domain.xml or host.xml, the
servers it ends up being applied to depends on where it is set. Setting
a system property in a child element directly under the domain.xml
root results in the property being set on all servers. Setting it in a
<system-property/> element inside a <server-group/> element in
domain.xml results in the property being set on all servers in the
group. Setting it in a child element directly under the host.xml root
results in the property being set on all servers controlled by that
host’s Host Controller. Finally, setting it in a <system-property/>
element inside a <server/> element in host.xml result in the
property being set on that server. The same property can be configured
in multiple locations, with a value in a <server/> element taking
precedence over a value specified directly under the host.xml root
element, the value in a host.xml taking precedence over anything from
domain.xml, and a value in a <server-group/> element taking
precedence over a value specified directly under the domain.xml root
element.
2.3. Management resources
When WildFly parses your configuration files at boot, or when you use one of the AS’s Management Clients you are adding, removing or modifying management resources in the AS’s internal management model. A WildFly management resource has the following characteristics:
2.3.1. Address
All WildFly management resources are organized in a tree. The path to the node in the tree for a particular resource is its address. Each segment in a resource’s address is a key/value pair:
-
The key is the resource’s type, in the context of its parent. So, for example, the root resource for a standalone server has children of type
subsystem,interface,socket-binding, etc. The resource for the subsystem that provides the AS’s webserver capability has children of typeconnectorandvirtual-server. The resource for the subsystem that provides the AS’s messaging server capability has, among others, children of typejms-queueandjms-topic. -
The value is the name of a particular resource of the given type, e.g
webormessagingfor subsystems orhttporhttpsfor web subsystem connectors.
The full address for a resource is the ordered list of key/value pairs that lead from the root of the tree to the resource. Typical notation is to separate the elements in the address with a '/' and to separate the key and the value with an '=':
-
/subsystem=undertow/server=default-server/http-listener=default -
/subsystem=messaging/jms-queue=testQueue -
/interface=public
When using the HTTP API, a '/' is used to separate the key and the value instead of an '=':
2.3.2. Operations
Querying or modifying the state of a resource is done via an operation. An operation has the following characteristics:
-
A string name
-
Zero or more named parameters. Each parameter has a string name, and a value of type
org.jboss.dmr.ModelNode(or, when invoked via the CLI, the text representation of aModelNode; when invoked via the HTTP API, the JSON representation of aModelNode.) Parameters may be optional. -
A return value, which will be of type
org.jboss.dmr.ModelNode(or, when invoked via the CLI, the text representation of aModelNode; when invoked via the HTTP API, the JSON representation of aModelNode.)
Every resource except the root resource will have an add operation and
should have a remove operation ("should" because in WildFly 19.1 many do
not). The parameters for the add operation vary depending on the
resource. The remove operation has no parameters.
There are also a number of "global" operations that apply to all resources. See Global operations for full details.
The operations a resource supports can themselves be determined by
invoking an operation: the read-operation-names operation. Once the
name of an operation is known, details about its parameters and return
value can be determined by invoking the read-operation-description
operation. For example, to learn the names of the operations exposed by
the root resource for a standalone server, and then learn the full
details of one of them, via the CLI one would:
[standalone@localhost:9990 /] :read-operation-names
{
    "outcome" => "success",
    "result" => [
        "add-namespace",
        "add-schema-location",
        "delete-snapshot",
        "full-replace-deployment",
        "list-snapshots",
        "read-attribute",
        "read-children-names",
        "read-children-resources",
        "read-children-types",
        "read-config-as-xml",
        "read-operation-description",
        "read-operation-names",
        "read-resource",
        "read-resource-description",
        "reload",
        "remove-namespace",
        "remove-schema-location",
        "replace-deployment",
        "shutdown",
        "take-snapshot",
        "upload-deployment-bytes",
        "upload-deployment-stream",
        "upload-deployment-url",
        "validate-address",
        "write-attribute"
    ]
}
[standalone@localhost:9990 /] :read-operation-description(name=upload-deployment-url)
{
    "outcome" => "success",
    "result" => {
        "operation-name" => "upload-deployment-url",
        "description" => "Indicates that the deployment content available at the included URL should be added to the deployment content repository. Note that this operation does not indicate the content should be deployed into the runtime.",
        "request-properties" => {"url" => {
            "type" => STRING,
            "description" => "The URL at which the deployment content is available for upload to the domain's or standalone server's deployment content repository.. Note that the URL must be accessible from the target of the operation (i.e. the Domain Controller or standalone server).",
            "required" => true,
            "min-length" => 1,
            "nillable" => false
        }},
        "reply-properties" => {
            "type" => BYTES,
            "description" => "The hash of managed deployment content that has been uploaded to the domain's or standalone server's deployment content repository.",
            "min-length" => 20,
            "max-length" => 20,
            "nillable" => false
        }
    }
}
See Descriptions below for more on how to learn about the operations a resource exposes.
2.3.3. Attributes
Management resources expose information about their state as attributes.
Attributes have string name, and a value of type
org.jboss.dmr.ModelNode (or: for the CLI, the text representation of a
ModelNode; for HTTP API, the JSON representation of a ModelNode.)
Attributes can either be read-only or read-write. Reading and writing
attribute values is done via the global read-attribute and
write-attribute operations.
The read-attribute operation takes a single parameter "name" whose
value is a the name of the attribute. For example, to read the "port"
attribute of a socket-binding resource via the CLI:
[standalone@localhost:9990 /] /socket-binding-group=standard-sockets/socket-binding=https:read-attribute(name=port)
{
    "outcome" => "success",
    "result" => 8443
}
If an attribute is writable, the write-attribute operation is used to
mutate its state. The operation takes two parameters:
-
name– the name of the attribute -
value– the value of the attribute
For example, to read the "port" attribute of a socket-binding resource via the CLI:
[standalone@localhost:9990 /] /socket-binding-group=standard-sockets/socket-binding=https:write-attribute(name=port,value=8444)
{"outcome" => "success"}
Attributes can have one of two possible storage types:
-
CONFIGURATION – means the value of the attribute is stored in the persistent configuration; i.e. in the
domain.xml,host.xmlorstandalone.xmlfile from which the resource’s configuration was read. -
RUNTIME – the attribute value is only available from a running server; the value is not stored in the persistent configuration. A metric (e.g. number of requests serviced) is a typical example of a RUNTIME attribute.
The values of all of the attributes a resource exposes can be obtained
via the read-resource operation, with the "include-runtime" parameter
set to "true". For example, from the CLI:
[standalone@localhost:9990 /] /subsystem=undertow/server=default-server/http-listener=default:read-resource(include-runtime=true)
{
    "outcome" => "success",
    "result" => {
        "allow-encoded-slash" => false,
        "allow-equals-in-cookie-value" => false,
        "always-set-keep-alive" => true,
        "buffer-pipelined-data" => true,
        "buffer-pool" => "default",
        "bytes-received" => 0L,
        "bytes-sent" => 0L,
        "certificate-forwarding" => false,
        "decode-url" => true,
        "disallowed-methods" => ["TRACE"],
        "enable-http2" => false,
        "enabled" => true,
        "error-count" => 0L,
        "max-buffered-request-size" => 16384,
        "max-connections" => undefined,
        "max-cookies" => 200,
        "max-header-size" => 1048576,
        "max-headers" => 200,
        "max-parameters" => 1000,
        "max-post-size" => 10485760L,
        "max-processing-time" => 0L,
        "no-request-timeout" => undefined,
        "processing-time" => 0L,
        "proxy-address-forwarding" => false,
        "read-timeout" => undefined,
        "receive-buffer" => undefined,
        "record-request-start-time" => false,
        "redirect-socket" => "https",
        "request-count" => 0L,
        "request-parse-timeout" => undefined,
        "resolve-peer-address" => false,
        "send-buffer" => undefined,
        "socket-binding" => "http",
        "tcp-backlog" => undefined,
        "tcp-keep-alive" => undefined,
        "url-charset" => "UTF-8",
        "worker" => "default",
        "write-timeout" => undefined
    }
}
Omit the "include-runtime" parameter (or set it to "false") to limit output to those attributes whose values are stored in the persistent configuration:
[standalone@localhost:9990 /] /subsystem=undertow/server=default-server/http-listener=default:read-resource(include-runtime=false)
{
    "outcome" => "success",
    "result" => {
        "allow-encoded-slash" => false,
        "allow-equals-in-cookie-value" => false,
        "always-set-keep-alive" => true,
        "buffer-pipelined-data" => true,
        "buffer-pool" => "default",
        "certificate-forwarding" => false,
        "decode-url" => true,
        "disallowed-methods" => ["TRACE"],
        "enable-http2" => false,
        "enabled" => true,
        "max-buffered-request-size" => 16384,
        "max-connections" => undefined,
        "max-cookies" => 200,
        "max-header-size" => 1048576,
        "max-headers" => 200,
        "max-parameters" => 1000,
        "max-post-size" => 10485760L,
        "no-request-timeout" => undefined,
        "proxy-address-forwarding" => false,
        "read-timeout" => undefined,
        "receive-buffer" => undefined,
        "record-request-start-time" => false,
        "redirect-socket" => "https",
        "request-parse-timeout" => undefined,
        "resolve-peer-address" => false,
        "send-buffer" => undefined,
        "socket-binding" => "http",
        "tcp-backlog" => undefined,
        "tcp-keep-alive" => undefined,
        "url-charset" => "UTF-8",
        "worker" => "default",
        "write-timeout" => undefined
    }
}
See Descriptions below for how to learn more about the attributes a particular resource exposes.
2.3.4. Children
Management resources may support child resources. The
types of children a
resource supports (e.g. connector for the web subsystem resource) can
be obtained by querying the resource’s description (see
Descriptions below)
or by invoking the read-children-types operation. Once you know the
legal child types, you can query the names of all children of a given
type by using the global read-children-types operation. The operation
takes a single parameter "child-type" whose value is the type. For
example, a resource representing a socket binding group has children. To
find the type of those children and the names of resources of that type
via the CLI one could:
[standalone@localhost:9990 /] /socket-binding-group=standard-sockets:read-children-types
{
    "outcome" => "success",
    "result" => ["socket-binding"]
}
[standalone@localhost:9990 /] /socket-binding-group=standard-sockets:read-children-names(child-type=socket-binding)
{
    "outcome" => "success",
    "result" => [
        "http",
        "https",
        "jmx-connector-registry",
        "jmx-connector-server",
        "jndi",
        "remoting",
        "txn-recovery-environment",
        "txn-status-manager"
    ]
}
2.3.5. Descriptions
All resources expose metadata that describes their attributes,
operations and child types. This metadata is itself obtained by invoking
one or more of the global operations each
resource supports. We showed examples of the read-operation-names,
read-operation-description, read-children-types and
read-children-names operations above.
The read-resource-description operation can be used to find the
details of the attributes and child types associated with a resource.
For example, using the CLI:
[standalone@localhost:9990 /] /socket-binding-group=standard-sockets:read-resource-description
{
    "outcome" => "success",
    "result" => {
        "description" => "Contains a list of socket configurations.",
        "head-comment-allowed" => true,
        "tail-comment-allowed" => false,
        "attributes" => {
            "name" => {
                "type" => STRING,
                "description" => "The name of the socket binding group.",
                "required" => true,
                "head-comment-allowed" => false,
                "tail-comment-allowed" => false,
                "access-type" => "read-only",
                "storage" => "configuration"
            },
            "default-interface" => {
                "type" => STRING,
                "description" => "Name of an interface that should be used as the interface for any sockets that do not explicitly declare one.",
                "required" => true,
                "head-comment-allowed" => false,
                "tail-comment-allowed" => false,
                "access-type" => "read-write",
                "storage" => "configuration"
            },
            "port-offset" => {
                "type" => INT,
                "description" => "Increment to apply to the base port values defined in the socket bindings to derive the runtime values to use on this server.",
                "required" => false,
                "head-comment-allowed" => true,
                "tail-comment-allowed" => false,
                "access-type" => "read-write",
                "storage" => "configuration"
            }
        },
        "operations" => {},
        "children" => {"socket-binding" => {
            "description" => "The individual socket configurtions.",
            "min-occurs" => 0,
            "model-description" => undefined
        }}
    }
}
Note the
"operations" ⇒ }} in the output above. If the command had included the {{operations
parameter (i.e.
/socket-binding-group=standard-sockets:read-resource-description(operations=true))
the output would have included the description of each operation
supported by the resource.
See the Global operations section for
details on other parameters supported by the read-resource-description
operation and all the other globally available operations.
2.3.6. Comparison to JMX MBeans
WildFly management resources are conceptually quite similar to Open MBeans. They have the following primary differences:
-
WildFly management resources are organized in a tree structure. The order of the key value pairs in a resource’s address is significant, as it defines the resource’s position in the tree. The order of the key properties in a JMX
ObjectNameis not significant. -
In an Open MBean attribute values, operation parameter values and operation return values must either be one of the simple JDK types (String, Boolean, Integer, etc) or implement either the
javax.management.openmbean.CompositeDatainterface or thejavax.management.openmbean.TabularDatainterface. WildFly management resource attribute values, operation parameter values and operation return values are all of typeorg.jboss.dmr.ModelNode.
2.3.7. Basic structure of the management resource trees
As noted above, management resources are organized in a tree structure. The structure of the tree depends on whether you are running a standalone server or a managed domain.
Standalone server
The structure of the managed resource tree is quite close to the
structure of the standalone.xml configuration file.
-
The root resource
-
extension– extensions installed in the server -
path– paths available on the server -
system-property– system properties set as part of the configuration (i.e. not on the command line) -
core-service=management– the server’s core management services -
core-service=service-container– resource for the JBoss MSCServiceContainerthat’s at the heart of the AS -
subsystem– the subsystems installed on the server. The bulk of the management model will be children of typesubsystem -
interface– interface configurations -
socket-binding-group– the central resource for the server’s socket bindings-
socket-binding– individual socket binding configurations
-
-
deployment– available deployments on the server
-
Managed domain
In a managed domain, the structure of the managed resource tree spans
the entire domain, covering both the domain wide configuration (e.g.
what’s in domain.xml, the host specific configuration for each host
(e.g. what’s in host.xml, and the resources exposed by each running
application server. The Host Controller processes in a managed domain
provide access to all or part of the overall resource tree. How much is
available depends on whether the management client is interacting with
the Host Controller that is acting as the master Domain Controller. If
the Host Controller is the master Domain Controller, then the section of
the tree for each host is available. If the Host Controller is a slave
to a remote Domain Controller, then only the portion of the tree
associated with that host is available.
-
The root resource for the entire domain. The persistent configuration associated with this resource and its children, except for those of type
host, is persisted in thedomain.xmlfile on the Domain Controller.-
extension– extensions available in the domain -
path– paths available on across the domain -
system-property– system properties set as part of the configuration (i.e. not on the command line) and available across the domain -
profile– sets of subsystem configurations that can be assigned to server groups-
subsystem– configuration of subsystems that are part of the profile
-
-
interface– interface configurations -
socket-binding-group– sets of socket bindings configurations that can be applied to server groups-
socket-binding– individual socket binding configurations
-
-
deployment– deployments available for assignment to server groups -
deployment-overlay — deployment-overlays content available to overlay deployments in server groups
-
server-group– server group configurations -
host – the individual Host Controllers. Each child of this type represents the root resource for a particular host. The persistent configuration associated with one of these resources or its children is persisted in the host’s
host.xmlfile.-
path– paths available on each server on the host -
system-property– system properties to set on each server on the host -
core-service=management– the Host Controller’s core management services -
interface– interface configurations that apply to the Host Controller or servers on the host -
jvm– JVM configurations that can be applied when launching servers -
server-config– configuration describing how the Host Controller should launch a server; what server group configuration to use, and any server-specific overrides of items specified in other resources -
server– the root resource for a running server. Resources from here and below are not directly persisted; the domain-wide and host level resources contain the persistent configuration that drives a server-
extension– extensions installed in the server -
path– paths available on the server -
system-property– system properties set as part of the configuration (i.e. not on the command line) -
core-service=management– the server’s core management services -
core-service=service-container– resource for the JBoss MSCServiceContainerthat’s at the heart of the AS -
subsystem– the subsystems installed on the server. The bulk of the management model will be children of typesubsystem -
interface– interface configurations -
socket-binding-group– the central resource for the server’s socket bindings-
socket-binding– individual socket binding configurations
-
-
deployment– available deployments on the server -
deployment-overlay — available overlays on the server
-
-
-
3. Management Clients
WildFly offers three different approaches to configure and manage servers: a web interface, a command line client and a set of XML configuration files. Regardless of the approach you choose, the configuration is always synchronized across the different views and finally persisted to the XML files.
3.1. Web Management Interface
The web interface is a GWT application that uses the HTTP management API to configure a management domain or standalone server.
3.1.1. HTTP Management Endpoint
The HTTP API endpoint is the entry point for management clients that rely on the HTTP protocol to integrate with the management layer. It uses a JSON encoded protocol and a de-typed, RPC style API to describe and execute management operations against a managed domain or standalone server. It’s used by the web console, but offers integration capabilities for a wide range of other clients too.
The HTTP API endpoint is co-located with either the domain controller or a standalone server. By default, it runs on port 9990:
<management-interfaces>
 [...]
 <http-interface security-realm="ManagementRealm">
  <socket-binding http="management-http"/>
 </http-interface>
<management-interfaces>
~(See standalone/configuration/standalone.xml or domain/configuration/host.xml)~
The HTTP API Endpoint serves two different contexts. One for executing management operations and another one that allows you to access the web interface:
-
Domain API: http://<host>:9990/management
-
Web Console: http://<host>:9990/console
3.1.2. Accessing the web console
The web console is served through the same port as the HTTP management API. It can be accessed by pointing your browser to:
Default URL
| By default the web interface can be accessed here: http://localhost:9990/console. |
3.1.3. Custom HTTP Headers
For the responses returned from the HTTP management interface it is also possible to define custom constant HTTP headers that will be added to any response based on matching a configured prefix against the request path.
As an example it could be desirable to add a HTTP header X-Help which points users to the correct location to obtain assistance. The following management operation can be executed within the CLI to activate returning this header on all requests.
[standalone@localhost:9990 /]  /core-service=management/management-interface=http-interface: \
    write-attribute(name=constant-headers, value=[{path="/", \
    headers=[{name="X-Help", value="wildfly.org"}]}])
The responses to all requests to the HTTP management interface will now include the header X-Help with the value wildfly.org.
The resulting configuration will look like: -
<management-interfaces>
    <http-interface security-realm="ManagementRealm">
        <http-upgrade enabled="true"/>
        <socket-binding http="management-http"/>
        <constant-headers>
            <header-mapping path="/">
                <header name="X-Help" value="wildfly.org"/>
            </header-mapping>
        </constant-headers>
    </http-interface>
</management-interfaces>
The example here has illustrated adding a single header for all requests matching the path prefix / i.e. every request. More advanced mappings can be defined by specifying a mapping for a more specific path prefix such as /management.
If a request matches multiple mappings such as a request to /management where mappings for / and /management have been specified the headers from all of the mappings will be applied to the corresponding request.
Within a single mapping it is also possible to define multiple headers which should be set on the corresponding response.
As the constant-headers attribute is set verification will be performed to verify that the HTTP headers specified are only making use of allowed characters as specified in the HTTP specification RFCs.
Additionally as they have special handling within the management interface overriding the following headers is disallowed and attempts to set these will result in an error being reported.
-
Connection -
Content-Length -
Content-Type -
Date -
Transfer-Encoding
The configured headers are set at the very end of processing the request immediately before the response is returned to the client, this will mean any of the configured headers will override the same headers set by the corresponding endpoint.
3.2. Command Line Interface
The Command Line Interface (CLI) is a management tool for a managed domain or standalone server. It allows a user to connect to the domain controller or a standalone server and execute management operations available through the de-typed management model.
3.2.1. Running the CLI
Depending on the operating system, the CLI is launched using
jboss-cli.sh or jboss-cli.bat located in the WildFly bin
directory. For further information on the default directory structure,
please consult the " Getting Started
Guide".
The first thing to do after the CLI has started is to connect to a managed WildFly instance. This is done using the command connect, e.g.
./bin/jboss-cli.sh
You are disconnected at the moment. Type 'connect' to connect to the server
or 'help' for the list of supported commands.
[disconnected /]

[disconnected /] connect
[domain@localhost:9990 /]

[domain@localhost:9990 /] quit
Closed connection to localhost:9990
localhost:9990 is the default host and port combination for the
WildFly CLI client.
The host and the port of the server can be provided as an optional parameter, if the server is not listening on localhost:9990.
./bin/jboss-cli.sh
You are disconnected at the moment. Type 'connect' to connect to the server
[disconnected /] connect 192.168.0.10:9990
Connected to standalone controller at 192.168.0.1:9990
The :9990 is not required as the CLI will use port 9990 by default. The port needs to be provided if the server is listening on some other port.
To terminate the session type quit.
| The jboss-cli script accepts a --connect parameter: ./jboss-cli.sh --connect |
The --controller parameter can be used to specify the host and port of the server: ./jboss-cli.sh --connect --controller=192.168.0.1:9990
Help is also available:
In order to list the set of commands that are currently available in the current context use the option --commands (NB: the following examples are not displaying an exhaustive set of CLI commands, more and/or different commands could be available in your running CLI instance):
[domain@localhost:9990 /] help --commands
Commands available in the current context:
batch               connection-factory  deployment-overlay  if                  patch               reload              try
cd                  connection-info     echo                jdbc-driver-info    pwd                 rollout-plan        undeploy
clear               data-source         echo-dmr            jms-queue           quit                run-batch           unset
command             deploy              help                jms-topic           read-attribute      set                 version
connect             deployment-info     history             ls                  read-operation      shutdown            xa-data-source
To read a description of a specific command execute 'help <command name>'.
The help command can print help for any command or operation. For operations, the operation description is formatted as a command help (synopsis, description and options). Some commands (eg: patch) expose two levels of documentation. A high level description for the command itself and a dedicated help content for each action (eg: apply). The help documentation of each command makes it clear if this two levels are available or not.
Use Tab-completion to discover the set of commands and operations:
help <TAB>The list of all commands (enabled or not) is displayed.
Examples
-
Display the help of the patch command:
help patch-
Display the help of the apply action of the patch command:
help patch apply-
Display the description of the elytron key-store resource add operation formatted as a command help content:
help /subsystem=elytron/key-store=?:add3.2.2. Keyboard navigation
In order to efficiently edit commands, the CLI allows you to navigate the words and characters of a command using the keyboard.
NB: Part of this navigation is platform dependent.
Go left (back) one word
-
Alt+B : Linux, Solaris, HP-UX, Windows.
-
Ctrl+LeftArrow: Linux, Solaris, HP-UX.
-
Alt+LeftArrow: Mac OSX.
Go right (forward) one word
-
Alt+F : Linux, Solaris, HP-UX, Windows.
-
Ctrl+RightArrow: Linux, Solaris, HP-UX.
-
Alt+RightArrow: Mac OSX.
Go to the beginning of the line
-
Ctrl+A: All supported platforms.
-
HOME: Linux, Solaris, HP-UX, Windows
Go to the end of the line
-
Ctrl+E: All supported platforms.
-
END: Linux, Solaris, HP-UX, Windows
Go left (back) one character
-
Ctrl+B or LeftArrow: All supported platforms.
Go right (forward) one character
-
Ctrl+F or RightArrow: All supported platforms.
3.2.3. Non-interactive Mode
The CLI can also be run in non-interactive mode to support scripts and other types of command line or batch processing. The --command and --commands arguments can be used to pass a command or a list of commands to execute. Additionally a --file argument is supported which enables CLI commands to be provided from a text file.
For example the following command can be used to list all the current deployments
$ ./bin/jboss-cli.sh --connect --commands=ls\ deployment
sample.war
business.jar
The output can be combined with other shell commands for further processing, for example to find out what .war files are deployed:
$ ./bin/jboss-cli.sh --connect --commands=ls\ deployment | grep war
sample.war
In order to match a command with its output, you can provide the option
--echo-command (or add the XML element <echo-command> to the CLI
configuration file) in order to make the CLI to include the prompt
command + options in the output. With this option enabled, any executed
command will be added to the output.
3.2.4. Command timeout
By default CLI command and operation executions are not timely bounded. It means that a command never ending its execution will make the CLI process to be stuck and unresponsive. To protect the CLI from this behavior, one can set a command execution timeout.
Command Timeout behavior
In interactive mode, when a timeout occurs, an error message is displayed then the console prompt is made available to type new commands. In non interactive mode (executing a script or a list of commands), when a timeout occurs, an exception is thrown and the CLI execution is stopped. In both modes (interactive and non interactive), when a timeout occurs, the CLI will make a best effort to cancel the associated server side activities.
Configuring the Command timeout
-
Add the XML element <command-timeout>\{num seconds}</command-timeout> to the CLI XML configuration file.
-
Add the option - -command-timeout=\{num seconds} to the CLI command line. This will override any value set in the XML configuration file.
Managing the Command Timeout
Once the CLI is running, the timeout can be adjusted to cope with the commands to execute. For example a batch command will need a longer timeout than a non batch one. The command command-timeout allows to get, set and reset the command timeout.
Retrieving the command timeout
The command command-timeout get displays the current timeout in seconds. A timeout of 0 means no timeout.
[standalone@localhost:9990 /] command-timeout get
0
Setting the command timeout
The command command-timeout set update the timeout value to a number of seconds. If a timeout has been set via configuration (XML file or option), it is overridden by the set action.
[standalone@localhost:9990 /] command-timeout set 10Resetting the command timeout
The command command-timeout reset \{config|default} allows to set the timeout to its configuration value (XML file or option) or default value (0 second). If no configuration value is set, resetting to the configuration value sets the timeout to its default value (0 seconds).
[standalone@localhost:9990 /] command-timeout reset config
[standalone@localhost:9990 /] command-timeout reset default
3.2.5. Default Native Management Interface Security
The native interface shares the same security configuration as the http interface, however we also support a local authentication mechanism which means that the CLI can authenticate against the local WildFly instance without prompting the user for a username and password. This mechanism only works if the user running the CLI has read access to the standalone/tmp/auth folder or domain/tmp/auth folder under the respective WildFly installation - if the local mechanism fails then the CLI will fallback to prompting for a username and password for a user configured as in Default HTTP Interface Security.
Establishing a CLI connection to a remote server will require a username and password by default.
3.2.6. Operation Requests
Operation requests allow for low level interaction with the management model. They are different from the high level commands (i.e. create-jms-queue) in that they allow you to read and modify the server configuration as if you were editing the XML configuration files directly. The configuration is represented as a tree of addressable resources, where each node in the tree (aka resource) offers a set of operations to execute.
An operation request basically consists of three parts: The address, an operation name and an optional set of parameters.
The formal specification for an operation request is:
[/node-type=node-name (/node-type=node-name)*] : operation-name [( [parameter-name=parameter-value (,parameter-name=parameter-value)*] )]
For example:
/subsystem=logging/root-logger=ROOT:change-root-log-level(level=WARN)Tab Completion
Tab-completion is supported for all commands and options, i.e. node-types and node-names, operation names and parameter names.
In operation Tab-completion, required parameters have a name terminated by the '*' character. This helps identify which are the parameters that must be set in order to construct a valid operation. Furthermore, Tab-completion does not propose parameters that are alternatives of parameters already present in the operation.
For example:
/deployment=myapp:add(<TAB>
!  content*  enabled  runtime-name
The parameter content is required and completion advertises it with a '*' character.
/deployment=myapp:add-content(content=[{<TAB>
bytes* hash* input-stream-index* target-path* url*bytes, hash, input-stream-index and url are required but also alternatives (only one of them can be set). As soon as one of these parameter has been set, the others are no longer proposed by completion.
/deployment=myapp:add-content(content=[{url=myurl,<TAB>
/deployment=myapp:add-content(content=[{url=myurl,target-path
target-path argument is automatically inlined in the command.
| We are also considering adding aliases that are less verbose for the user, and will translate into the corresponding operation requests in the background. |
Whitespaces between the separators in the operation request strings are not significant.
Addressing resources
Operation requests might not always have the address part or the parameters. E.g.
:read-resourcewhich will list all the node types for the current node.
To syntactically disambiguate between the commands and operations, operations require one of the following prefixes:
To execute an operation against the current node, e.g.
cd subsystem=logging
:read-resource(recursive="true")
To execute an operation against a child node of the current node, e.g.
cd subsystem=logging
./root-logger=ROOT:change-root-log-level(level=WARN)
To execute an operation against the root node, e.g.
/:read-resourceAvailable Operation Types and Descriptions
The operation types can be distinguished between common operations that exist on any node and specific operations that belong to a particular configuration resource (i.e. subsystem). The common operations are:
-
add
-
read-attribute
-
read-children-names
-
read-children-resources
-
read-children-types
-
read-operation-description
-
read-operation-names
-
read-resource
-
read-resource-description
-
remove
-
validate-address
-
write-attribute
For a list of specific operations (e.g. operations that relate to the logging subsystem) you can always query the model itself. For example, to read the operations supported by the logging subsystem resource on a standalone server:
[[standalone@localhost:9990 /] /subsystem=logging:read-operation-names
{
   "outcome" => "success",
   "result" => [
       "add",
       "change-root-log-level",
       "read-attribute",
       "read-children-names",
       "read-children-resources",
       "read-children-types",
       "read-operation-description",
       "read-operation-names",
       "read-resource",
       "read-resource-description",
       "remove-root-logger",
       "root-logger-assign-handler",
       "root-logger-unassign-handler",
       "set-root-logger",
       "validate-address",
       "write-attribute"
   ]
}
As you can see, the logging resource offers four additional operations, namely root-logger-assign-handler, root-logger-unassign-handler, set-root-logger and remove-root-logger.
Further documentation about a resource or operation can be retrieved through the description:
[standalone@localhost:9990 /] /subsystem=logging:read-operation-description(name=change-root-log-level)
{
   "outcome" => "success",
   "result" => {
       "operation-name" => "change-root-log-level",
       "description" => "Change the root logger level.",
       "request-properties" => {"level" => {
           "type" => STRING,
           "description" => "The log level specifying which message levels will be logged by this logger.
                            Message levels lower than this value will be discarded.",
           "required" => true
       }}
   }
}
Full model
To see the full model enter :read-resource(recursive=true).
|
3.2.7. Command History
Command (and operation request) history is enabled by default. The history is kept both in-memory and in a file on the disk, i.e. it is preserved between command line sessions. The history file name is .jboss-cli-history and is automatically created in the user’s home directory. When the command line interface is launched this file is read and the in-memory history is initialized with its content.
| While in the command line session, you can use the arrow keys to go back and forth in the history of commands and operations. |
To manipulate the history you can use the history command. If executed without any arguments, it will print all the recorded commands and operations (up to the configured maximum, which defaults to 500) from the in-memory history.
history supports three optional arguments:
-
disable - will disable history expansion (but will not clear the previously recorded history);
-
enabled - will re-enable history expansion (starting from the last recorded command before the history expansion was disabled);
-
clear - will clear the in-memory history (but not the file one).
3.2.8. JSON and DMR output
By default the CLI prints operation results using the DMR textual syntax. There are two ways to make the CLI to display JSON:
-
--output-json option when launching the CLI.
-
<output-json> XML element added to jboss-cli.xml configuration file.
3.2.9. Color output
The CLI outputs results of commands and the prompt in color. To disable this, there are two possible ways to disable it:
-
--no-color-output will disable color output;
-
Change <enabled> to
falseinjboss-cli.xml.
The <color-output> block is used to configure the colors of the six basic elements that do support it
-
Output messages: error, warning and success;
-
Required configuration options when using the auto-complete functionality;
-
The color of the default prompt;
-
The color of the prompt when using
batchand any of the workflow commands,if,forandtry.
<color-output>
    <enabled>true</enabled>
    <error-color>red</error-color>
    <warn-color>yellow</warn-color>
    <success-color>default</success-color>
    <required-color>magenta</required-color>
    <workflow-color>green</workflow-color>
    <prompt-color>blue</prompt-color>
</color-output>
There are eight available colors:
Black |
Magenta |
Blue |
Red |
Cyan |
White |
Green |
Yellow |
There is also the possibility of using the default color, which is the terminal’s configured foreground color.
3.2.10. Paging and searching output
In interactive mode, when the content to display is longer than the terminal height, the content is paged. You can navigate the content by using the following keys and mouse events:
-
space or PAGE_DOWN: scroll the content one page down.
-
'\' or PAGE_UP: scroll the content one page up.
-
';' or up arrow or mouse wheel up: scroll the content one line up.
-
ENTER or down arrow or mouse wheel down: scroll the content one line down.
-
HOME or 'g': scroll to the top of the content. NB: HOME is only supported for keyboards containing this key.
-
END or 'G': scroll to the bottom of the content. NB: END is only supported for keyboards containing this key.
-
'q' or 'Q' or ESC: exit the paging.
NB: When the end of the content is reached (using ENTER, space, …) the paging is automatically exited.
It is possible to search for text when the content is paged. Search is operated with the following keys:
-
'/' to display prompt allowing to type some text. Type return to launch the search.
You can use up/down arrows to retrieve previously typed text. NB: search history is not persisted when CLI process exits. -
'n' to jump to the next match if any. If no search text has been typed, then the last entry from the search history is used.
-
'N' to jump to the previous match if any. If no search text has been typed, then the last entry from the search history is used.
There are two possible ways to disable the output paging and write the whole output of the commands at once:
-
--no-output-paging command line parameter will disable the output paging;
-
Add <output-paging>false<output-paging> in
jboss-cli.xml.
| On Windows, searching and navigating backward is only supported starting with Windows 10 and Windows Server 2016. |
| If the CLI process is sent the signal KILL(9) while it is paging, the terminal will stay in alternate mode. This makes the terminal to behave in an unexpected manner (display and mouse events). In order to restore the terminal state call: tput rmcup. |
3.2.11. Batch Processing
The batch mode allows one to group commands and operations and execute them together as an atomic unit. If at least one of the commands or operations fails, all the other successfully executed commands and operations in the batch are rolled back.
Not all of the commands are allowed in the batch. For example, commands like cd, ls, help, etc. are not allowed in the batch since they don’t translate into operation requests. Only the commands that translate into operation requests are allowed in the batch. The batch, actually, is executed as a composite operation request.
The batch mode is entered by executing command batch.
[standalone@localhost:9990 /] batch
[standalone@localhost:9990 / #] /subsystem=datasources/data-source="java\:\/H2DS":enable
[standalone@localhost:9990 / #] /subsystem=messaging-activemq/server=default/jms-queue=newQueue:add
You can execute a batch using the run-batch command:
[standalone@localhost:9990 / #] run-batch
The batch executed successfully.
Exit the batch edit mode without losing your changes:
[standalone@localhost:9990 / #] holdback-batch
[standalone@localhost:9990 /]
Then activate it later on again:
[standalone@localhost:9990 /] batch
Re-activated batch
#1 /subsystem=datasources/data-source=java:/H2DS:\/H2DS:enable
There are several other notable batch commands available as well (tab complete to see the list):
-
clear-batch
-
edit-batch-line (e.g. edit-batch line 3 create-jms-topic name=mytopic)
-
remove-batch-line (e.g. remove-batch-line 3)
-
move-batch-line (e.g. move-batch-line 3 1)
-
discard-batch
3.2.12. Operators
CLI has some operators that are similar to shell operators:
-
> To redirect the output of a command/operation to a file:
:read-resource > my-file.txt
-
>> To redirect the output of a command/operation and append it at the end of a file:
:read-resource >> my-file.txt
-
| To redirect the output of a command/operation to the grep command:
:read-resource | grep undefined
3.3. Default HTTP Interface Security
WildFly is distributed secured by default. The default security mechanism is username / password based making use of HTTP Digest for the authentication process.
The reason for securing the server by default is so that if the management interfaces are accidentally exposed on a public IP address authentication is required to connect - for this reason there is no default user in the distribution.
If you attempt to connect to the admin console before you have added a user to the server you will be presented with the following screen.

The user are stored in a properties file called mgmt-users.properties under standalone/configuration and domain/configuration depending on the running mode of the server, these files contain the users username along with a pre-prepared hash of the username along with the name of the realm and the users password.
| Although the properties files do not contain the plain text passwords they should still be guarded as the pre-prepared hashes could be used to gain access to any server with the same realm if the same user has used the same password. |
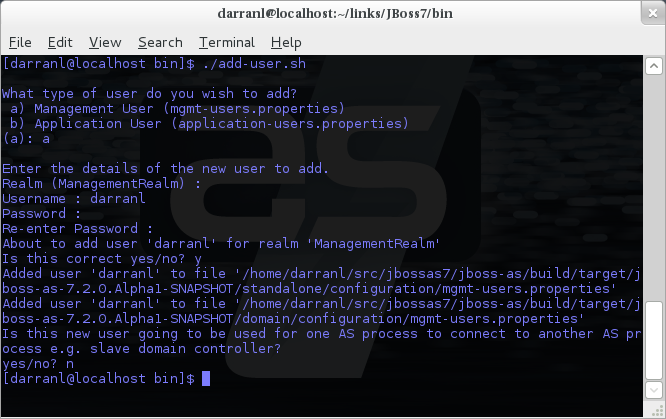
To manipulate the files and add users we provide a utility add-user.sh
and add-user.bat to add the users and generate the hashes, to add a user
you should execute the script and follow the guided process.
The full details of the add-user utility are described later but for the
purpose of accessing the management interface you need to enter the
following values: -
-
Type of user - This will be a 'Management User' to selection option a.
-
Realm - This MUST match the realm name used in the configuration so unless you have changed the configuration to use a different realm name leave this set as 'ManagementRealm'.
-
Username - The username of the user you are adding.
-
Password - The users password.
Provided the validation passes you will then be asked to confirm you want to add the user and the properties files will be updated.
For the final question, as this is a user that is going to be accessing the admin console just answer 'n' - this option will be described later for adding slave host controllers that authenticate against a master domain controller but that is a later topic.
Updates to the properties file are picked up in real time so either click 'Try Again' on the error page that was displayed in the browser or navigate to the console again and you should then be prompted to enter the username and password to connect to the server.
3.4. Default Native Interface Security
The native interface shares the same security configuration as the http interface, however we also support a local authentication mechanism which means that the CLI can authenticate against the local WildFly instance without prompting the user for a username and password. This mechanism only works if the user running the CLI has read access to the standalone/tmp/auth folder or domain/tmp/auth folder under the respective WildFly installation - if the local mechanism fails then the CLI will fallback to prompting for a username and password for a user configured as in Default HTTP Interface Security.
Establishing a CLI connection to a remote server will require a username and password by default.
3.5. Command Line Interface
The Command Line Interface (CLI) is a management tool for a managed domain or standalone server. It allows a user to connect to the domain controller or a standalone server and execute management operations available through the de-typed management model.
Details on how to use the CLI can be found in the Command Line Interface page.
3.6. Configuration Files
WildFly stores its configuration in centralized XML configuration files, one per server for standalone servers and, for managed domains, one per host with an additional domain wide policy controlled by the master host. These files are meant to be human-readable and human editable.
| The XML configuration files act as a central, authoritative source of configuration. Any configuration changes made via the web interface or the CLI are persisted back to the XML configuration files. If a domain or standalone server is offline, the XML configuration files can be hand edited as well, and any changes will be picked up when the domain or standalone server is next started. However, users are encouraged to use the web interface or the CLI in preference to making offline edits to the configuration files. External changes made to the configuration files while processes are running will not be detected, and may be overwritten. |
3.6.1. Standalone Server Configuration File
The XML configuration for a standalone server can be found in the
standalone/configuration directory. The default configuration file is
standalone/configuration/standalone.xml.
The standalone/configuration directory includes a number of other
standard configuration files, e.g. standalone-full.xml,
standalone-ha.xml and standalone-full-ha.xml each of which is
similar to the default standalone.xml file but includes additional
subsystems not present in the default configuration. If you prefer to
use one of these files as your server configuration, you can specify it
with the [line-through]*c* or -server-config command line argument:
-
bin/standalone.sh -c=standalone-full.xml -
bin/standalone.sh --server-config=standalone-ha.xml
3.6.2. Managed Domain Configuration Files
In a managed domain, the XML files are found in the
domain/configuration directory. There are two types of configuration
files – one per host, and then a single domain-wide file managed by the
master host, aka the Domain Controller. (For more on the types of
processes in a managed domain, see Operating
Modes.)
Host Specific Configuration – host.xml
When you start a managed domain process, a Host Controller instance is
launched, and it parses its own configuration file to determine its own
configuration, how it should integrate with the rest of the domain, any
host-specific values for settings in the domain wide configuration (e.g.
IP addresses) and what servers it should launch. This information is
contained in the host-specific configuration file, the default version
of which is domain/configuration/host.xml.
Each host will have its own variant host.xml, with settings
appropriate for its role in the domain. WildFly ships with three
standard variants:
| host-master.xml | A configuration that specifies the Host Controller should become the master, aka the Domain Controller. No servers will be started by this Host Controller, which is a recommended setup for a production master. |
|---|---|
host-slave.xml |
A configuration that specifies the Host Controller should not become master and instead should register with a remote master and be controlled by it. This configuration launches servers, although a user will likely wish to modify how many servers are launched and what server groups they belong to. |
host.xml |
The default host configuration, tailored for an easy out of the box experience experimenting with a managed domain. This configuration specifies the Host Controller should become the master, aka the Domain Controller, but it also launches a couple of servers. |
Which host-specific configuration should be used can be controlled via the _ --host-config_ command line argument:
$ bin/domain.sh --host-config=host-master.xmlDomain Wide Configuration – domain.xml
Once a Host Controller has processed its host-specific configuration, it
knows whether it is configured to act as the master Domain Controller.
If it is, it must parse the domain wide configuration file, by default
located at domain/configuration/domain.xml. This file contains the
bulk of the settings that should be applied to the servers in the domain
when they are launched – among other things, what subsystems they should
run with what settings, what sockets should be used, and what
deployments should be deployed.
Which domain-wide configuration should be used can be controlled via the _ --domain-config_ command line argument:
$ bin/domain.sh --domain-config=domain-production.xmlThat argument is only relevant for hosts configured to act as the master.
A slave Host Controller does not usually parse the domain wide
configuration file. A slave gets the domain wide configuration from the
remote master Domain Controller when it registers with it. A slave also
will not persist changes to a domain.xml file if one is present on the
filesystem. For that reason it is recommended that no domain.xml be
kept on the filesystem of hosts that will only run as slaves.
A slave can be configured to keep a locally persisted copy of the domain wide configuration and then use it on boot (in case the master is not available.) See --backup and --cached-dc under Command line parameters.
4. Interfaces and ports
4.1. Interface declarations
WildFly uses named interface references throughout the configuration. A network interface is declared by specifying a logical name and a selection criteria for the physical interface:
[standalone@localhost:9990 /] :read-children-names(child-type=interface)
{
   "outcome" => "success",
   "result" => [
       "management",
       "public"
   ]
}
This means the server in question declares two interfaces: One is referred to as " management"; the other one " public". The " management" interface is used for all components and services that are required by the management layer (i.e. the HTTP Management Endpoint). The " public" interface binding is used for any application related network communication (i.e. Web, Messaging, etc). There is nothing special about these names; interfaces can be declared with any name. Other sections of the configuration can then reference those interfaces by their logical name, rather than having to include the full details of the interface (which, on servers in a management domain, may vary on different machines).
The domain.xml, host.xml and standalone.xml configuration files
all include a section where interfaces can be declared. If we take a
look at the XML declaration it reveals the selection criteria. The
criteria is one of two types: either a single element indicating that
the interface should be bound to a wildcard address, or a set of one or
more characteristics that an interface or address must have in order to
be a valid match. The selection criteria in this example are specific IP
addresses for each interface:
<interfaces>
  <interface name="management">
   <inet-address value="127.0.0.1"/>
  </interface>
  <interface name="public">
   <inet-address value="127.0.0.1"/>
  </interface>
</interfaces>
Some other examples:
<interface name="global">
   <!-- Use the wildcard address -->
   <any-address/>
</interface>

<interface name="external">
   <nic name="eth0"/>
</interface>

<interface name="default">
   <!-- Match any interface/address on the right subnet if it's
        up, supports multicast and isn't point-to-point -->
   <subnet-match value="192.168.0.0/16"/>
   <up/>
   <multicast/>
   <not>
      <point-to-point/>
   </not>
</interface>
An interface configuration element is used to provide a single InetAddress to parts
of the server that reference that interface. If the selection criteria specified for
the interface element results in more than one address meeting the criteria, then a
warning will be logged and one just one address will be selected and used. Preference
will be given to network interfaces that are up, are non-loopback and are not
point-to-point.
|
4.1.1. The -b command line argument
WildFly supports using the -b command line argument to specify the
address to assign to interfaces. See
Controlling the Bind Address with -b for further details.
4.2. Socket Binding Groups
The socket configuration in WildFly works similarly to the interfaces declarations. Sockets are declared using a logical name, by which they will be referenced throughout the configuration. Socket declarations are grouped under a certain name. This allows you to easily reference a particular socket binding group when configuring server groups in a managed domain. Socket binding groups reference an interface by its logical name:
<socket-binding-group name="standard-sockets" default-interface="public">
  <socket-binding name="management-http" interface="management" port="${jboss.management.http.port:9990}"/>
  <socket-binding name="management-https" interface="management" port="${jboss.management.https.port:9993}"/>
  <socket-binding name="ajp" port="${jboss.ajp.port:8009}"/>
  <socket-binding name="http" port="${jboss.http.port:8080}"/>
  <socket-binding name="https" port="${jboss.https.port:8443}"/>
  <socket-binding name="txn-recovery-environment" port="4712"/>
  <socket-binding name="txn-status-manager" port="4713"/>
</socket-binding-group>
A socket binding includes the following information:
-
name — logical name of the socket configuration that should be used elsewhere in the configuration
-
port — base port to which a socket based on this configuration should be bound. (Note that servers can be configured to override this base value by applying an increment or decrement to all port values.)
-
interface (optional) — logical name (see "Interfaces declarations" above) of the interface to which a socket based on this configuration should be bound. If not defined, the value of the "default-interface" attribute from the enclosing socket binding group will be used.
-
multicast-address (optional) — if the socket will be used for multicast, the multicast address to use
-
multicast-port (optional) — if the socket will be used for multicast, the multicast port to use
-
fixed-port (optional, defaults to false) — if true, declares that the value of port should always be used for the socket and should not be overridden by applying an increment or decrement
4.3. IPv4 versus IPv6
WildFly supports the use of both IPv4 and IPv6 addresses. By default, WildFly is configured for use in an IPv4 network and so if you are running in an IPv4 network, no changes are required. If you need to run in an IPv6 network, the changes required are minimal and involve changing the JVM stack and address preferences, and adjusting any interface IP address values specified in the configuration (standalone.xml or domain.xml).
4.3.1. Stack and address preference
The system properties java.net.preferIPv4Stack and java.net.preferIPv6Addresses are used to configure the JVM for use with IPv4 or IPv6 addresses. With WildFly, in order to run using IPv4 addresses, you need to specify java.net.preferIPv4Stack=true; in order to run with IPv6 addresses, you need to specify java.net.preferIPv4Stack=false (the JVM default) and java.net.preferIPv6Addresses=true. The latter ensures that any hostname to IP address conversions always return IPv6 address variants.
These system properties are conveniently set by the JAVA_OPTS environment variable, defined in the standalone.conf (or domain.conf) file. For example, to change the IP stack preference from its default of IPv4 to IPv6, edit the standalone.conf (or domain.conf) file and change its default IPv4 setting:
if [ "x$JAVA_OPTS" = "x" ]; then
   JAVA_OPTS=" ... -Djava.net.preferIPv4Stack=true ..."
...
to an IPv6 suitable setting:
if [ "x$JAVA_OPTS" = "x" ]; then
   JAVA_OPTS=" ... -Djava.net.preferIPv4Stack=false -Djava.net.preferIPv6Addresses=true ..."
...
4.3.2. IP address literals
To change the IP address literals referenced in standalone.xml (or domain.xml), first visit the interface declarations and ensure that valid IPv6 addresses are being used as interface values. For example, to change the default configuration in which the loopback interface is used as the primary interface, change from the IPv4 loopback address:
<interfaces>
  <interface name="management">
    <inet-address value="${jboss.bind.address.management:127.0.0.1}"/>
  </interface>
  <interface name="public">
    <inet-address value="${jboss.bind.address:127.0.0.1}"/>
  </interface>
</interfaces>
to the IPv6 loopback address:
<interfaces>
  <interface name="management">
    <inet-address value="${jboss.bind.address.management:[::1]}"/>
  </interface>
  <interface name="public">
    <inet-address value="${jboss.bind.address:[::1]}"/>
  </interface>
</interfaces>
Note that when embedding IPv6 address literals in the substitution expression, square brackets surrounding the IP address literal are used to avoid ambiguity. This follows the convention for the use of IPv6 literals in URLs.
Over and above making such changes for the interface definitions, you should also check the rest of your configuration file and adjust IP address literals from IPv4 to IPv6 as required.
6. Security Realms
Within WildFly we make use of security realms to secure access to the management interfaces, these same realms are used to secure inbound access as exposed by JBoss Remoting such as remote JNDI and EJB access, the realms are also used to define an identity for the server - this identity can be used for both inbound connections to the server and outbound connections being established by the server.
6.1. General Structure
The general structure of a management realm definition is: -
<security-realm name="ManagementRealm">
   <plug-ins></plug-ins>
   <server-identities></server-identities>
   <authentication></authentication>
   <authorization></authorization>
</security-realm>-
plug-ins- This is an optional element that is used to define modules what will be searched for security realm PlugInProviders to extend the capabilities of the security realms. -
server-identities- An optional element to define the identity of the server as visible to the outside world, this applies to both inbound connection to a resource secured by the realm and to outbound connections also associated with the realm.
One example is the SSL identity of the server, for inbound connections this will control the identity of the server as the SSL connection is established, for outbound connections this same identity can be used where CLIENT-CERT style authentication is being performed.
A second example is where the server is establishing an outbound connection that requires username / password authentication - this element can be used to define that password.
-
authentication- This is probably the most important element that will be used within a security realm definition and mostly applies to inbound connections to the server, this element defines which backing stores will be used to provide the verification of the inbound connection.
This element is optional as there are some scenarios where it will not be required such as if a realm is being defined for an outbound connection using a username and password.
-
authorization- This is the final optional element and is used to define how roles are loaded for an authenticated identity. At the moment this is more applicable for realms used for access to EE deployments such as web applications or EJBs but this will also become relevant as we add role based authorization checks to the management model.
6.2. Using a Realm
After a realm has been defined it needs to be associated with an inbound or outbound connection for it to be used, the following are some examples where these associations are used within the WildFly 19.1 configuration.
6.2.1. Inbound Connections
Management Interfaces
Either within the standalone.xml or host.xml configurations the
security realms can be associated with the management interface as
follows:
<http-interface security-realm="ManagementRealm">...</http-interface>If the security-realm attribute is omitted or removed from the
interface definition it means that access to that interface will be
unsecured.
| By default we do bind these interfaces to the loopback address so that the interfaces are not accessible remotely out of the box, however do be aware that if these interfaces are then unsecured any other local user will be able to control and administer the WildFly installation. |
Remoting Subsystem
The Remoting subsystem exposes a connector to allow for inbound
comunications with JNDI and the EJB subsystem by default we associate
the ApplicationRealm with this connection.
<subsystem xmlns="urn:jboss:domain:remoting:3.0">
  <endpoint worker="default"/>
  <http-connector name="http-remoting-connector" connector-ref="default" security-realm="ApplicationRealm"/>
</subsystem>
6.2.2. Outbound Connections
Remoting Subsystem
Outbound connections can also be defined within the Remoting subsystem, these are typically used for remote EJB invocations from one AS server to another, in this scenario the security realm is used to obtain the server identity either it’s password for X.509 certificate and possibly a trust store to verify the certificate of the remote host.
| Even if the referenced realm contains username and password authentication configuration the client side of the connection will NOT use this to verify the remote server. |
<remote-outbound-connection name="remote-ejb-connection"
                            outbound-socket-binding-ref="binding-remote-ejb-connection"
                            username="user1"
security-realm="PasswordRealm">| The security realm is only used to obtain the password for this example, as you can see here the username is specified separately. |
Slave Host Controller
When running in domain mode slave host controllers need to establish a connection to the native interface of the master domain controller so these also need a realm for the identity of the slave.
<domain-controller>
  <remote host="${jboss.domain.master.address}" port="${jboss.domain.master.port:9999}" security-realm="ManagementRealm"/>
</domain-controller>
By default when a slave host controller authenticates against the master
domain controller it uses its configured name as its username. If you
want to override the username used for authentication a username
attribute can be added to the <remote /> element.
|
6.3. Authentication
One of the primary functions of the security realms is to define the user stores that will be used to verify the identity of inbound connections, the actual approach taken at the transport level is based on the capabilities of these backing store definitions. The security realms are used to secure inbound connections for both the http management interface and for inbound remoting connections for both the native management interface and to access other services exposed over remoting - because of this there are some small differences between how the realm is used for each of these.
At the transport level we support the following authentication mechanisms.
| HTTP | Remoting (SASL) |
|---|---|
None |
Anonymous |
N/A |
JBoss Local User |
Digest |
Digest |
Basic |
Plain |
Client Cert |
Client Cert |
The most notable are the first two in this list as they need some additional explanation - the final 3 are fairly standard mechanisms.
If either the http interface, the native interface or a remoting connection are difined without a security realm reference then they are effectively unsecured, in the case of the http interface this means that no authentication will be performed on the incoming connection - for the remoting connections however we make use of SASL so require at least one authentication mechanism so make use of the anonymous mechanism to allow a user in without requiring a validated authentication process.
The next mechanism 'JBoss Local User' is specific to the remoting connections - as we ship WildFly secured by default we wanted a way to allow users to connect to their own AS installation after it is started without mandating that they define a user with a password - to accomplish this we have added the 'JBoss Local User' mechanism. This mechanism makes the use of tokens exchanged on the filesystem to prove that the client is local to the AS installation and has the appropriate file permissions to read a token written by the AS to file. As this mechanism is dependent on both server and client implementation details it is only supported for the remoting connections and not the http connections - at some point we may review if we can add support for this to the http interface but we would need to explore the options available with the commony used web browsers that are used to communicate with the http interface.
The Digest mechanism is simply the HTTP Digest / SASL Digest mechanism that authenticates the user by making use of md5 hashed including nonces to avoid sending passwords in plain text over the network - this is the preferred mechanism for username / password authentication.
The HTTP Basic / SASL Plain mechanism is made available for times that Digest can not be used but effectively this means that the users password will be sent over the network in the clear unless SSL is enabled.
The final mechanism Client-Cert allows X.509 certificates to be used to verify the identity of the remote client.
| One point bearing in mind is that it is possible that an association with a realm can mean that a single incoming connection has the ability to choose between one or more authentication mechanisms. As an example it is possible that an incoming remoting connection could choose between 'Client Cert', A username password mechanism or 'JBoss Local User' for authentication - this would allow say a local user to use the local mechanism, a remote user to supply their username and password whilst a remote script could make a call and authenticate using a certificate. |
6.4. Authorization
The actual security realms are not involved in any authorization decisions. However, they can be configured to load a user’s roles, which will subsequently be used to make authorization decisions - when references to authorization are seen in the context of security realms, it is this loading of roles that is being referred to.
For the loading of roles, the process is split out to occur after the authentication step so after a user has been authenticated, a second step will occur to load the roles based on the username they used to authenticate with.
6.5. Out Of The Box Configuration
Before describing the complete set of configuration options available within the realms, we will look at the default configuration, as for most users, that is going to be the starting point before customising further.
The examples here are taken from the standalone configuration. However,
the descriptions are equally applicable to domain mode. One point worth
noting is that all security realms defined in the host.xml are
available to be referenced within the domain configuration for the
servers running on that host controller.
|
6.5.1. Management Realm
<security-realm name="ManagementRealm">
  <authentication>
    <local default-user="$local"/>
    <properties path="mgmt-users.properties" relative-to="jboss.server.config.dir"/>
  </authentication>
</security-realm>
The realm ManagementRealm is the simplest realm within the default
configuration. This realm simply enables two authentication mechanisms,
the local mechanism and username/password authentication which will be
using Digest authentication.
-
local
When using the local mechanism, it is optional for remote clients to
send a username to the server. This configuration specifies that where
clients do not send a username, it will be assumed that the clients
username is $local - the <local /> element can also be configured to
allow other usernames to be specified by remote clients. However, for
the default configuration, this is not enabled so is not supported.
-
properties
For username / password authentication the users details will be loaded
from the file mgmt-users.properties which is located in \{
jboss.home}/standalone/configuration or \{
jboss.home}/domain/configuration depending on the running mode of the
server.
Each user is represented on their own line and the format of each line
is username= HASH where HASH is a pre-prepared hash of the users
password along with their username and the name of the realm which in
this case is ManagementRealm.
You do not need to worry about generating the entries within the
properties file as we provide a utility add-user.sh or add-user.bat
to add the users, this utility is described in more detail below.
|
| By pre-hashing the passwords in the properties file it does mean that if the user has used the same password on different realms then the contents of the file falling into the wrong hands does not nescesarily mean all accounts are compromised. HOWEVER the contents of the files do still need to be protected as they can be used to access any server where the realm name is the same and the user has the same username and password pair. |
6.5.2. Application Realm
<security-realm name="ApplicationRealm">
  <authentication>
    <local default-user="$local" allowed-users="*"/>
    <properties path="application-users.properties" relative-to="jboss.server.config.dir"/>
  </authentication>
  <authorization>
    <properties path="application-roles.properties" relative-to="jboss.server.config.dir"/>
  </authorization>
</security-realm>
The realm ApplicationRealm is a slightly more complex realm as this is
used for both
Authentication
The authentication configuration is very similar to the
ManagementRealm in that it enabled both the local mechanism and a
username/password based Digest mechanism.
-
local
The local configuration is similar to the ManagementRealm in that
where the remote user does not supply a username it will be assumed that
the username is $local, however in addition to this there is now an
allowed-users attribute with a value of '*' - this means that the
remote user can specify any username and it will be accepted over the
local mechanism provided that the local verification is a success.
To restrict the usernames that can be specified by the remote user a
comma separated list of usernames can be specified instead within the
allowed-users attribute.
|
-
properties
The properties definition works in exactly the same way as the
definition for ManagementRealm except now the properties file is
called application-users.properties.
Authorization
The contents of the Authorization element are specific to the
ApplicationRealm, in this case a properties file is used to load a
users roles.
The properties file is called application-roles.properties and is
located in \{ jboss.home}/standalone/configuration or \{
jboss.home}/domain/configuration depending on the running mode of the
server. The format of this file is username= ROLES where ROLES is
a comma separated list of the users roles.
| As the loading of a users roles is a second step this is where it may be desirable to restrict which users can use the local mechanism so that some users still require username and password authentication for their roles to be loaded. |
other security domain
<security-domain name="other" cache-type="default">
  <authentication>
    <login-module code="Remoting" flag="optional">
      <module-option name="password-stacking" value="useFirstPass"/>
    </login-module>
    <login-module code="RealmDirect" flag="required">
      <module-option name="password-stacking" value="useFirstPass"/>
    </login-module>
  </authentication>
</security-domain>
When applications are deployed to the application server they are
associated with a security domain within the security subsystem, the
other security domain is provided to work with the ApplicationRealm,
this domain is defined with a pair of login modules Remoting and
RealmDirect.
-
Remoting
The Remoting login module is used to check if the request currently
being authenticated is a request received over a Remoting connection, if
so the identity that was created during the authentication process is
used and associated with the current request.
If the request did not arrive over a Remoting connection this module does nothing and allows the JAAS based login to continue to the next module.
-
RealmDirect
The RealmDirect login module makes use of a security realm to
authenticate the current request if that did not occur in the Remoting
login module and then use the realm to load the users roles, by default
this login module assumes the realm to use is called ApplicationRealm
although other names can be overridden using the "realm" module-option.
The advantage of this approach is that all of the backing store configuration can be left within the realm with the security domain just delegating to the realm.
6.6. add-user utility
For use with the default configuration we supply a utility add-user
which can be used to manage the properties files for the default realms
used to store the users and their roles.
The add-user utility can be used to manage both the users in the
ManagementRealm and the users in the ApplicationRealm, changes made
apply to the properties file used both for domain mode and standalone
mode.
| After you have installed your application server and decided if you are going to run in standalone mode or domain mode you can delete the parent folder for the mode you are not using, the add-user utility will then only be managing the properties file for the mode in use. |
The add-user utility is a command line utility however it can be run in
both interactive and non-interactive mode. Depending on your platform
the script to run the add-user utility is either add-user.sh or
add-user.bat which can be found in \{ jboss.home}/bin.
This guide now contains a couple of examples of this utility in use to accomplish the most common tasks.
6.6.1. Adding a User
Adding users to the properties files is the primary purpose of this utility. Usernames can only contain the following characters in any number and in any order:
-
Alphanumeric characters (a-z, A-Z, 0-9)
-
Dashes (-), periods (.), commas (,), at (@)
-
Escaped backslash ( \\ )
-
Escaped equals (\=)
| The server caches the contents of the properties files in memory, however the server does check the modified time of the properties files on each authentication request and re-load if the time has been updated - this means all changes made by this utility are immediately applied to any running server. |
A Management User
The default name of the realm for management users is ManagementRealm,
when the utility prompts for the realm name just accept the default
unless you have switched to a different realm.
|
Interactive Mode
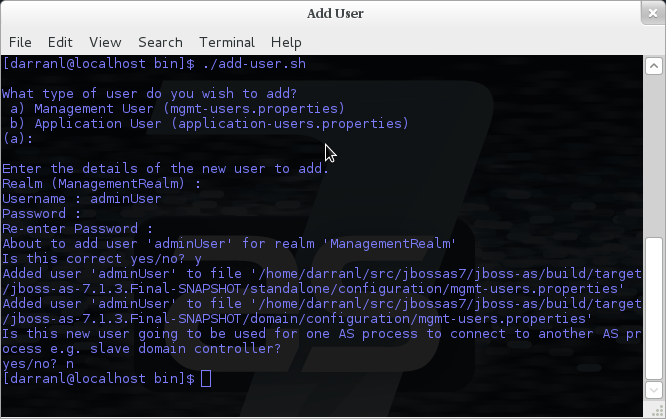
Here we have added a new Management User called adminUser, as you can
see some of the questions offer default responses so you can just press
enter without repeating the default value.
For now just answer n or no to the final question, adding users to
be used by processes is described in more detail in the domain
management chapter.
Non-Interactive Mode
To add a user in non-interactive mode the command
./add-user.sh {username} {password} can be used.
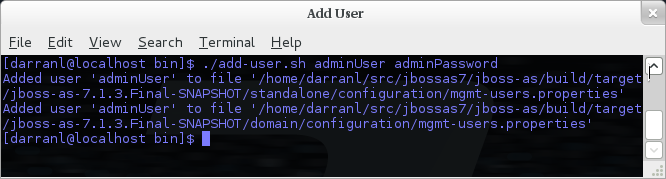
| If you add users using this approach there is a risk that any other user that can view the list of running process may see the arguments including the password of the user being added, there is also the risk that the username / password combination will be cached in the history file of the shell you are currently using. |
An Application User
When adding application users in addition to adding the user with their pre-hashed password it is also now possible to define the roles of the user.
Interactive Mode
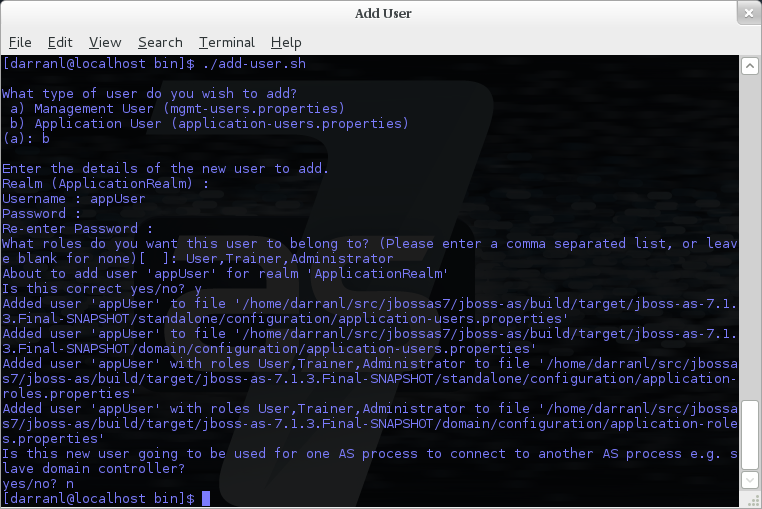
Here a new user called appUser has been added, in this case a comma
separated list of roles has also been specified.
As with adding a management user just answer n or no to the final
question until you know you are adding a user that will be establishing
a connection from one server to another.
Non-Interactive Mode
To add an application user non-interactively use the command
./add-user.sh -a {username} {password}.
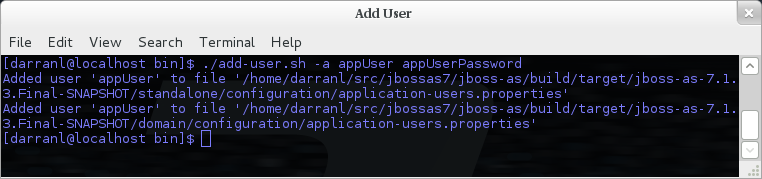
Non-interactive mode does not support defining a list of users, to
associate a user with a set of roles you will need to manually edit the
application-roles.properties file by hand.
|
6.6.2. Updating a User
Within the add-user utility it is also possible to update existing users, in interactive mode you will be prompted to confirm if this is your intention.
A Management User
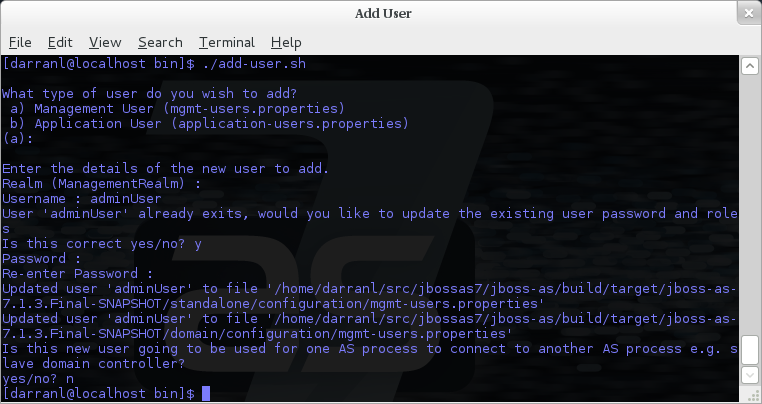
Non-Interactive Mode
In non-interactive mode if a user already exists the update is automatic with no confirmation prompt.
An Application User
Interactive Mode
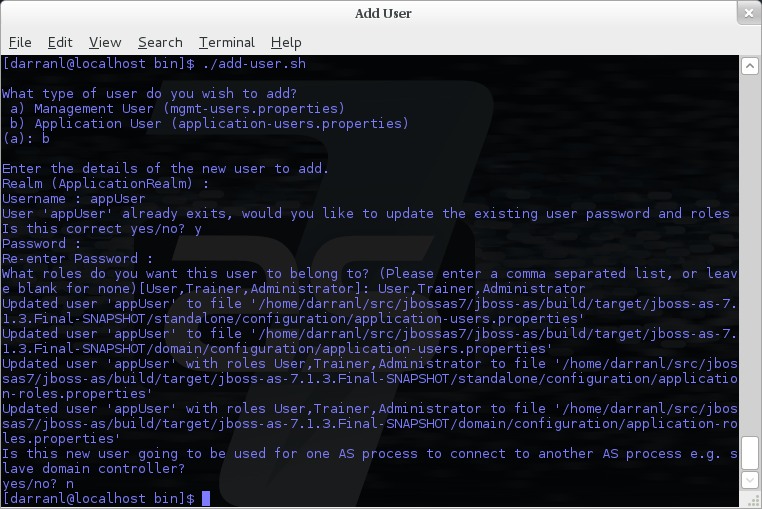
| On updating a user with roles you will need to re-enter the list of roles assigned to the user. |
Non-Interactive Mode
In non-interactive mode if a user already exists the update is automatic with no confirmation prompt.
6.6.3. Community Contributions
There are still a few features to add to the add-user utility such as removing users or adding application users with roles in non-interactive mode, if you are interested in contributing to WildFly development the add-user utility is a good place to start as it is a stand alone utility, however it is a part of the AS build so you can become familiar with the AS development processes without needing to delve straight into the internals of the application server.
6.7. JMX Security
When configuring the security realms remote access to the server’s MBeanServer needs a special mention. When running in standalone mode the following is the default configuration:
<subsystem xmlns="urn:jboss:domain:jmx:1.3">
  ...
  <remoting-connector/>
</subsystem>
With this configuration remote access to JMX is provided over the http
management interface, this is secured using the realm ManagementRealm,
this means that any user that can connect to the native interface can
also use this interface to access the MBeanServer - to disable this just
remove the <remoting-connector /> element.
In domain mode it is slightly more complicates as the native interface is exposed by the host controller process however each application server is running in it’s own process so by default remote access to JMX is disabled.
<subsystem xmlns="urn:jboss:domain:remoting:3.0">
  <http-connector name="http-remoting-connector" connector-ref="default" security-realm="ApplicationRealm"/>
</subsystem>
<subsystem xmlns="urn:jboss:domain:jmx:1.3">
...
<!--<remoting-connector use-management-endpoint="false"/>-->
</subsystem>To enable remote access to JMX uncomment the <remoting-connector />
element however be aware that this will make the MBeanServer accessible
over the same Remoting connector used for remote JNDI and EJB access -
this means that any user that can authenticate against the realm
ApplicationRealm will be able to access the MBeanServer.
| The following Jira issue is currently outstanding to allow access to the individual MBeanServers by proxying through the host controllers native interface WFCORE-2584, if this is a feature you would use please add your vote to the issue. |
6.8. Detailed Configuration
This section of the documentation describes the various configuration options when defining realms, plug-ins are a slightly special case so the configuration options for plug-ins is within it’s own section.
Within a security realm definition there are four optional elements
<plug-ins />, <server-identities />, <authentication />, and
<authorization />, as mentioned above plug-ins is defined within it’s
own section below so we will begin by looking at the
<server-identities /> element.
6.8.1. <server-identities />
The server identities section of a realm definition is used to define how a server appears to the outside world, currently this element can be used to configure a password to be used when establishing a remote outbound connection and also how to load a X.509 key which can be used for both inbound and outbound SSL connections.
<ssl />
<server-identities>
  <ssl protocol="...">
    <engine enabled-protocols="..."/>
    <keystore path="..." relative-to="..." keystore-password="..." alias="..." key-password="..." />
  </ssl>
</server-identities>-
protocol - By default this is set to TLS and in general does not need to be set. To make use of OpenSSL, this can be set to
openssl.TLS. Other valid values areopenssl.TLSv1.1andopenssl.TLSv1.2, which limit the minimum protocol version to TLSv1.1 and TLSv1.2 respectively. -
enabled-protocols - The protocols to enable on the underlying
SSLEngine.
NOTE When using OpenSSL 1.1.0g or higher, the lowest and highest protocol
versions specified by enabled-protocols will be used to set the minimum
and maximum protocol versions on the underlying SSLEngine. For example,
if enabled-protocols is set to ["TLSv1.0", "TLSv1.2"], the minimum
protocol version will be set to TLSv1.0 and the maximum protocol version
will be set to TLSv1.2.
The SSL element then contains the nested <keystore /> element, this is
used to define how to load the key from the file based (JKS) keystore.
-
path (mandatory) - This is the path to the keystore, this can be an absolute path or relative to the next attribute.
-
relative-to (optional) - The name of a service representing a path the keystore is relative to.
-
keystore-password (mandatory) - The password required to open the keystore.
-
alias (optional) - The alias of the entry to use from the keystore - for a keystore with multiple entries in practice the first usable entry is used but this should not be relied on and the alias should be set to guarantee which entry is used.
-
key-password (optional) - The password to load the key entry, if omitted the keystore-password will be used instead.
If you see the error
UnrecoverableKeyException: Cannot recover keythe most likely cause that you need to specify akey-passwordand possible even analiasas well to ensure only one key is loaded.
<secret />
<server-identities>
  <secret value="..." />
</server-identities>-
value (mandatory) - The password to use for outbound connections encoded as Base64, this field also supports a vault expression should stronger protection be required.
| The username for the outbound connection is specified at the point the outbound connection is defined. |
6.8.2. <authentication />
The authentication element is predominantly used to configure the authentication that is performed on an inbound connection, however there is one exception and that is if a trust store is defined - on negotiating an outbound SSL connection the trust store will be used to verify the remote server.
<authentication>
  <truststore />
  <local />
  <jaas />
  <ldap />
  <properties />
  <users />
  <plug-in />
</authentication>
An authentication definition can have zero or one <truststore />, it
can also have zero or one <local /> and it can also have one of
<jaas />, <ldap />, <properties />, <users />, and <plug-in />
i.e. the local mechanism and a truststore for certificate verification
can be independent switched on and off and a single username / password
store can be defined.
<truststore />
<authentication>
  <truststore path="..." relative-to="..." keystore-password="..."/>
</authentication>
This element is used to define how to load a key store file that can be used as the trust store within the SSLContext we create internally, the store is then used to verify the certificates of the remote side of the connection be that inbound or outbound.
-
path (mandatory) - This is the path to the keystore, this can be an absolute path or relative to the next attribute.
-
relative-to (optional) - The name of a service representing a path the keystore is relative to.
-
keystore-password (mandatory) - The password required to open the keystore.
Although this is a definition of a trust store the attribute for the
password is keystore-password, this is because the underlying file
being opened is still a key store.
|
<local />
<authentication>
  <local default-user="..." allowed-users="..." />
</authentication>
This element switches on the local authentication mechanism that allows clients to the server to verify that they are local to the server, at the protocol level it is optional for the remote client to send a user name in the authentication response.
-
default-user (optional) - If the client does not pass in a username this is the assumed username, this value is also automatically added to the list of allowed-users.
-
allowed-users (optional) - This attribute is used to specify a comma separated list of users allowed to authenticate using the local mechanism, alternatively ' `*’ can be specified to allow any username to be specified.
<jaas />
<authentication>
  <jaas name="..." />
</authentication>
The jaas element is used to enable username and password based authentication where the supplied username and password are verified by making use of a configured jaas domain.
-
name (mandatory) - The name of the jaas domain to use to verify the supplied username and password.
| As JAAS authentication works by taking a username and password and verifying these the use of this element means that at the transport level authentication will be forced to send the password in plain text, any interception of the messages exchanged between the client and server without SSL enabled will reveal the users password. |
<ldap />
<authentication>
  <ldap connection="..." base-dn="..." recursive="..." user-dn="...">
    <username-filter attribute="..." />
    <advanced-filter filter="..." />
  </ldap>
</authentication>
The ldap element is used to define how LDAP searches will be used to authenticate a user, this works by first connecting to LDAP and performing a search using the supplied user name to identity the distinguished name of the user and then a subsequent connection is made to the server using the password supplied by the user - if this second connection is a success then authentication succeeds.
| Due to the verification approach used this configuration causes the authentication mechanisms selected for the protocol to cause the password to be sent from the client in plain text, the following Jira issue is to investigating proxying a Digest authentication with the LDAP server so no plain text password is needed ELY-296. |
-
connection (mandatory) - The name of the connection to use to connect to LDAP.
-
base-dn (mandatory) - The distinguished name of the context to use to begin the search from.
-
recursive (optional) - Should the filter be executed recursively? Defaults to false.
-
user-dn (optional) - After the user has been found specifies which attribute to read for the users distinguished name, defaults to ' `dn’.
Within the ldap element only one of <username-filter /> or
<advanced-filter /> can be specified.
<username-filter />
This element is used for a simple filter to match the username specified by the remote user against a single attribute, as an example with Active Directory the match is most likely to be against the ' `sAMAccountName’ attribute.
-
attribute (mandatory) - The name of the field to match the users supplied username against.
<advanced-filter />
This element is used where a more advanced filter is required, one example use of this filter is to exclude certain matches by specifying some additional criteria for the filter.
-
filter (mandatory) - The filter to execute to locate the user, this filter should contain '\{
0}' as a place holder for the username supplied by the user authenticating.
<properties />
<authentication>
  <properties path="..." relative-to="..." plain-text="..." />
</authentication>
The properties element is used to reference a properties file to load to read a users password or pre-prepared digest for the authentication process.
-
path (mandatory) - The path to the properties file, either absolute or relative to the path referenced by the relative-to attribute.
-
relative-to (optional) - The name of a path service that the defined path will be relative to.
-
plain-text (optional) - Setting to specify if the passwords are stored as plain text within the properties file, defaults to false.
| By default the properties files are expected to store a pre-prepared hash of the users password in the form HEX( MD5( username ':' realm ':' password)) |
<users />
<authentication>
  <users>
    <user username="...">
      <password>...</password>
    </user>
  </users>
</authentication>
This is a very simple store of a username and password that stores both of these within the domain model, this is only really provided for the provision of simple examples.
-
username (mandatory) - A users username.
The <password/> element is then used to define the password for the
user.
6.8.3. <authorization />
The authorization element is used to define how a users roles can be loaded after the authentication process completes, these roles may then be used for subsequent authorization decisions based on the service being accessed. At the moment only a properties file approach or a custom plug-in are supported - support for loading roles from LDAP or from a database are planned for a subsequent release.
<authorization>
  <properties />
  <plug-in />
</authorization>
<properties />
<authorization>
  <properties path="..." relative-to="..." />
</authorization>
The format of the properties file is username={ROLES} where \{
ROLES} is a comma separated list of the users roles.
-
path (mandatory) - The path to the properties file, either absolute or relative to the path referenced by the relative-to attribute.
-
relative-to (optional) - The name of a path service that the defined path will be relative to.
6.8.4. <outbound-connection />
Strictly speaking these are not a part of the security realm definition, however at the moment they are only used by security realms so the definition of outbound connection is described here.
<management>
  <security-realms />
  <outbound-connections>
    <ldap />
  </outbound-connections>
</management>
<ldap />
We only support outbound connections to ldap servers for the authentication process.
<outbound-connections>
  <ldap name="..." url="..." search-dn="..." search-credential="..." security-realm="..." initial-context-factory="..."
        referrals="..." handles-referrals-for="..." always-send-client-cert="...">
    <properties>
      <property name="..." value="..." />
    </properties>
    <security-credential-reference store="..." alias="..." type="..."  clear-text="..." />
  </ldap>
</outbound-connections>
The outbound connections are defined in this section and then referenced by name from the configuration that makes use of them.
-
name (mandatory) - The unique name used to reference this connection.
-
url (mandatory) - The URL use to establish the LDAP connection.
-
search-dn (mandatory) - The distinguished name of the user to authenticate as to perform the searches.
-
search-credential (optional) - The password required to connect to LDAP as the search-dn.
-
initial-context-factory (optional) - Allows overriding the initial context factory, defaults to ' `com.sun.jndi.ldap.LdapCtxFactory’
-
referrals (optional) - The referral handling mode.
-
IGNORE - Ignore any referrals received.
-
FOLLOW - Automatically follow any referrals re-using the configuration for this connection.
-
THROW - Throw an exception is a referral is encountered, this allows an alternative connection to be identified to handle the referral.
-
-
handles-referrals-for (optional) - A space separated list of URIs this connection can be used for.
-
always-send-client-cert (optional) - By default the server’s client certificate is not sent whilst verifying the users credential, if this is set to
trueit will always be sent.
The optional <properties/> element can be used to specify additional properties to be passed in to the DirContext when it is created.
The optional <security-credential-reference /> can be used to reference a credential stored in a credential store as an alternative to
the search-credential attribute. This element supports the following attributes: -
-
store (optional) - Reference to the credential store to obtain the search credential from.
-
alias (optional) - The alias of the credential in the referenced store.
-
type (optional) - The fully qualified class name of the credential type to obtain from the credential store.
-
clear-text (optional) - Instead of referencing a credential store this attribute can be used to specify a clear text password.
6.9. Plug Ins
Within WildFly 19.1 for communication with the management interfaces and for other services exposed using Remoting where username / password authentication is used the use of Digest authentication is preferred over the use of HTTP Basic or SASL Plain so that we can avoid the sending of password in the clear over the network. For validation of the digests to work on the server we either need to be able to retrieve a users plain text password or we need to be able to obtain a ready prepared hash of their password along with the username and realm.
Previously to allow the addition of custom user stores we have added an option to the realms to call out to a JAAS domain to validate a users username and password, the problem with this approach is that to call JAAS we need the remote user to send in their plain text username and password so that a JAAS LoginModule can perform the validation, this forces us down to use either the HTTP Basic authentication mechanism or the SASL Plain mechanism depending on the transport used which is undesirable as we can not longer use Digest.
To overcome this we now support plugging in custom user stores to support loading a users password, hash and roles from a custom store to allow different stores to be implemented without forcing the authentication back to plain text variant, this article describes the requirements for a plug in and shows a simple example plug-in for use with WildFly 19.1.
When implementing a plug in there are two steps to the authentication process, the first step is to load the users identity and credential from the relevant store - this is then used to verify the user attempting to connect is valid. After the remote user is validated we then load the users roles in a second step. For this reason the support for plug-ins is split into the two stages, when providing a plug-in either of these two steps can be implemented but there is no requirement to implement the other side.
When implementing a plug-in the following interfaces are the bare minimum that need to be implemented so depending on if a plug-in to load a users identity or a plug-in to load a users roles is being implemented you will be implementing one of these interfaces.
Note - All classes and interfaces of the SPI to be implemented are in the 'org.jboss.as.domain.management.plugin' package which is a part of the 'org.jboss.as.domain-management' module but for simplicity for the rest of this section only the short names will be shown.
6.9.1. AuthenticationPlugIn
To implement an AuthenticationPlugIn the following interface needs to
be implemened: -
public interface AuthenticationPlugIn<T extends Credential> {
    Identity<T> loadIdentity(final String userName, final String realm) throws IOException;
}
During the authentication process this method will be called with the user name supplied by the remote user and the name of the realm they are authenticating against, this method call represents that an authentication attempt is occurring but it is the Identity instance that is returned that will be used for the actual authentication to verify the remote user.
The Identity interface is also an interface you will implement: -
public interface Identity<T extends Credential> {
    String getUserName();
    T getCredential();
}
Additional information can be contained within the Identity implementation although it will not currently be used, the key piece of information here is the Credential that will be returned - this needs to be one of the following: -
PasswordCredential
public final class PasswordCredential implements Credential {
    public PasswordCredential(final char[] password);
    public char[] getPassword();
    void clear();
}
The PasswordCredential is already implemented so use this class if you
have the plain text password of the remote user, by using this the
secured interfaces will be able to continue using the Digest mechanism
for authentication.
DigestCredential
public final class DigestCredential implements Credential {
    public DigestCredential(final String hash);
    public String getHash();
}
This class is also already implemented and should be returned if instead of the plain text password you already have a pre-prepared hash of the username, realm and password.
ValidatePasswordCredential
public interface ValidatePasswordCredential extends Credential {
    boolean validatePassword(final char[] password);
}
This is a special Credential type to use when it is not possible to obtain either a plain text representation of the password or a pre-prepared hash - this is an interface as you will need to provide an implementation to verify a supplied password. The down side of using this type of Credential is that the authentication mechanism used at the transport level will need to drop down from Digest to either HTTP Basic or SASL Plain which will now mean that the remote client is sending their credential across the network in the clear.
If you use this type of credential be sure to force the mechanism choice to Plain as described in the configuration section below.
6.9.2. AuthorizationPlugIn
If you are implementing a custom mechanism to load a users roles you
need to implement the AuthorizationPlugIn
public interface AuthorizationPlugIn {
    String[] loadRoles(final String userName, final String realm) throws IOException;
}
As with the AuthenticationPlugIn this has a single method that takes a
users userName and realm - the return type is an array of Strings with
each entry representing a role the user is a member of.
6.9.3. PlugInConfigurationSupport
In addition to the specific interfaces above there is an additional interface that a plug-in can implement to receive configuration information before the plug-in is used and also to receive a Map instance that can be used to share state between the plug-in instance used for the authentication step of the call and the plug-in instance used for the authorization step.
public interface PlugInConfigurationSupport {
    void init(final Map<String, String> configuration, final Map<String, Object> sharedState) throws IOException;
}
6.9.4. Installing and Configuring a Plug-In
The next step of this article describes the steps to implement a plug-in provider and how to make it available within WildFly 19.1 and how to configure it. Example configuration and an example implementation are shown to illustrate this.
The following is an example security realm definition which will be used to illustrate this: -
<security-realm name="PlugInRealm">
   <plug-ins>
      <plug-in module="org.jboss.as.sample.plugin"/>
   </plug-ins>
   <authentication>
      <plug-in name="Sample">
         <properties>
            <property name="darranl.password" value="dpd"/>
            <property name="darranl.roles" value="Admin,Banker,User"/>
         </properties>
      </plug-in>
   </authentication>
   <authorization>
      <plug-in name="Delegate" />
   </authorization>
</security-realm>
Before looking closely at the packaging and configuration there is one
more interface to implement and that is the PlugInProvider interface,
that interface is responsible for making PlugIn instances available at
runtime to handle the requests.
PlugInProvider
public interface PlugInProvider {
    AuthenticationPlugIn<Credential> loadAuthenticationPlugIn(final String name);
    AuthorizationPlugIn loadAuthorizationPlugIn(final String name);
}
These methods are called with the name that is supplied in the plug-in elements that are contained within the authentication and authorization elements of the configuration, based on the sample configuration above the loadAuthenticationPlugIn method will be called with a parameter of 'Sample' and the loadAuthorizationPlugIn method will be called with a parameter of 'Delegate'.
Multiple plug-in providers may be available to the application server so
if a PlugInProvider implementation does not recognise a name then it
should just return null and the server will continue searching the other
providers. If a PlugInProvider does recognise a name but fails to
instantiate the PlugIn then a RuntimeException can be thrown to
indicate the failure.
As a server could have many providers registered it is recommended that a naming convention including some form of hierarchy is used e.g. use package style names to avoid conflicts.
For the example the implementation is as follows: -
public class SamplePluginProvider implements PlugInProvider {

    public AuthenticationPlugIn<Credential> loadAuthenticationPlugIn(String name) {
        if ("Sample".equals(name)) {
            return new SampleAuthenticationPlugIn();
        }
        return null;
    }

    public AuthorizationPlugIn loadAuthorizationPlugIn(String name) {
        if ("Sample".equals(name)) {
            return new SampleAuthenticationPlugIn();
        } else if ("Delegate".equals(name)) {
            return new DelegateAuthorizationPlugIn();
        }
        return null;
    }
}
The load methods are called for each authentication attempt but it will be an implementation detail of the provider if it decides to return a new instance of the provider each time - in this scenario as we also use configuration and shared state then new instances of the implementations make sense.
To load the provider use a ServiceLoader so within the META-INF/services folder of the jar this project adds a file called ' `org.jboss.as.domain.management.plugin.PlugInProvider’ - this contains a single entry which is the fully qualified class name of the PlugInProvider implementation class.
org.jboss.as.sample.SamplePluginProvider
Package as a Module
To make the PlugInProvider available to the application it is bundled
as a module and added to the modules already shipped with WildFly 19.1.
To add as a module we first need a module.xml: -
<?xml version="1.0" encoding="UTF-8"?>

<module xmlns="urn:jboss:module:1.1" name="org.jboss.as.sample.plugin">
    <properties>
    </properties>

    <resources>
        <resource-root path="SamplePlugIn.jar"/>
    </resources>

    <dependencies>
        <module name="org.jboss.as.domain-management" />
    </dependencies>
</module>
The interfaces being implemented are in the '
org.jboss.as.domain-management’ module so a dependency on that module
is defined, this `module.xml
is then placed in the '\{
`jboss.home}/modules/org/jboss/as/sample/plugin/main’.
The compiled classed and META-INF/services as described above are
assembled into a jar called SamplePlugIn.jar and also placed into this
folder.
Looking back at the sample configuration at the top of the realm definition the following element was added: -
   <plug-ins>
      <plug-in module="org.jboss.as.sample.plugin"/>
   </plug-ins>
This element is used to list the modules that should be searched for plug-ins. As plug-ins are loaded during the server start up this search is a lazy search so don’t expect a definition to a non existant module or to a module that does not contain a plug-in to report an error.
The AuthenticationPlugIn
The example AuthenticationPlugIn is implemented as: -
public class SampleAuthenticationPlugIn extends AbstractPlugIn {

    private static final String PASSWORD_SUFFIX = ".password";
    private static final String ROLES_SUFFIX = ".roles";
    private Map<String, String> configuration;

    public void init(Map<String, String> configuration, Map<String, Object> sharedState) throws IOException {
        this.configuration = configuration;
        // This will allow an AuthorizationPlugIn to delegate back to this instance.
        sharedState.put(AuthorizationPlugIn.class.getName(), this);
    }

    public Identity loadIdentity(String userName, String realm) throws IOException {
        String passwordKey = userName + PASSWORD_SUFFIX;
        if (configuration.containsKey(passwordKey)) {
            return new SampleIdentity(userName, configuration.get(passwordKey));
        }
        throw new IOException("Identity not found.");
    }

    public String[] loadRoles(String userName, String realm) throws IOException {
        String rolesKey = userName + ROLES_SUFFIX;
        if (configuration.containsKey(rolesKey)) {
            String roles = configuration.get(rolesKey);
            return roles.split(",");
        } else {
            return new String[0];
        }
    }

    private static class SampleIdentity implements Identity {
        private final String userName;
        private final Credential credential;

        private SampleIdentity(final String userName, final String password) {
            this.userName = userName;
            this.credential = new PasswordCredential(password.toCharArray());
        }

        public String getUserName() {
            return userName;
        }

        public Credential getCredential() {
            return credential;
        }
    }
}
As you can see from this implementation there is also an additional
class being extended AbstractPlugIn - that is simply an abstract class
that implements the AuthenticationPlugIn, AuthorizationPlugIn, and
PlugInConfigurationSupport interfaces already. The properties that
were defined in the configuration are passed in as a Map and importantly
for this sample the plug-in adds itself to the shared state map.
The AuthorizationPlugIn
The example implementation of the authentication plug in is as follows: -
public class DelegateAuthorizationPlugIn extends AbstractPlugIn {

    private AuthorizationPlugIn authorizationPlugIn;

    public void init(Map<String, String> configuration, Map<String, Object> sharedState) throws IOException {
        authorizationPlugIn = (AuthorizationPlugIn) sharedState.get(AuthorizationPlugIn.class.getName());
    }

    public String[] loadRoles(String userName, String realm) throws IOException {
        return authorizationPlugIn.loadRoles(userName, realm);
    }

}
This plug-in illustrates how two plug-ins can work together, by the
AuthenticationPlugIn placing itself in the shared state map it is
possible for the authorization plug-in to make use of it for the
loadRoles implementation.
Another option to consider to achieve similar behaviour could be to
provide an Identity implementation that also contains the roles and
place this in the shared state map - the AuthorizationPlugIn can
retrieve this and return the roles.
Forcing Plain Text Authentication
As mentioned earlier in this article if the ValidatePasswordCredential
is going to be used then the authentication used at the transport level
needs to be forced from Digest authentication to plain text
authentication, this can be achieved by adding a mechanism attribute to
the plug-in definition within the authentication element i.e.
  <authentication>
    <plug-in name="Sample" mechanism="PLAIN">
6.10. Examples
This section of the document contains a couple of examples for the most common scenarios likely to be used with the security realms, please feel free to raise Jira issues requesting additional scenarios or if you have configured something not covered here please feel free to add your own examples - this document is editable after all
At the moment these examples are making use of the ' `ManagementRealm’ however the same can apply to the ' `ApplicationRealm’ or any custom realm you create for yourselves.
6.10.1. LDAP Authentication
The following example demonstrates an example configuration making use of Active Directory to verify the users username and password.
<management>
  <security-realms>
    <security-realm name="ManagementRealm">
      <authentication>
        <ldap connection="EC2" base-dn="CN=Users,DC=darranl,DC=jboss,DC=org">
          <username-filter attribute="sAMAccountName" />
        </ldap>
      </authentication>
    </security-realm>

  </security-realms>

  <outbound-connections>
    <ldap name="EC2" url="ldap://127.0.0.1:9797" search-dn="CN=wf8,CN=Users,DC=darranl,DC=jboss,DC=org" search-credential="password"/>
  </outbound-connections>

  ...

</management>
For simplicity the <local/> configuration has been removed from this
example, however there it is fine to leave that in place for local
authentication to remain possible.
|
6.10.2. Enable SSL
The first step is the creation of the key, by default this is going to
be used for both the native management interface and the http management
interface - to create the key we can use the keyTool, the following
example will create a key valid for one year.
Open a terminal window in the folder \{
jboss.home}/standalone/configuration and enter the following command:
-
keytool -genkey -alias server -keyalg RSA -keystore server.keystore -validity 365
Enter keystore password:
Re-enter new password:
In this example I choose ' `keystore_password’.
What is your first and last name?
  [Unknown]:  localhost
| Of all of the questions asked this is the most important and should match the host name that will be entered into the web browser to connect to the admin console. |
Answer the remaining questions as you see fit and at the end for the purpose of this example I set the key password to ' `key_password’.
The following example shows how this newly created keystore will be referenced to enable SSL.
<security-realm name="ManagementRealm">
  <server-identities>
    <ssl>
      <keystore path="server.keystore" relative-to="jboss.server.config.dir" keystore-password="keystore_password" alias="server" key-password="key_password" />
    </ssl>
  </server-identities>
  <authentication>
    ...
  </authentication>
</security-realm>
The contents of the <authentication /> have not been changed in this
example so authentication still occurs using either the local mechanism
or username/password authentication using Digest.
6.10.3. Add Client-Cert to SSL
To enable Client-Cert style authentication we just now need to add a
<truststore /> element to the <authentication /> element referencing
a trust store that has had the certificates or trusted clients imported.
<security-realm name="ManagementRealm">
  <server-identities>
    <ssl>
      <keystore path="server.keystore" relative-to="jboss.server.config.dir" keystore-password="keystore_password" alias="server" key-password="key_password" />
    </ssl>
  </server-identities>
  <authentication>
    <truststore path="server.truststore" relative-to="jboss.server.config.dir" keystore-password="truststore_password" />
    <local default-user="$local"/>
    <properties path="mgmt-users.properties" relative-to="jboss.server.config.dir"/>
  </authentication>
</security-realm>
In this scenario if Client-Cert authentication does not occur clients
can fall back to use either the local mechanism or username/password
authentication. To make Client-Cert based authentication mandatory just
remove the <local /> and <properties /> elements.
7. Authorizing management actions with Role Based Access Control
WildFly introduces a Role Based Access Control scheme that allows different administrative users to have different sets of permissions to read and update parts of the management tree. This replaces the simple permission scheme used in JBoss AS 7, where anyone who could successfully authenticate to the management security realm would have all permissions.
7.1. Access Control Providers
WildFly ships with two access control "providers", the "simple" provider, and the "rbac" provider. The "simple" provider is the default, and provides a permission scheme equivalent to the JBoss AS 7 behavior where any authenticated administrator has all permissions. The "rbac" provider gives the finer grained permission scheme that is the focus of this section.
The access control configuration is included in the management section of a standalone server’s standalone.xml, or in a new "management" section in a managed domain’s domain.xml. The access control policy is centrally configured in a managed domain.
<management>
    . . .
    <access-control provider="simple">
        <role-mapping>
            <role name="SuperUser">
                <include>
                    <user name="$local"/>
                </include>
            </role>
        </role-mapping>
    </access-control>
</management>
As you can see, the provider is set to "simple" by default. With the "simple" provider, the nested "role-mapping" section is not actually relevant. It’s there to help ensure that if the provider attribute is switched to "rbac" there will be at least one user mapped to a role that can continue to administer the system. This default mapping assigns the "$local" user name to the RBAC role that provides all permissions, the "SuperUser" role. The "$local" user name is the name an administrator will be assigned if he or she uses the CLI on the same system as the WildFly instance and the "local" authentication scheme is enabled.
7.2. RBAC provider overview
The access control scheme implemented by the "rbac" provider is based on seven standard roles. A role is a named set of permissions to perform one of the actions: addressing (i.e. looking up) a management resource, reading it, or modifying it. The different roles have constraints applied to their permissions that are used to determine whether the permission is granted.
7.2.1. RBAC roles
The seven standard roles are divided into two broad categories, based on whether the role can deal with items that are considered to be "security sensitive". Resources, attributes and operations that may affect administrative security (e.g. security realm resources and attributes that contain passwords) are "security sensitive".
Four roles are not given permissions for "security sensitive" items:
-
Monitor – a read-only role. Cannot modify any resource.
-
Operator – Monitor permissions, plus can modify runtime state, but cannot modify anything that ends up in the persistent configuration. Could, for example, restart a server.
-
Maintainer – Operator permissions, plus can modify the persistent configuration.
-
Deployer – like a Maintainer, but with permission to modify persistent configuration constrained to resources that are considered to be "application resources". A deployment is an application resource. The messaging server is not. Items like datasources and JMS destinations are not considered to be application resources by default, but this is configurable.
Three roles are granted permissions for security sensitive items:
-
SuperUser – has all permissions. Equivalent to a JBoss AS 7 administrator.
-
Administrator – has all permissions except cannot read or write resources related to the administrative audit logging system.
-
Auditor – can read anything. Can only modify the resources related to the administrative audit logging system.
The Auditor and Administrator roles are meant for organizations that want a separation of responsibilities between those who audit normal administrative actions and those who perform them, with those who perform most actions (Administrator role) not being able to read or alter the auditing configuration.
7.2.2. Access control constraints
The following factors are used to determine whether a given role is granted a permission:
-
What the requested action is (address, read, write)
-
Whether the resource, attribute or operation affects the persistent configuration
-
Whether the resource, attribute or operation is related to the administrative audit logging function
-
Whether the resource, attribute or operation is configured as security sensitive
-
Whether an attribute or operation parameter value has a security vault expression
-
Whether a resource is considered to be associated with applications, as opposed to being part of a general container configuration
The first three of these factors are non-configurable; the latter three allow some customization. See " Configuring constraints" for details.
7.2.3. Addressing a resource
As mentioned above, permissions are granted to perform one of three actions, addressing a resource, reading it, and modifying. The latter two actions are fairly self-explanatory. But what is meant by "addressing" a resource?
"Addressing" a resource refers to taking an action that allows the user to determine whether a resource at a given address actually exists. For example, the "read-children-names" operation lets a user determine valid addresses. Trying to read a resource and getting a "Permission denied" error also gives the user a clue that there actually is a resource at the requested address.
Some resources may include sensitive information as part of their address. For example, security realm resources include the realm name as the last element in the address. That realm name is potentially security sensitive; for example it is part of the data used when creating a hash of a user password. Because some addresses may contain security sensitive data, a user needs permission to even "address" a resource. If a user attempts to address a resource and does not have permission, they will not receive a "permission denied" type error. Rather, the system will respond as if the resource does not even exist, e.g. excluding the resource from the result of the "read-children-names" operation or responding with a "No such resource" error instead of "Permission denied" if the user is attempting to read or write the resource.
Another term for "addressing" a resource is "looking up" the resource.
7.3. Switching to the "rbac" provider
Use the CLI to switch the access-control provider.
| Before changing the provider to "rbac", be sure your configuration has a user who will be mapped to one of the RBAC roles, preferably with at least one in the Administrator or SuperUser role. Otherwise your installation will not be manageable except by shutting it down and editing the xml configuration. If you have started with one of the standard xml configurations shipped with WildFly, the "$local" user will be mapped to the "SuperUser" role and the "local" authentication scheme will be enabled. This will allow a user running the CLI on the same system as the WildFly process to have full administrative permissions. Remote CLI users and web-based admin console users will have no permissions. |
We recommend mapping at least one user besides "$local" before switching the provider to "rbac". You can do all of the configuration associated with the "rbac" provider even when the provider is set to "simple"
The management resources related to access control are located in the
core-service=management/access=authorization portion of the management
resource tree. Update the provider attribute to change between the
"simple" and "rbac" providers. Any update requires a reload or restart
to take effect.
[standalone@localhost:9990 /] cd core-service=management/access=authorization
[standalone@localhost:9990 access=authorization] :write-attribute(name=provider,value=rbac)
{
    "outcome" => "success",
    "response-headers" => {
        "operation-requires-reload" => true,
        "process-state" => "reload-required"
    }
}
[standalone@localhost:9990 access=authorization] reload
In a managed domain, the access control configuration is part of the domain wide configuration, so the resource address is the same as above, but the CLI is connected to the master Domain Controller:
[domain@localhost:9990 /] cd core-service=management/access=authorization
[domain@localhost:9990 access=authorization] :write-attribute(name=provider,value=rbac)
{
    "outcome" => "success",
    "response-headers" => {
        "operation-requires-reload" => true,
        "process-state" => "reload-required"
    },
    "result" => undefined,
    "server-groups" => {"main-server-group" => {"host" => {"master" => {
        "server-one" => {"response" => {
            "outcome" => "success",
            "response-headers" => {
                "operation-requires-reload" => true,
                "process-state" => "reload-required"
            }
        }},
        "server-two" => {"response" => {
            "outcome" => "success",
            "response-headers" => {
                "operation-requires-reload" => true,
                "process-state" => "reload-required"
            }
        }}
    }}}}
}
[domain@localhost:9990 access=authorization] reload --host=master
As with a standalone server, a reload or restart is required for the change to take effect. In this case, all hosts and servers in the domain will need to be reloaded or restarted, starting with the master Domain Controller, so be sure to plan well before making this change.
7.4. Mapping users and groups to roles
Once the "rbac" access control provider is enabled, only users who are mapped to one of the available roles will have any administrative permissions at all. So, to make RBAC useful, a mapping between individual users or groups of users and the available roles must be performed.
7.4.1. Mapping individual users
The easiest way to map individual users to roles is to use the web-based admin console.
Navigate to the "Administration" tab and the "Users" subtab. From there individual user mappings can be added, removed, or edited.
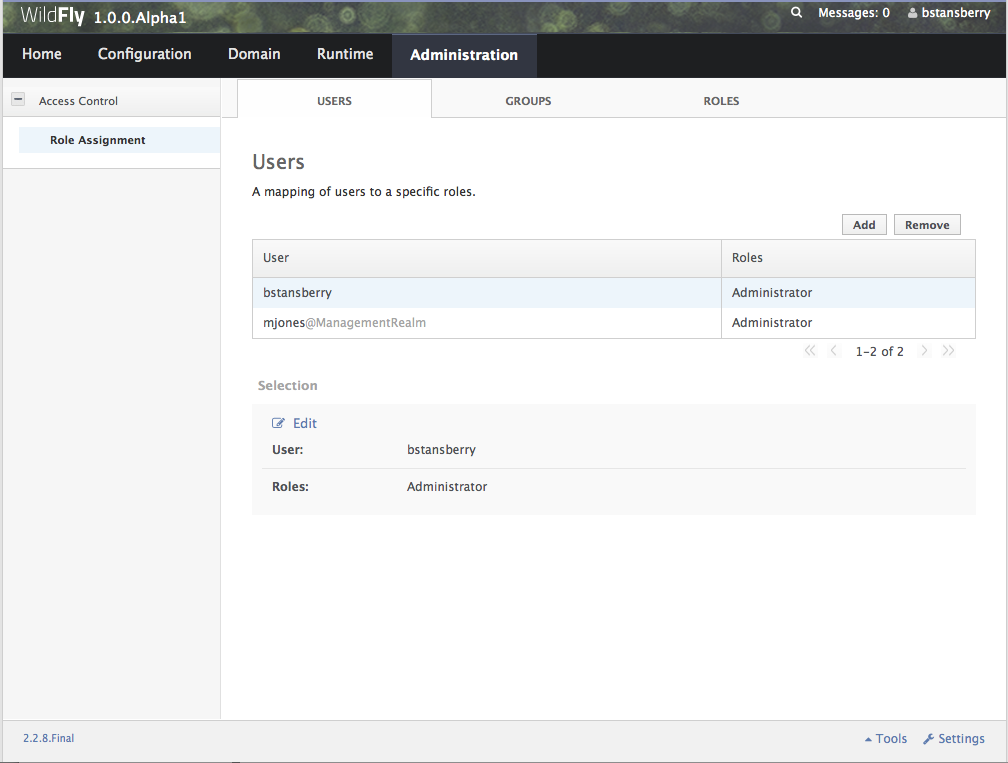
The CLI can also be used to map individuals users to roles.
First, if one does not exist, create the parent resource for all
mappings for a role. Here we create the resource for the Administrator
role.
[domain@localhost:9990 /] /core-service=management/access=authorization/role-mapping=Administrator:add
{
    "outcome" => "success",
    "result" => undefined,
    "server-groups" => {"main-server-group" => {"host" => {"master" => {
        "server-one" => {"response" => {"outcome" => "success"}},
        "server-two" => {"response" => {"outcome" => "success"}}
    }}}}
}
Once this is done, map a user to the role:
[domain@localhost:9990 /] /core-service=management/access=authorization/role-mapping=Administrator/include=user-jsmith:add(name=jsmith,type=USER)
{
    "outcome" => "success",
    "result" => undefined,
    "server-groups" => {"main-server-group" => {"host" => {"master" => {
        "server-one" => {"response" => {"outcome" => "success"}},
        "server-two" => {"response" => {"outcome" => "success"}}
    }}}}
}
Now if user jsmith authenticates to any security realm associated with
the management interface they are using, he will be mapped to the
Administrator role.
To restrict the mapping to a particular security realm, change the
realm attribute to the realm name. This might be useful if different
realms are associated with different management interfaces, and the goal
is to limit a user to a particular interface.
[domain@localhost:9990 /] /core-service=management/access=authorization/role-mapping=Administrator/include=user-mjones:add(name=mjones,type=USER,realm=ManagementRealm)
{
    "outcome" => "success",
    "result" => undefined,
    "server-groups" => {"main-server-group" => {"host" => {"master" => {
        "server-one" => {"response" => {"outcome" => "success"}},
        "server-two" => {"response" => {"outcome" => "success"}}
    }}}}
}
7.4.2. User groups
A "group" is an arbitrary collection of users that may exist in the end
user environment. They can be named whatever the end user organization
wants and can contain whatever users the end user organization wants.
Some of the authentication store types supported by WildFly security
realms include the ability to access information about what groups a
user is a member of and associate this information with the Subject
produced when the user is authenticated. This is currently supported for
the following authentication store types:
-
properties file (via the
<realm_name>-groups.propertiesfile) -
LDAP (via directory-server-specific configuration)
Groups are convenient when it comes to associating a user with a role, since entire groups can be associated with a role in a single mapping.
7.4.3. Mapping groups to roles
The easiest way to map groups to roles is to use the web-based admin console.
Navigate to the "Administration" tab and the "Groups" subtab. From there group mappings can be added, removed, or edited.
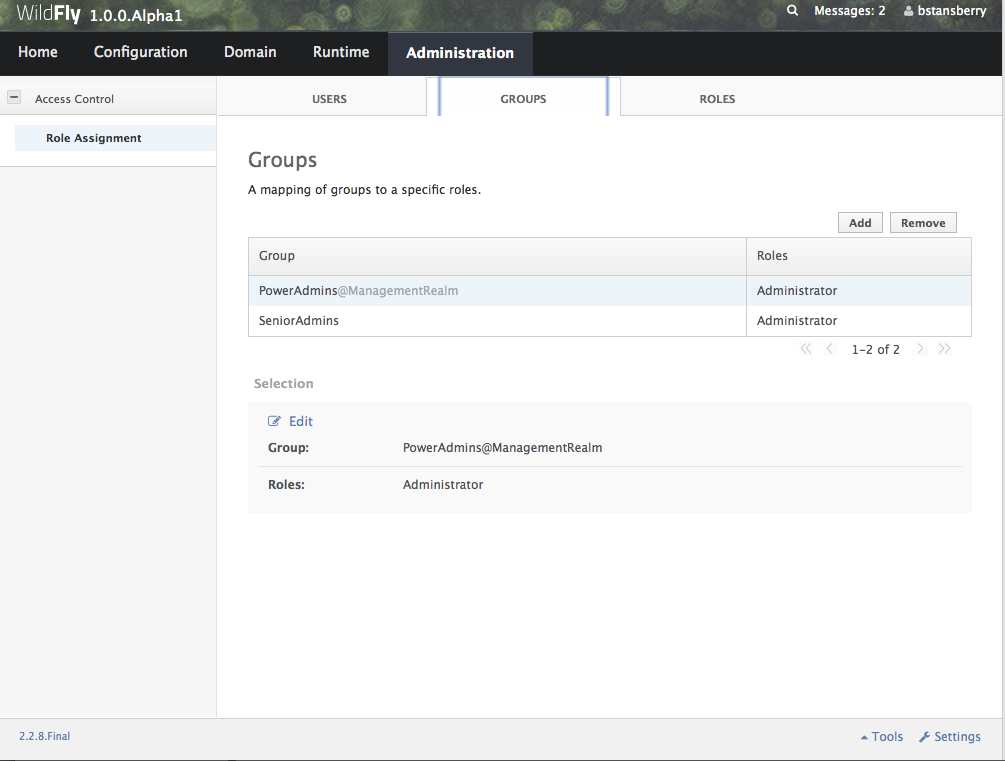
The CLI can also be used to map groups to roles. The only difference to
individual user mapping is the value of the type attribute should be
GROUP instead of USER.
[domain@localhost:9990 /] /core-service=management/access=authorization/role-mapping=Administrator/include=group-SeniorAdmins:add(name=SeniorAdmins,type=GROUP)
{
    "outcome" => "success",
    "result" => undefined,
    "server-groups" => {"main-server-group" => {"host" => {"master" => {
        "server-one" => {"response" => {"outcome" => "success"}},
        "server-two" => {"response" => {"outcome" => "success"}}
    }}}}
}
As with individual user mappings, the mapping can be restricted to users authenticating via a particular security realm:
[domain@localhost:9990 /] /core-service=management/access=authorization/role-mapping=Administrator/include=group-PowerAdmins:add(name=PowerAdmins,type=GROUP,realm=ManagementRealm)
{
    "outcome" => "success",
    "result" => undefined,
    "server-groups" => {"main-server-group" => {"host" => {"master" => {
        "server-one" => {"response" => {"outcome" => "success"}},
        "server-two" => {"response" => {"outcome" => "success"}}
    }}}}
}
7.4.4. Including all authenticated users in a role
It’s possible to specify that all authenticated users should be mapped
to a particular role. This could be used, for example, to ensure that
anyone who can authenticate can at least have Monitor privileges.
| A user who can authenticate to the management security realm but who does not map to a role will not be able to perform any administrative functions, not even reads. |
In the web based admin console, navigate to the "Administration" tab, "Roles" subtab, highlight the relevant role, click the "Edit" button and click on the "Include All" checkbox:
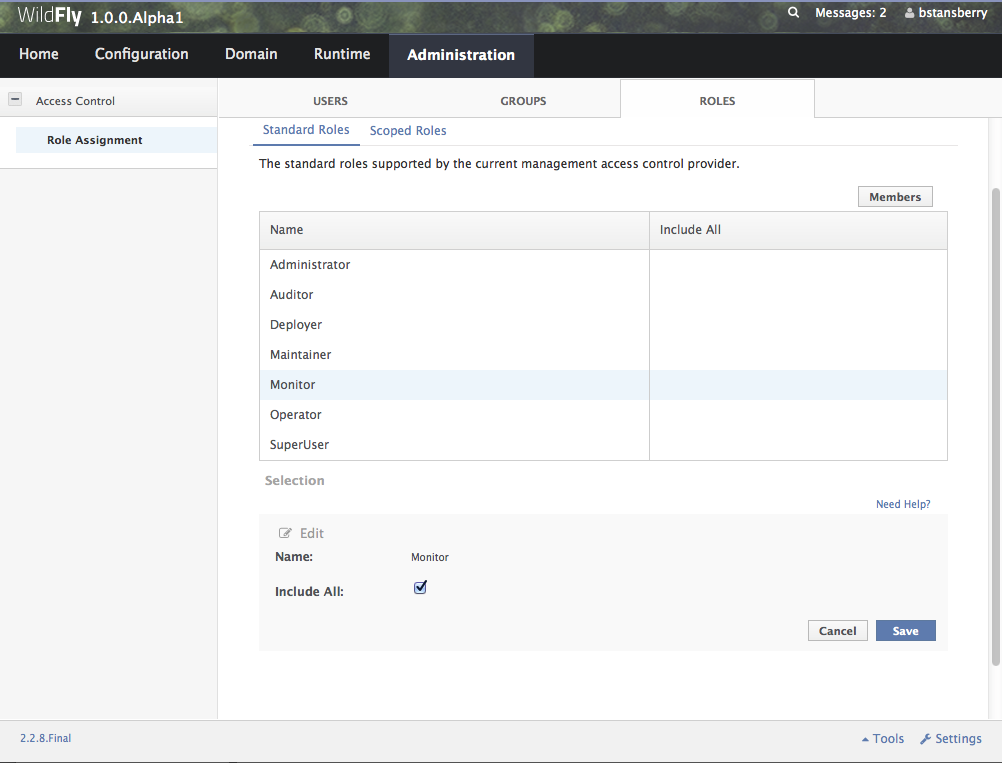
The same change can be made using the CLI:
[domain@localhost:9990 /] /core-service=management/access=authorization/role-mapping=Monitor:write-attribute(name=include-all,value=true)
{
    "outcome" => "success",
    "result" => undefined,
    "server-groups" => {"main-server-group" => {"host" => {"master" => {
        "server-one" => {"response" => {"outcome" => "success"}},
        "server-two" => {"response" => {"outcome" => "success"}}
    }}}}
}
7.4.5. Excluding users and groups
It is also possible to explicitly exclude certain users and groups from
a role. Exclusions take precedence over inclusions, including cases
where the include-all attribute is set to true for a role.
In the admin console, excludes are done in the same screens as includes. In the add dialog, simply change the "Type" pulldown to "Exclude".
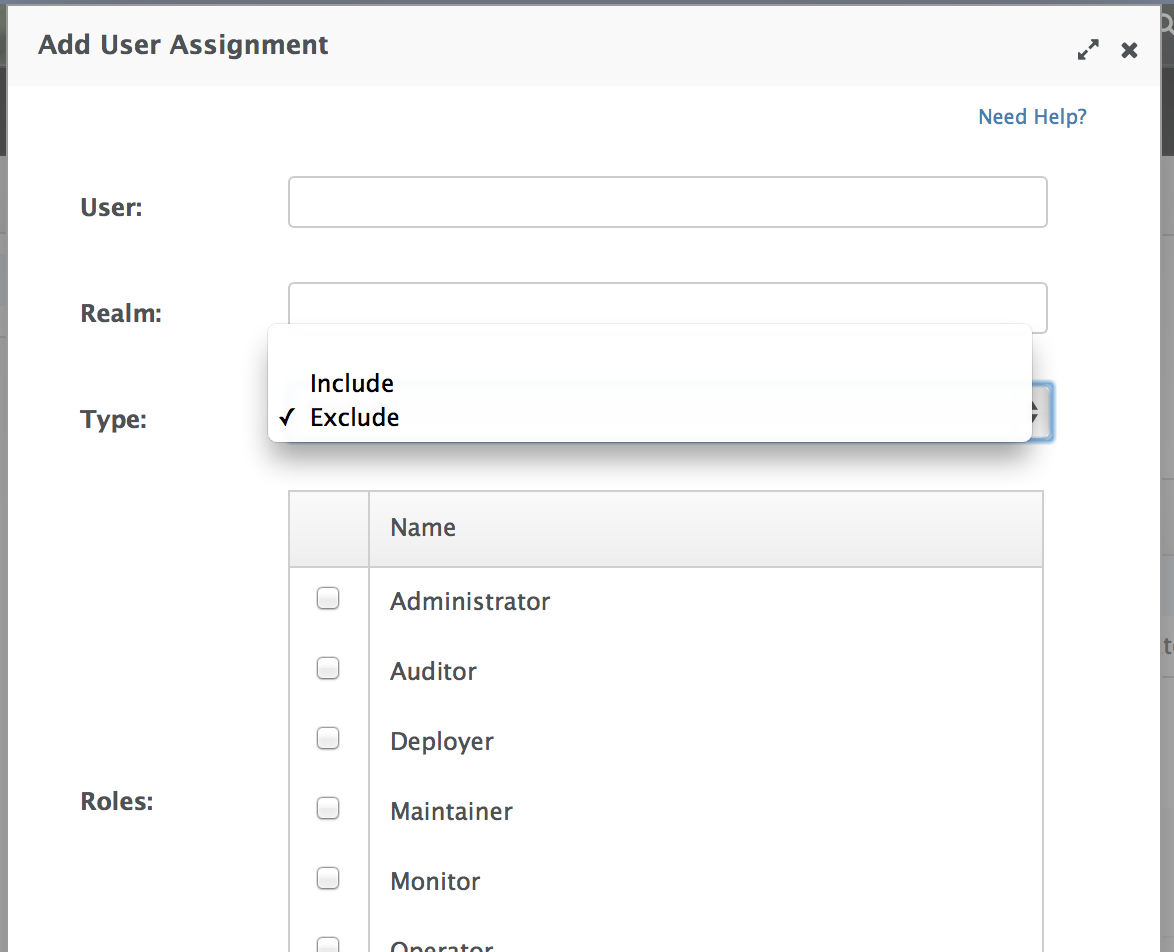
In the CLI, excludes are identical to includes, except the resource
address has exclude instead of include as the key for the last
address element:
[domain@localhost:9990 /] /core-service=management/access=authorization/role-mapping=Monitor/exclude=group-Temps:add(name=Temps,type=GROUP)
{
    "outcome" => "success",
    "result" => undefined,
    "server-groups" => {"main-server-group" => {"host" => {"master" => {
        "server-one" => {"response" => {"outcome" => "success"}},
        "server-two" => {"response" => {"outcome" => "success"}}
    }}}}
}
7.4.6. Users who map to multiple roles
It is possible that a given user will be mapped to more than one role. When this occurs, by default the user will be granted the union of the permissions of the two roles. This behavior can be changed on a global basis to instead respond to the user request with an error if this situation is detected:
[standalone@localhost:9990 /] cd core-service=management/access=authorization
[standalone@localhost:9990 access=authorization] :write-attribute(name=permission-combination-policy,value=rejecting)
{"outcome" => "success"}
Note that no reload is required; the change takes immediate effect.
To restore the default behavior, set the value to "permissive":
[standalone@localhost:9990 /] cd core-service=management/access=authorization
[standalone@localhost:9990 access=authorization] :write-attribute(name=permission-combination-policy,value=permissive)
{"outcome" => "success"}
7.5. Adding custom roles in a managed domain
A managed domain may involve a variety of servers running different configurations and hosting different applications. In such an environment, it is likely that there will be different teams of administrators responsible for different parts of the domain. To allow organizations to grant permissions to only parts of a domain, WildFly’s RBAC scheme allows for the creation of custom "scoped roles". Scoped roles are based on the seven standard roles, but with permissions limited to a portion of the domain – either to a set of server groups or to a set of hosts.
7.5.1. Server group scoped roles
The privileges for a server-group scoped role are constrained to resources associated with one or more server groups. Server groups are often associated with a particular application or set of applications; organizations that have separate teams responsible for different applications may find server-group scoped roles useful.
A server-group scoped role is equivalent to the default role upon which it is based, but with privileges constrained to target resources in the resource trees rooted in the server group resources. The server-group scoped role can be configured to include privileges for the following resources trees logically related to the server group:
-
Profile
-
Socket Binding Group
-
Deployment
-
Deployment override
-
Server group
-
Server config
-
Server
Resources in the profile, socket binding group, server config and server portions of the tree that are not logically related to a server group associated with the server-group scoped role will not be addressable by a user in that role. So, in a domain with server groups "a" and "b", a user in a server-group scoped role that grants access to "a" will not be able to address /server-group=b. The system will treat that resource as non-existent for that user.
In addition to these privileges, users in a server-group scoped role will have non-sensitive read privileges (equivalent to the Monitor role) for resources other than those listed above.
The easiest way to create a server-group scoped role is to use the admin console. But you can also use the CLI to create a server-group scoped role.
[domain@localhost:9990 /] /core-service=management/access=authorization/server-group-scoped-role=MainGroupAdmins:add(base-role=Administrator,server-groups=[main-server-group])
{
    "outcome" => "success",
    "result" => undefined,
    "server-groups" => {"main-server-group" => {"host" => {"master" => {
        "server-one" => {"response" => {"outcome" => "success"}},
        "server-two" => {"response" => {"outcome" => "success"}}
    }}}}
}
Once the role is created, users or groups can be mapped to it the same as with the seven standard roles.
7.5.2. Host scoped roles
The privileges for a host-scoped role are constrained to resources associated with one or more hosts. A user with a host-scoped role cannot modify the domain wide configuration. Organizations may use host-scoped roles to give administrators relatively broad administrative rights for a host without granting such rights across the managed domain.
A host-scoped role is equivalent to the default role upon which it is based, but with privileges constrained to target resources in the resource trees rooted in the host resources for one or more specified hosts.
In addition to these privileges, users in a host-scoped role will have non-sensitive read privileges (equivalent to the Monitor role) for domain wide resources (i.e. those not in the /host=* section of the tree.)
Resources in the /host=* portion of the tree that are unrelated to the hosts specified for the Host Scoped Role will not be visible to users in that host-scoped role. So, in a domain with hosts "a" and "b", a user in a host-scoped role that grants access to "a" will not be able to address /host=b. The system will treat that resource as non-existent for that user.
The easiest way to create a host-scoped role is to use the admin console. But you can also use the CLI to create a host scoped role.
[domain@localhost:9990 /] /core-service=management/access=authorization/host-scoped-role=MasterOperators:add(base-role=Operator,hosts=[master]}
{
    "outcome" => "success",
    "result" => undefined,
    "server-groups" => {"main-server-group" => {"host" => {"master" => {
        "server-one" => {"response" => {"outcome" => "success"}},
        "server-two" => {"response" => {"outcome" => "success"}}
    }}}}
}
Once the role is created, users or groups can be mapped to it the same as with the seven standard roles.
7.5.3. Using the admin console to create scoped roles
Both server-group and host scoped roles can be added, removed or edited via the admin console. Select "Scoped Roles" from the "Administration" tab, "Roles" subtab:
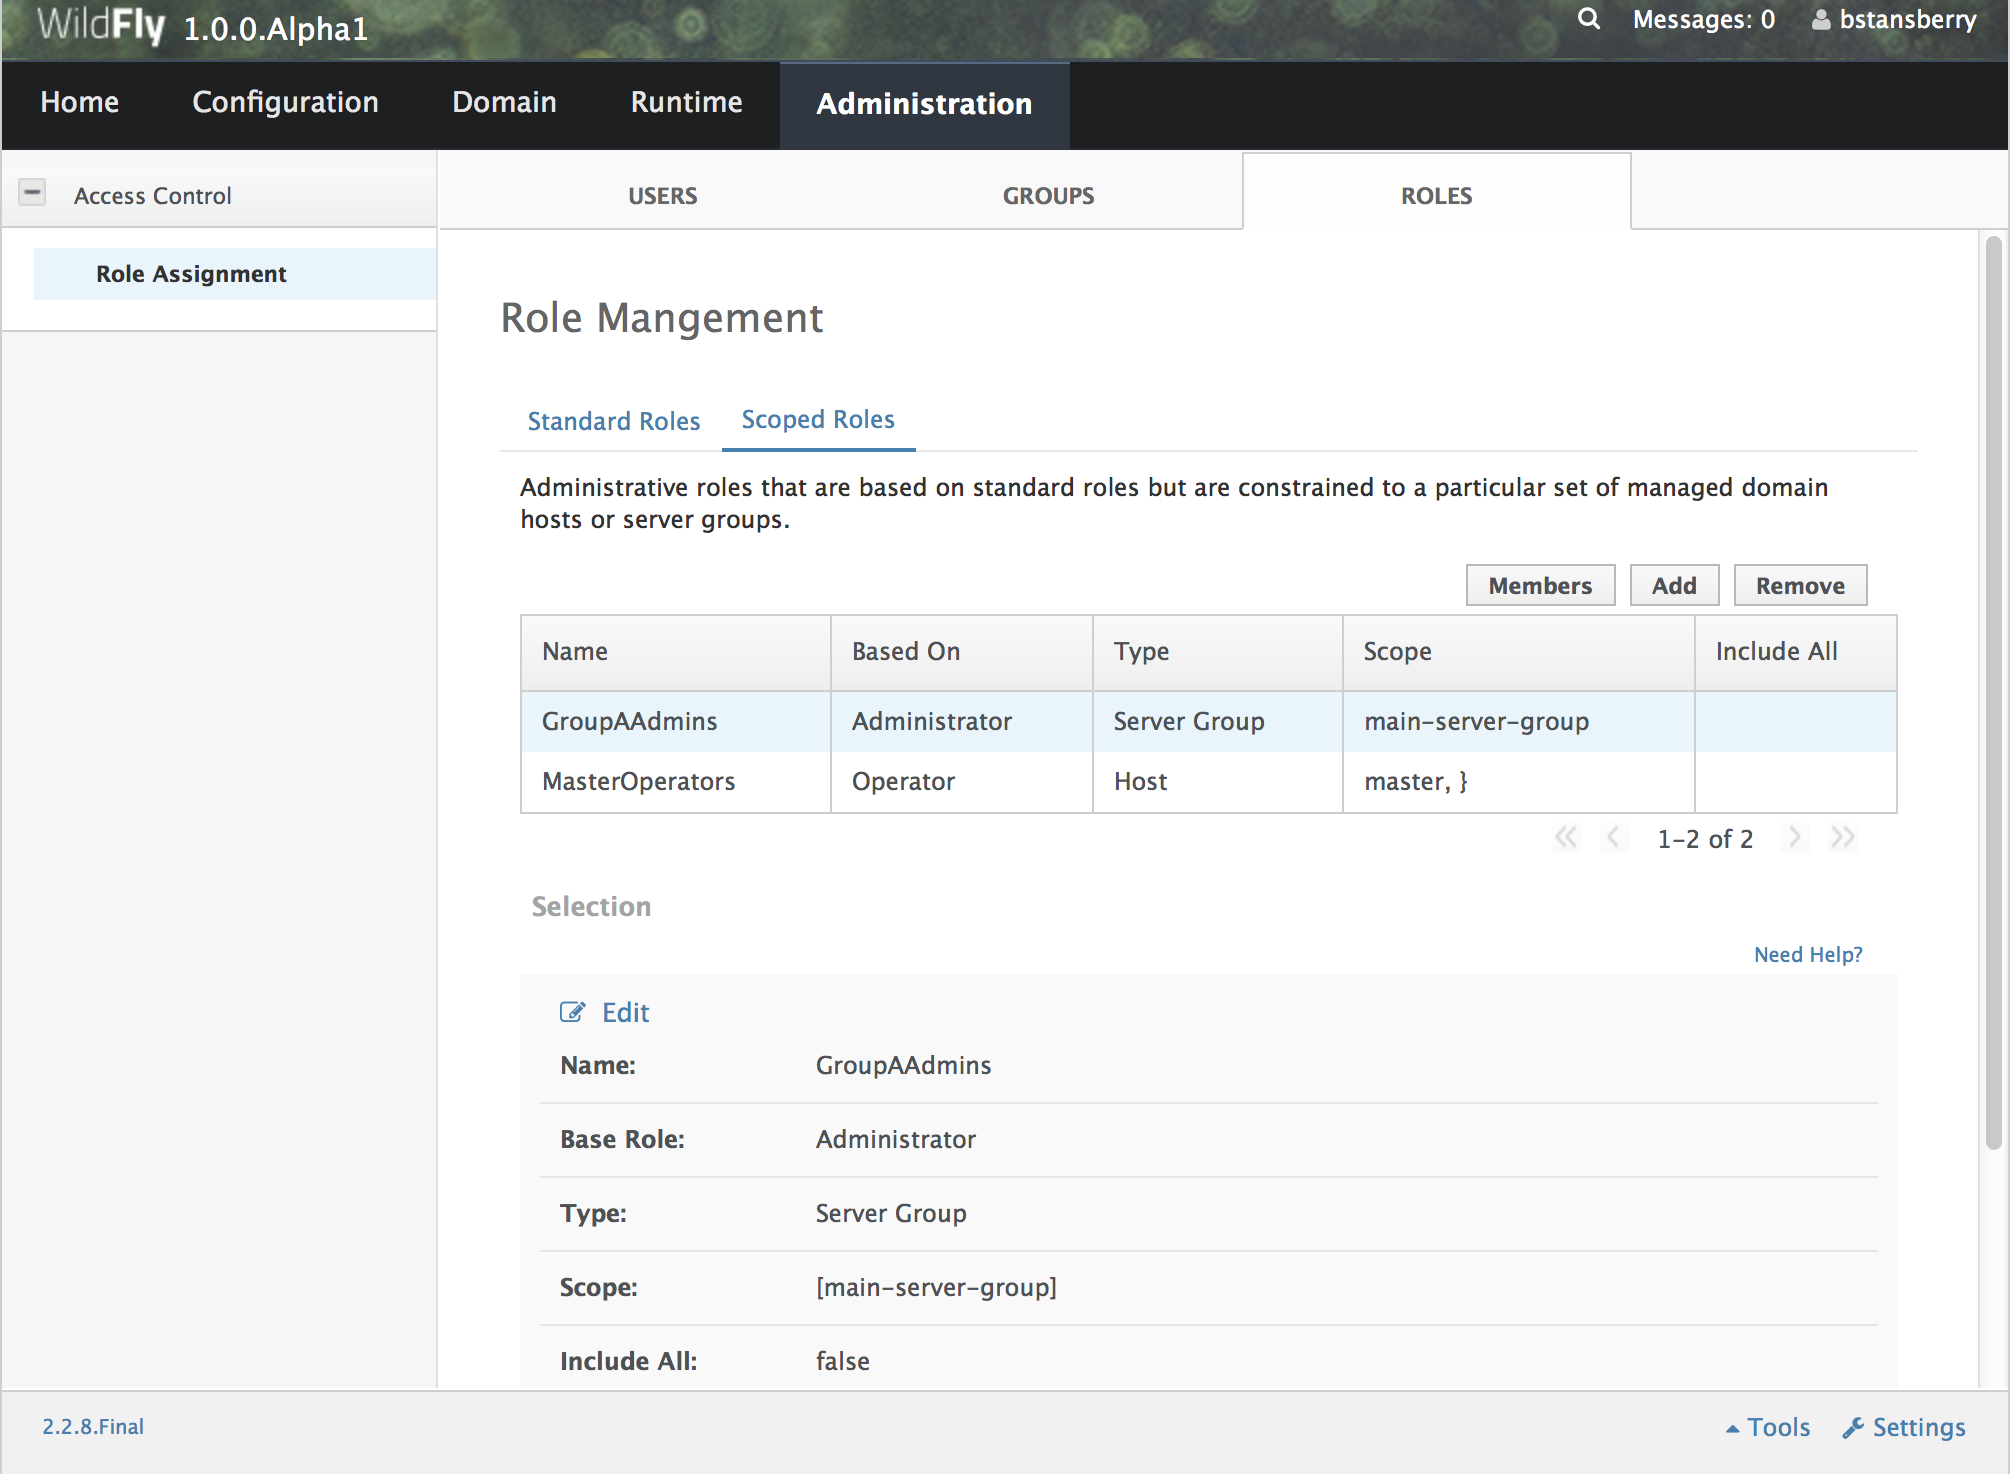
When adding a new scoped role, use the dialogue’s "Type" pull down to choose between a host scoped role and a server-group scoped role. Then place the names of the relevant hosts or server groups in the "Scope" text are.
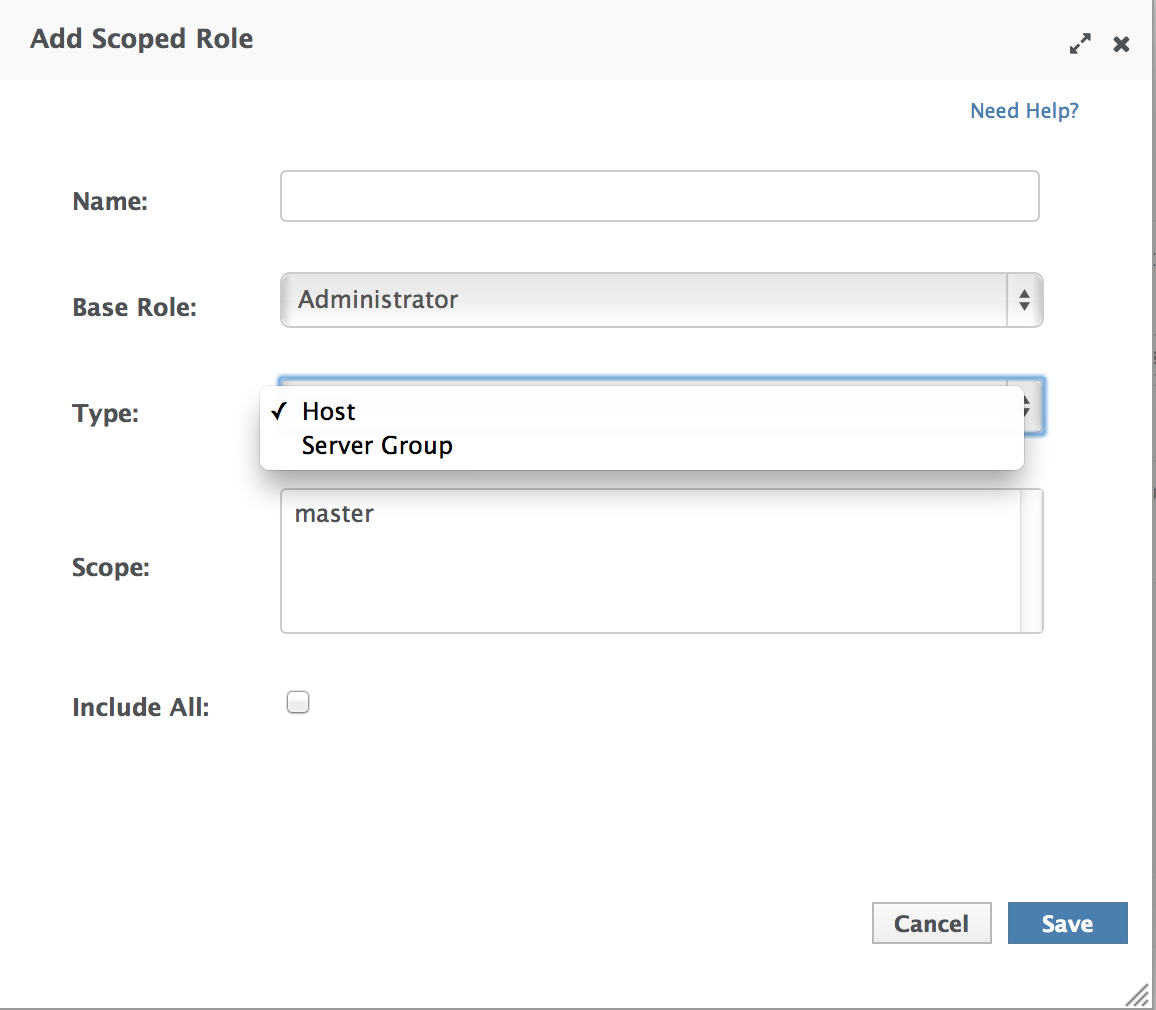
7.6. Configuring constraints
The following factors are used to determine whether a given role is granted a permission:
-
What the requested action is (address, read, write)
-
Whether the resource, attribute or operation affects the persistent configuration
-
Whether the resource, attribute or operation is related to the administrative audit logging function
-
Whether the resource, attribute or operation is configured as security sensitive
-
Whether an attribute or operation parameter value has a security vault expression
-
Whether a resource is considered to be associated with applications, as opposed to being part of a general container configuration
The first three of these factors are non-configurable; the latter three allow some customization.
7.6.1. Configuring sensitivity
"Sensitivity" constraints are about restricting access to security-sensitive data. Different organizations may have different opinions about what is security sensitive, so WildFly provides configuration options to allow users to tailor these constraints.
Sensitive resources, attributes and operations
The developers of the WildFly core and of any subsystem may annotate resources, attributes or operations with a "sensitivity classification". Classifications are either provided by the core and may be applicable anywhere in the management model, or they are scoped to a particular subsystem. For each classification, there will be a setting declaring whether by default the addressing, read and write actions are considered to be sensitive. If an action is sensitive, only users in the roles able to deal with sensitive data (Administrator, Auditor, SuperUser) will have permissions.
Using the CLI, administrators can see the settings for a classification. For example, there is a core classification called "socket-config" that is applied to elements throughout the model that relate to configuring sockets:
[domain@localhost:9990 /] cd core-service=management/access=authorization/constraint=sensitivity-classification/type=core/classification=socket-config
[domain@localhost:9990 classification=socket-config] ls -l
ATTRIBUTE                       VALUE     TYPE
configured-requires-addressable undefined BOOLEAN
configured-requires-read        undefined BOOLEAN
configured-requires-write       undefined BOOLEAN
default-requires-addressable    false     BOOLEAN
default-requires-read           false     BOOLEAN
default-requires-write          true      BOOLEAN

CHILD      MIN-OCCURS MAX-OCCURS
applies-to n/a        n/a
The various default-requires-… attributes indicate whether a user
must be in a role that allows security sensitive actions in order to
perform the action. In the socket-config example above,
default-requires-write is true, while the others are false. So, by
default modifying a setting involving socket configuration is considered
sensitive, while addressing those resources or doing reads is not
sensitive.
The default-requires-… attributes are read-only. The
configured-requires-… attributes however can be modified to override
the default settings with ones appropriate for your organization. For
example, if your organization doesn’t regard modifying socket
configuration settings to be security sensitive, you can change that
setting:
[domain@localhost:9990 classification=socket-config] :write-attribute(name=configured-requires-write,value=false)
{
    "outcome" => "success",
    "result" => undefined,
    "server-groups" => {"main-server-group" => {"host" => {"master" => {
        "server-one" => {"response" => {"outcome" => "success"}},
        "server-two" => {"response" => {"outcome" => "success"}}
    }}}}
}
Administrators can also read the management model to see to which resources, attributes and operations a particular sensitivity classification applies:
[domain@localhost:9990 classification=socket-config] :read-children-resources(child-type=applies-to)
{
    "outcome" => "success",
    "result" => {
        "/host=master" => {
            "address" => "/host=master",
            "attributes" => [],
            "entire-resource" => false,
            "operations" => ["resolve-internet-address"]
        },
        "/host=master/core-service=host-environment" => {
            "address" => "/host=master/core-service=host-environment",
            "attributes" => [
                "host-controller-port",
                "host-controller-address",
                "process-controller-port",
                "process-controller-address"
            ],
            "entire-resource" => false,
            "operations" => []
        },
        "/host=master/core-service=management/management-interface=http-interface" => {
            "address" => "/host=master/core-service=management/management-interface=http-interface",
            "attributes" => [
                "port",
                "secure-interface",
                "secure-port",
                "interface"
            ],
            "entire-resource" => false,
            "operations" => []
        },
        "/host=master/core-service=management/management-interface=native-interface" => {
            "address" => "/host=master/core-service=management/management-interface=native-interface",
            "attributes" => [
                "port",
                "interface"
            ],
            "entire-resource" => false,
            "operations" => []
        },
        "/host=master/interface=*" => {
            "address" => "/host=master/interface=*",
            "attributes" => [],
            "entire-resource" => true,
            "operations" => ["resolve-internet-address"]
        },
        "/host=master/server-config=*/interface=*" => {
            "address" => "/host=master/server-config=*/interface=*",
            "attributes" => [],
            "entire-resource" => true,
            "operations" => []
        },
        "/interface=*" => {
            "address" => "/interface=*",
            "attributes" => [],
            "entire-resource" => true,
            "operations" => []
        },
        "/profile=*/subsystem=messaging/hornetq-server=*/broadcast-group=*" => {
            "address" => "/profile=*/subsystem=messaging/hornetq-server=*/broadcast-group=*",
            "attributes" => [
                "group-address",
                "group-port",
                "local-bind-address",
                "local-bind-port"
            ],
            "entire-resource" => false,
            "operations" => []
        },
        "/profile=*/subsystem=messaging/hornetq-server=*/discovery-group=*" => {
            "address" => "/profile=*/subsystem=messaging/hornetq-server=*/discovery-group=*",
            "attributes" => [
                "group-address",
                "group-port",
                "local-bind-address"
            ],
            "entire-resource" => false,
            "operations" => []
        },
        "/profile=*/subsystem=transactions" => {
            "address" => "/profile=*/subsystem=transactions",
            "attributes" => ["process-id-socket-max-ports"],
            "entire-resource" => false,
            "operations" => []
        },
        "/server-group=*" => {
            "address" => "/server-group=*",
            "attributes" => ["socket-binding-port-offset"],
            "entire-resource" => false,
            "operations" => []
        },
        "/socket-binding-group=*" => {
            "address" => "/socket-binding-group=*",
            "attributes" => [],
            "entire-resource" => true,
            "operations" => []
        }
    }
}
There will be a separate child for each address to which the
classification applies. The entire-resource attribute will be true if
the classification applies to the entire resource. Otherwise, the
attributes and operations attributes will include the names of
attributes or operations to which the classification applies.
Classifications with broad use
Several of the core sensitivity classifications are commonly used across the management model and deserve special mention.
| Name | Description |
|---|---|
credential |
An attribute whose value is some sort of credential, e.g. a password or a username. By default sensitive for both reads and writes |
security-domain-ref |
An attribute whose value is the name of a security domain. By default sensitive for both reads and writes |
security-realm-ref |
An attribute whose value is the name of a security realm. By default sensitive for both reads and writes |
socket-binding-ref |
An attribute whose value is the name of a socket binding. By default not sensitive for any action |
socket-config |
A resource, attribute or operation that somehow relates to configuring a socket. By default sensitive for writes |
Values with security vault expressions
By default any attribute or operation parameter whose value includes a security vault expression will be treated as sensitive, even if no sensitivity classification applies or the classification does not treat the action as sensitive.
This setting can be globally changed via the CLI. There is a resource for this configuration:
[domain@localhost:9990 /] cd core-service=management/access=authorization/constraint=vault-expression
[domain@localhost:9990 constraint=vault-expression] ls -l
ATTRIBUTE                 VALUE     TYPE
configured-requires-read  undefined BOOLEAN
configured-requires-write undefined BOOLEAN
default-requires-read     true      BOOLEAN
default-requires-write    true      BOOLEAN
The various default-requires-… attributes indicate whether a user
must be in a role that allows security sensitive actions in order to
perform the action. So, by default both reading and writing attributes
whose values include vault expressions requires a user to be in one of
the roles with sensitive data permissions.
The default-requires-… attributes are read-only. The
configured-requires-… attributes however can be modified to override
the default settings with settings appropriate for your organization.
For example, if your organization doesn’t regard reading vault
expressions to be security sensitive, you can change that setting:
[domain@localhost:9990 constraint=vault-expression] :write-attribute(name=configured-requires-read,value=false)
{
    "outcome" => "success",
    "result" => undefined,
    "server-groups" => {"main-server-group" => {"host" => {"master" => {
        "server-one" => {"response" => {"outcome" => "success"}},
        "server-two" => {"response" => {"outcome" => "success"}}
    }}}}
}| This vault-expression constraint overlaps somewhat with the core "credential" sensitivity classification in that the most typical uses of a vault expression are in attributes that contain a user name or password, and those will typically be annotated with the "credential" sensitivity classification. So, if you change the settings for the "credential" sensitivity classification you may also need to make a corresponding change to the vault-expression constraint settings, or your change will not have full effect. |
Be aware though, that vault expressions can be used in any attribute that supports expressions, not just in credential-type attributes. So it is important to be familiar with where and how your organization uses vault expressions before changing these settings.
7.6.2. Configuring "Deployer" role access
The standard Deployer role has its write permissions limited to resources that are considered to be "application resources"; i.e. conceptually part of an application and not part of the general server configuration. By default, only deployment resources are considered to be application resources. However, different organizations may have different opinions on what qualifies as an application resource, so for resource types that subsystems authors consider potentially to be application resources, WildFly provides a configuration option to declare them as such. Such resources will be annotated with an "application classification".
For example, the mail subsystem provides such a classification:
[domain@localhost:9990 /] cd /core-service=management/access=authorization/constraint=application-classification/type=mail/classification=mail-session
[domain@localhost:9990 classification=mail-session] ls -l
ATTRIBUTE              VALUE     TYPE
configured-application undefined BOOLEAN
default-application    false     BOOLEAN

CHILD      MIN-OCCURS MAX-OCCURS
applies-to n/a        n/a
Use read-resource or read-children-resources to see what resources
have this classification applied:
[domain@localhost:9990 classification=mail-session] :read-children-resources(child-type=applies-to)
{
    "outcome" => "success",
    "result" => {"/profile=*/subsystem=mail/mail-session=*" => {
        "address" => "/profile=*/subsystem=mail/mail-session=*",
        "attributes" => [],
        "entire-resource" => true,
        "operations" => []
    }}
}
This indicates that this classification, intuitively enough, only applies to mail subsystem mail-session resources.
To make resources with this classification writeable by users in the
Deployer role, set the configured-application attribute to true.
[domain@localhost:9990 classification=mail-session] :write-attribute(name=configured-application,value=true)
{
    "outcome" => "success",
    "result" => undefined,
    "server-groups" => {"main-server-group" => {"host" => {"master" => {
        "server-one" => {"response" => {"outcome" => "success"}},
        "server-two" => {"response" => {"outcome" => "success"}}
    }}}}
}
Application classifications shipped with WildFly
The subsystems shipped with the full WildFly distribution include the following application classifications:
| Subsystem | Classification |
|---|---|
datasources |
data-source |
datasources |
jdbc-driver |
datasources |
xa-data-source |
logging |
logger |
logging |
logging-profile |
mail-session |
|
messaging |
jms-queue |
messaging |
jms-topic |
messaging |
queue |
messaging |
security-setting |
naming |
binding |
resource-adapters |
resource-adapter |
security |
security-domain |
In each case the classification applies to the resources you would expect, given its name.
7.7. RBAC effect on administrator user experience
The RBAC scheme will result in reduced permissions for administrators who do not map to the SuperUser role, so this will of course have some impact on their experience when using administrative tools like the admin console and the CLI.
7.7.1. Admin console
The admin console takes great pains to provide a good user experience even when the user has reduced permissions. Resources the user is not permitted to see will simply not be shown, or if appropriate will be replaced in the UI with an indication that the user is not authorized. Interaction units like "Add" and "Remove" buttons and "Edit" links will be suppressed if the user has no write permissions.
7.7.2. CLI
The CLI is a much more unconstrained tool than the admin console is, allowing users to try to execute whatever operations they wish, so it’s more likely that users who attempt to do things for which they lack necessary permissions will receive failure messages. For example, a user in the Monitor role cannot read passwords:
[domain@localhost:9990 /] /profile=default/subsystem=datasources/data-source=ExampleDS:read-attribute(name=password)
{
    "outcome" => "failed",
    "result" => undefined,
    "failure-description" => "WFLYCTL0313: Unauthorized to execute operation 'read-attribute' for resource '[
    (\"profile\" => \"default\"),
    (\"subsystem\" => \"datasources\"),
    (\"data-source\" => \"ExampleDS\")
]' -- \"WFLYCTL0332: Permission denied\"",
    "rolled-back" => true
}
If the user isn’t even allowed to address the resource then the response would be as if the resource doesn’t exist, even though it actually does:
[domain@localhost:9990 /] /profile=default/subsystem=security/security-domain=other:read-resource
{
    "outcome" => "failed",
    "failure-description" => "WFLYCTL0216: Management resource '[
    (\"profile\" => \"default\"),
    (\"subsystem\" => \"security\"),
    (\"security-domain\" => \"other\")
]' not found",
    "rolled-back" => true
}
This prevents unauthorized users fishing for sensitive data in resource addresses by checking for "Permission denied" type failures.
Users who use the read-resource operation may ask for data, some of
which they are allowed to see and some of which they are not. If this
happens, the request will not fail, but inaccessible data will be elided
and a response header will be included advising on what was not
included. Here we show the effect of a Monitor trying to recursively
read the security subsystem configuration:
[domain@localhost:9990 /] /profile=default/subsystem=security:read-resource(recursive=true)
{
    "outcome" => "success",
    "result" => {
        "deep-copy-subject-mode" => undefined,
        "security-domain" => undefined,
        "vault" => undefined
    },
    "response-headers" => {"access-control" => [{
        "absolute-address" => [
            ("profile" => "default"),
            ("subsystem" => "security")
        ],
        "relative-address" => [],
        "filtered-attributes" => ["deep-copy-subject-mode"],
        "filtered-children-types" => ["security-domain"]
    }]}
}
The response-headers section includes access control data in a list
with one element per relevant resource. (In this case there’s just one.)
The absolute and relative address of the resource is shown, along with
the fact that the value of the deep-copy-subject-mode attribute has
been filtered (i.e. undefined is shown as the value, which may not be
the real value) as well as the fact that child resources of type
security-domain have been filtered.
7.7.3. Description of access control constraints in the management model
metadata
The management model descriptive metadata returned from operations like
read-resource-description and read-operation-description can be
configured to include information describing the access control
constraints relevant to the resource, This is done by using the
access-control parameter. The output will be tailored to the caller’s
permissions. For example, a user who maps to the Monitor role could ask
for information about a resource in the mail subsystem:
[domain@localhost:9990 /] cd /profile=default/subsystem=mail/mail-session=default/server=smtp
[domain@localhost:9990 server=smtp] :read-resource-description(access-control=trim-descriptions)
{
    "outcome" => "success",
    "result" => {
        "description" => undefined,
        "access-constraints" => {"application" => {"mail-session" => {"type" => "mail"}}},
        "attributes" => undefined,
        "operations" => undefined,
        "children" => {},
        "access-control" => {
            "default" => {
                "read" => true,
                "write" => false,
                "attributes" => {
                    "outbound-socket-binding-ref" => {
                        "read" => true,
                        "write" => false
                    },
                    "username" => {
                        "read" => false,
                        "write" => false
                    },
                    "tls" => {
                        "read" => true,
                        "write" => false
                    },
                    "ssl" => {
                        "read" => true,
                        "write" => false
                    },
                    "password" => {
                        "read" => false,
                        "write" => false
                    }
                }
            },
            "exceptions" => {}
        }
    }
}
Because trim-descriptions was used as the value for the
access-control parameter, the typical "description", "attributes",
"operations" and "children" data is largely suppressed. (For more on
this, see below.) The
access-constraints field indicates that this resource is annotated
with an application constraint. The access-control field includes information about the
permissions the current caller has for this resource. The default
section shows the default settings for resources of this type. The
read and write fields directly under default show that the caller
can, in general, read this resource but cannot write it. The
attributes section shows the individual attribute settings. Note that
Monitor cannot read the username and password attributes.
There are three valid values for the access-control parameter to
read-resource-description and read-operation-description:
-
none – do not include access control information in the response. This is the default behavior if no parameter is included.
-
trim-descriptions – remove the normal description details, as shown in the example above
-
combined-descriptions – include both the normal output and the access control data
7.8. Learning about your own role mappings
Users can learn in which roles they are operating. In the admin console, click on your name in the top right corner; the roles you are in will be shown.
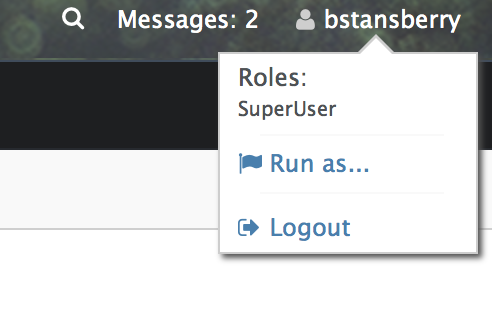
CLI users should use the whoami operation with the verbose attribute
set:
[domain@localhost:9990 /] :whoami(verbose=true)
{
    "outcome" => "success",
    "result" => {
        "identity" => {
            "username" => "aadams",
            "realm" => "ManagementRealm"
        },
        "mapped-roles" => [
            "Maintainer"
        ]
    }
}
7.9. "Run-as" capability for SuperUsers
If a user maps to the SuperUser role, WildFly also supports letting that user request that they instead map to one or more other roles. This can be useful when doing demos, or when the SuperUser is changing the RBAC configuration and wants to see what effect the changes have from the perspective of a user in another role. This capability is only available to the SuperUser role, so it can only be used to narrow a user’s permissions, not to potentially increase them.
7.9.1. CLI run-as
With the CLI, run-as capability is on a per-request basis. It is done by using the "roles" operation header, the value of which can be the name of a single role or a bracket-enclosed, comma-delimited list of role names.
Example with a low level operation:
[standalone@localhost:9990 /] :whoami(verbose=true){roles=[Operator,Auditor]}
{
    "outcome" => "success",
    "result" => {
        "identity" => {
            "username" => "$local",
            "realm" => "ManagementRealm"
        },
        "mapped-roles" => [
            "Auditor",
            "Operator"
        ]
    }
}
Example with a CLI command:
[standalone@localhost:9990 /] deploy /tmp/helloworld.war --headers={roles=Monitor}
{"WFLYCTL0062: Composite operation failed and was rolled back. Steps that failed:" => {"Operation step-1" => "WFLYCTL0313: Unauthorized to execute operation 'add' for resource '[(\"deployment\" => \"helloworld.war\")]' -- \"WFLYCTL0332: Permission denied\""}}
[standalone@localhost:9990 /] deploy /tmp/helloworld.war --headers={roles=Maintainer}
Here we show the effect of switching to a role that isn’t granted the necessary permission.
7.9.2. Admin console run-as
Admin console users can change the role in which they operate by clicking on their name in the top right corner and clicking on the "Run as…" link.
Then select the role in which you wish to operate:
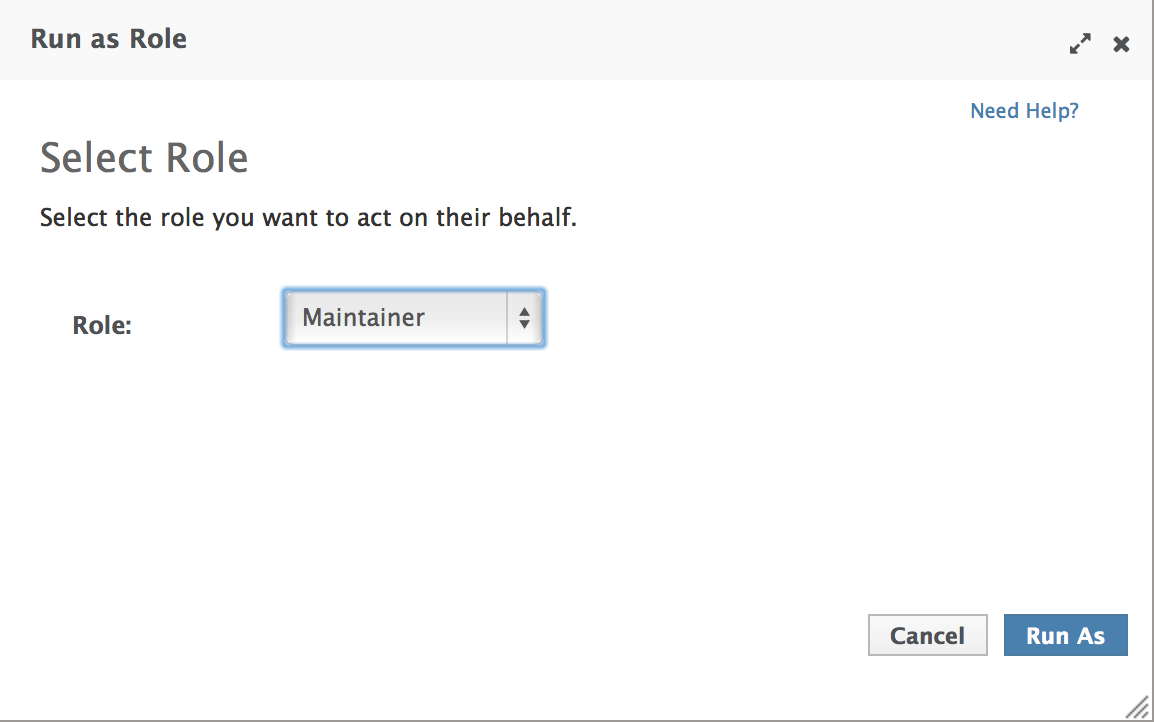
The console will need to be restarted in order for the change to take effect.
7.9.3. Using run-as roles with the "simple" access control provider
This "run-as" capability is available even if the "simple" access
control provider is used. When the "simple" provider is used, any
authenticated administrator is treated the same as if they would map to
SuperUser when the "rbac" provider is used.
However, the "simple" provider actually understands all of the "rbac"
provider configuration settings described above, but only makes use of
them if the "run-as" capability is used for a request. Otherwise, the
SuperUser role has all permissions, so detailed configuration is
irrelevant.
Using the run-as capability with the "simple" provider may be useful if an administrator is setting up an rbac provider configuration before switching the provider to rbac to make that configuration take effect. The administrator can then run-as different roles to see the effect of the planned settings.
8. Application deployment
8.1. Managed Domain
In a managed domain, deployments are associated with a server-group
(see Core management concepts).
Any server within the server group will then be provided with that
deployment.
The domain and host controller components manage the distribution of binaries across network boundaries.
8.1.1. Deployment Commands
Distributing deployment binaries involves two steps: uploading the deployment to the repository the domain controller will use to distribute its contents, and then assigning the deployment to one or more server groups.
You can do this in one sweep with the CLI:
[domain@localhost:9990 /] deploy ~/Desktop/test-application.war
Either --all-server-groups or --server-groups must be specified.

[domain@localhost:9990 /] deploy ~/Desktop/test-application.war --all-server-groups
'test-application.war' deployed successfully.
The deployment will be available to the domain controller, assigned to a server group, and deployed on all running servers in that group:
[domain@localhost:9990 /] :read-children-names(child-type=deployment)
{
   "outcome" => "success",
   "result" => [
       "mysql-connector-java-5.1.15.jar",
       "test-application.war"
   ]
}

[domain@localhost:9990 /] /server-group=main-server-group/deployment=test-application.war:read-resource(include-runtime)
{
   "outcome" => "success",
   "result" => {
       "enabled" => true,
       "name" => "test-application.war",
       "managed" => true,
       "runtime-name" => "test-application.war"
   }
}
If you only want the deployment deployed on servers in some server
groups, but not all, use the --server-groups parameter instead of
-all-server-groups:
[domain@localhost:9990 /] deploy ~/Desktop/test-application.war --server-groups=main-server-group,another-group
'test-application.war' deployed successfully.
If you have a new version of the deployment that you want to deploy
replacing an existing one, use the --force parameter:
[domain@localhost:9990 /] deploy ~/Desktop/test-application.war --all-server-groups --force
'test-application.war' deployed successfully.
You can remove binaries from server groups with the undeploy command:
[domain@localhost:9990 /] undeploy test-application.war --all-relevant-server-groups
Successfully undeployed test-application.war.

[domain@localhost:9990 /] /server-group=main-server-group:read-children-names(child-type=deployment)
{
   "outcome" => "success",
   "result" => []
}
If you only want to undeploy from some server groups but not others, use
the - server-groups parameter instead of
-all-relevant-server-groups.
The CLI deploy command supports a number of other parameters that can
control behavior. Use the --help parameter to learn more:
[domain@localhost:9990 /] deploy --help
[...]| Managing deployments through the web interface provides an alternate, sometimes simpler approach. |
8.1.2. Exploded managed deployments
Managed and unmanaged deployments can be 'exploded', i.e. on the filesystem in the form of a directory structure whose structure corresponds to an unzipped version of the archive. An exploded deployment can be convenient to administer if your administrative processes involve inserting or replacing files from a base version in order to create a version tailored for a particular use (for example, copy in a base deployment and then copy in a jboss-web.xml file to tailor a deployment for use in WildFly.) Exploded deployments are also nice in some development scenarios, as you can replace static content (e.g. .html, .css) files in the deployment and have the new content visible immediately without requiring a redeploy.
Since unmanaged deployment content is directly in your charge, the following operations only make sense for a managed deployment.
[domain@localhost:9990 /] /deployment=exploded.war:add(content=[{empty=true}])
This will create an empty exploded deployment to which you’ll be able to add content. The empty content parameter is required to check that you really intend to create an empty deployment and not just forget to define the content.
[domain@localhost:9990 /] /deployment=kitchensink.ear:explode()
This will 'explode' an existing archive deployment to its exploded format. This operation is not recursive so you need to explode the sub-deployment if you want to be able to manipulate the sub-deployment content. You can do this by specifying the sub-deployment archive path as a parameter to the explode operation.
[domain@localhost:9990 /] /deployment=kitchensink.ear:explode(path=wildfly-kitchensink-ear-web.war)
Now you can add or remove content to your exploded deployment. Note that per-default this will overwrite existing contents, you can specify the overwrite parameter to make the operation fail if the content already exists.
[domain@localhost:9990 /] /deployment=exploded.war:add-content(content=[{target-path=WEB-INF/classes/org/jboss/as/test/deployment/trivial/ServiceActivatorDeployment.class, input-stream-index=/home/demo/org/jboss/as/test/deployment/trivial/ServiceActivatorDeployment.class}, {target-path=META-INF/MANIFEST.MF, input-stream-index=/home/demo/META-INF/MANIFEST.MF}, {target-path=META-INF/services/org.jboss.msc.service.ServiceActivator, input-stream-index=/home/demo/META-INF/services/org.jboss.msc.service.ServiceActivator}])
Each content specifies a source content and the target path to which it will be copied relative to the deployment root. With WildFly 11 you can use input-stream-index (which was a convenient way to pass a stream of content) from the CLI by pointing it to a local file.
[domain@localhost:9990 /] /deployment=exploded.war:remove-content(paths=[WEB-INF/classes/org/jboss/as/test/deployment/trivial/ServiceActivatorDeployment.class, META-INF/MANIFEST.MF, META-INF/services/org.jboss.msc.service.ServiceActivator])
Now you can list the content of an exploded deployment, or just some part of it.
[domain@localhost:9990 /] /deployment=kitchensink.ear:browse-content(archive=false, path=wildfly-kitchensink-ear-web.war)
{
    "outcome" => "success",
    "result" => [
        {
            "path" => "META-INF/",
            "directory" => true
        },
        {
            "path" => "META-INF/MANIFEST.MF",
            "directory" => false,
            "file-size" => 128L
        },
        {
            "path" => "WEB-INF/",
            "directory" => true
        },
        {
            "path" => "WEB-INF/templates/",
            "directory" => true
        },
        {
            "path" => "WEB-INF/classes/",
            "directory" => true
        },
        {
            "path" => "WEB-INF/classes/org/",
            "directory" => true
        },
        {
            "path" => "WEB-INF/classes/org/jboss/",
            "directory" => true
        },
        {
            "path" => "WEB-INF/classes/org/jboss/as/",
            "directory" => true
        },
        {
            "path" => "WEB-INF/classes/org/jboss/as/quickstarts/",
            "directory" => true
        },
        {
            "path" => "WEB-INF/classes/org/jboss/as/quickstarts/kitchensink_ear/",
            "directory" => true
        },
        {
            "path" => "WEB-INF/classes/org/jboss/as/quickstarts/kitchensink_ear/controller/",
            "directory" => true
        },
        {
            "path" => "WEB-INF/classes/org/jboss/as/quickstarts/kitchensink_ear/rest/",
            "directory" => true
        },
        {
            "path" => "WEB-INF/classes/org/jboss/as/quickstarts/kitchensink_ear/util/",
            "directory" => true
        },
        {
            "path" => "resources/",
            "directory" => true
        },
        {
            "path" => "resources/css/",
            "directory" => true
        },
        {
            "path" => "resources/gfx/",
            "directory" => true
        },
        {
            "path" => "WEB-INF/templates/default.xhtml",
            "directory" => false,
            "file-size" => 2113L
        },
        {
            "path" => "WEB-INF/faces-config.xml",
            "directory" => false,
            "file-size" => 1365L
        },
        {
            "path" => "WEB-INF/classes/org/jboss/as/quickstarts/kitchensink_ear/controller/MemberController.class",
            "directory" => false,
            "file-size" => 2750L
        },
        {
            "path" => "WEB-INF/classes/org/jboss/as/quickstarts/kitchensink_ear/rest/MemberResourceRESTService.class",
            "directory" => false,
            "file-size" => 6363L
        },
        {
            "path" => "WEB-INF/classes/org/jboss/as/quickstarts/kitchensink_ear/rest/JaxRsActivator.class",
            "directory" => false,
            "file-size" => 464L
        },
        {
            "path" => "WEB-INF/classes/org/jboss/as/quickstarts/kitchensink_ear/util/WebResources.class",
            "directory" => false,
            "file-size" => 667L
        },
        {
            "path" => "WEB-INF/beans.xml",
            "directory" => false,
            "file-size" => 1262L
        },
        {
            "path" => "index.xhtml",
            "directory" => false,
            "file-size" => 3603L
        },
        {
            "path" => "index.html",
            "directory" => false,
            "file-size" => 949L
        },
        {
            "path" => "resources/css/screen.css",
            "directory" => false,
            "file-size" => 4025L
        },
        {
            "path" => "resources/gfx/headerbkg.png",
            "directory" => false,
            "file-size" => 1147L
        },
        {
            "path" => "resources/gfx/asidebkg.png",
            "directory" => false,
            "file-size" => 1374L
        },
        {
            "path" => "resources/gfx/banner.png",
            "directory" => false,
            "file-size" => 41473L
        },
        {
            "path" => "resources/gfx/bkg-blkheader.png",
            "directory" => false,
            "file-size" => 116L
        },
        {
            "path" => "resources/gfx/rhjb_eap_logo.png",
            "directory" => false,
            "file-size" => 2637L
        },
        {
            "path" => "META-INF/maven/",
            "directory" => true
        },
        {
            "path" => "META-INF/maven/org.wildfly.quickstarts/",
            "directory" => true
        },
        {
            "path" => "META-INF/maven/org.wildfly.quickstarts/wildfly-kitchensink-ear-web/",
            "directory" => true
        },
        {
            "path" => "META-INF/maven/org.wildfly.quickstarts/wildfly-kitchensink-ear-web/pom.xml",
            "directory" => false,
            "file-size" => 4128L
        },
        {
            "path" => "META-INF/maven/org.wildfly.quickstarts/wildfly-kitchensink-ear-web/pom.properties",
            "directory" => false,
            "file-size" => 146L
        }
    ]
}
You also have a read-content operation but since it returns a binary stream, this is not displayable from the CLI.
[domain@localhost:9990 /] /deployment=kitchensink.ear:read-content(path=META-INF/MANIFEST.MF)
{
    "outcome" => "success",
    "result" => {"uuid" => "b373d587-72ee-4b1e-a02a-71fbb0c85d32"},
    "response-headers" => {"attached-streams" => [{
        "uuid" => "b373d587-72ee-4b1e-a02a-71fbb0c85d32",
        "mime-type" => "text/plain"
    }]}
}
The management CLI however provides high level commands to display or save binary stream attachments:
[domain@localhost:9990 /] attachment display --operation=/deployment=kitchensink.ear:read-content(path=META-INF/MANIFEST.MF)
ATTACHMENT d052340a-abb7-4a66-aa24-4eeeb6b256be:
Manifest-Version: 1.0
Archiver-Version: Plexus Archiver
Built-By: mjurc
Created-By: Apache Maven 3.3.9
Build-Jdk: 1.8.0_91
[domain@localhost:9990 /] attachment save --operation=/deployment=kitchensink.ear:read-content(path=META-INF/MANIFEST.MF) --file=example File saved to /home/mjurc/wildfly/build/target/wildfly-11.0.0.Alpha1-SNAPSHOT/example
8.1.3. XML Configuration File
When you deploy content, the domain controller adds two types of entries
to the domain.xml configuration file, one showing global information
about the deployment, and another for each relevant server group showing
how it is used by that server group:
[...]
<deployments>
   <deployment name="test-application.war"
               runtime-name="test-application.war">
       <content sha1="dda9881fa7811b22f1424b4c5acccb13c71202bd"/>
   </deployment>
</deployments>
[...]
<server-groups>
   <server-group name="main-server-group" profile="default">
       [...]
       <deployments>
           <deployment name="test-application.war" runtime-name="test-application.war"/>
       </deployments>
   </server-group>
</server-groups>
[...]
~(See domain/configuration/domain.xml)~
8.2. Standalone Server
Deployments on a standalone server work in a similar way to those on managed domains. The main difference is that there are no server group associations.
8.2.1. Deployment Commands
The same CLI commands used for managed domains work for standalone servers when deploying and removing an application:
[standalone@localhost:9990 /] deploy ~/Desktop/test-application.war
'test-application.war' deployed successfully.

[standalone@localhost:9990 /] undeploy test-application.war
Successfully undeployed test-application.war.
8.2.2. Deploying Using the Deployment Scanner
Deployment content (for example, war, ear, jar, and sar files) can be
placed in the standalone/deployments directory of the WildFly
distribution, in order to be automatically deployed into the server
runtime. For this to work the deployment-scanner subsystem must be
present. The scanner periodically checks the contents of the deployments
directory and reacts to changes by updating the server.
| Users are encouraged to use the WildFly management APIs to upload and deploy deployment content instead of relying on the deployment scanner that periodically scans the directory, particularly if running production systems. |
Deployment Scanner Modes
The WildFly filesystem deployment scanner operates in one of two different modes, depending on whether it will directly monitor the deployment content in order to decide to deploy or redeploy it.
Auto-deploy mode:
The scanner will directly monitor the deployment content, automatically deploying new content and redeploying content whose timestamp has changed. This is similiar to the behavior of previous AS releases, although there are differences:
-
A change in any file in an exploded deployment triggers redeploy. Because EE 6+ applications do not require deployment descriptors,
there is no attempt to monitor deployment descriptors and only redeploy when a deployment descriptor changes. -
The scanner will place marker files in this directory as an indication of the status of its attempts to deploy or undeploy content. These are detailed below.
Manual deploy mode:
The scanner will not attempt to directly monitor the deployment content and decide if or when the end user wishes the content to be deployed. Instead, the scanner relies on a system of marker files, with the user’s addition or removal of a marker file serving as a sort of command telling the scanner to deploy, undeploy or redeploy content.
Auto-deploy mode and manual deploy mode can be independently configured for zipped deployment content and exploded deployment content. This is done via the "auto-deploy" attribute on the deployment-scanner element in the standalone.xml configuration file:
<deployment-scanner scan-interval="5000" relative-to="jboss.server.base.dir"
   path="deployments" auto-deploy-zipped="true" auto-deploy-exploded="false"/>
By default, auto-deploy of zipped content is enabled, and auto-deploy of exploded content is disabled. Manual deploy mode is strongly recommended for exploded content, as exploded content is inherently vulnerable to the scanner trying to auto-deploy partially copied content.
Marker Files
The marker files always have the same name as the deployment content to which they relate, but with an additional file suffix appended. For example, the marker file to indicate the example.war file should be deployed is named example.war.dodeploy. Different marker file suffixes have different meanings.
The relevant marker file types are:
| File | Purpose |
|---|---|
.dodeploy |
Placed by the user to indicate that the given content shouldbe deployed into the runtime (or redeployed if alreadydeployed in the runtime.) |
.skipdeploy |
Disables auto-deploy of the content for as long as the fileis present. Most useful for allowing updates to explodedcontent without having the scanner initiate redeploy in themiddle of the update. Can be used with zipped content aswell, although the scanner will detect in-progress changesto zipped content and wait until changes are complete. |
.isdeploying |
Placed by the deployment scanner service to indicate that ithas noticed a .dodeploy file or new or updated auto-deploymode content and is in the process of deploying the content.This marker file will be deleted when the deployment processcompletes. |
.deployed |
Placed by the deployment scanner service to indicate that thegiven content has been deployed into the runtime. If an enduser deletes this file, the content will be undeployed. |
.failed |
Placed by the deployment scanner service to indicate that thegiven content failed to deploy into the runtime. The contentof the file will include some information about the cause ofthe failure. Note that with auto-deploy mode, removing thisfile will make the deployment eligible for deployment again. |
.isundeploying |
Placed by the deployment scanner service to indicate that ithas noticed a .deployed file has been deleted and thecontent is being undeployed. This marker file will be deletedwhen the undeployment process completes. |
.undeployed |
Placed by the deployment scanner service to indicate that thegiven content has been undeployed from the runtime. If an enduser deletes this file, it has no impact. |
.pending |
Placed by the deployment scanner service to indicate that ithas noticed the need to deploy content but has not yetinstructed the server to deploy it. This file is created ifthe scanner detects that some auto-deploy content is still inthe process of being copied or if there is some problem thatprevents auto-deployment. The scanner will not instruct theserver to deploy or undeploy any content (not just thedirectly affected content) as long as this condition holds. |
Basic workflows:
All examples assume variable $JBOSS_HOME points to the root of the WildFly distribution.
-
Add new zipped content and deploy it:
-
cp target/example.war/ $JBOSS_HOME/standalone/deployments
-
(Manual mode only) touch $JBOSS_HOME/standalone/deployments/example.war.dodeploy
-
-
Add new unzipped content and deploy it:
-
cp -r target/example.war/ $JBOSS_HOME/standalone/deployments
-
(Manual mode only) touch $JBOSS_HOME/standalone/deployments/example.war.dodeploy
-
-
Undeploy currently deployed content:
-
rm $JBOSS_HOME/standalone/deployments/example.war.deployed
-
-
Auto-deploy mode only: Undeploy currently deployed content:
-
rm $JBOSS_HOME/standalone/deployments/example.war
-
-
Replace currently deployed zipped content with a new version and deploy it:
-
cp target/example.war/ $JBOSS_HOME/standalone/deployments
-
(Manual mode only) touch $JBOSS_HOME/standalone/deployments/example.war.dodeploy
-
-
Manual mode only: Replace currently deployed unzipped content with a new version and deploy it:
-
rm $JBOSS_HOME/standalone/deployments/example.war.deployed
-
wait for $JBOSS_HOME/standalone/deployments/example.war.undeployed file to appear
-
cp -r target/example.war/ $JBOSS_HOME/standalone/deployments
-
touch $JBOSS_HOME/standalone/deployments/example.war.dodeploy
-
-
Auto-deploy mode only: Replace currently deployed unzipped content with a new version and deploy it:
-
touch $JBOSS_HOME/standalone/deployments/example.war.skipdeploy
-
cp -r target/example.war/ $JBOSS_HOME/standalone/deployments
-
rm $JBOSS_HOME/standalone/deployments/example.war.skipdeploy
-
-
Manual mode only: Live replace portions of currently deployed unzipped content without redeploying:
-
cp -r target/example.war/foo.html $JBOSS_HOME/standalone/deployments/example.war
-
-
Auto-deploy mode only: Live replace portions of currently deployed unzipped content without redeploying:
-
touch $JBOSS_HOME/standalone/deployments/example.war.skipdeploy
-
cp -r target/example.war/foo.html $JBOSS_HOME/standalone/deployments/example.war
-
-
Manual or auto-deploy mode: Redeploy currently deployed content (i.e. bounce it with no content change):
-
touch $JBOSS_HOME/standalone/deployments/example.war.dodeploy
-
-
Auto-deploy mode only: Redeploy currently deployed content (i.e. bounce it with no content change):
-
touch $JBOSS_HOME/standalone/deployments/example.war
-
|
The above examples use Unix shell commands. Windows equivalents are:
cp src dest -→ xcopy /y src dest cp -r src dest -→ xcopy /e /s /y src dest rm afile -→ del afile touch afile -→ echo>> afile |
Note that the behavior of 'touch' and 'echo' are different but the differences are not relevant to the usages in the examples above.
8.3. Managed and Unmanaged Deployments
WildFly supports two mechanisms for dealing with deployment content – managed and unmanaged deployments.
With a managed deployment the server takes the deployment content and copies it into an internal content repository and thereafter uses that copy of the content, not the original user-provided content. The server is thereafter responsible for the content it uses.
With an unmanaged deployment the user provides the local filesystem path of deployment content, and the server directly uses that content. However the user is responsible for ensuring that content, e.g. for making sure that no changes are made to it that will negatively impact the functioning of the deployed application.
To help you differentiate managed from unmanaged deployments the deployment model has a runtime boolean attribute 'managed'.
Managed deployments have a number of benefits over unmanaged:
-
They can be manipulated by remote management clients, not requiring access to the server filesystem.
-
In a managed domain, WildFly/EAP will take responsibility for replicating a copy of the deployment to all hosts/servers in the domain where it is needed. With an unmanaged deployment, it is the user’s responsibility to have the deployment available on the local filesystem on all relevant hosts, at a consistent path.
-
The deployment content actually used is stored on the filesystem in the internal content repository, which should help shelter it from unintended changes.
All of the previous examples above illustrate using managed deployments, except for any discussion of deployment scanner handling of exploded deployments. In WildFly 10 and earlier exploded deployments are always unmanaged, this is no longer the case since WildFly 11.
8.3.1. Content Repository
For a managed deployment, the actual file the server uses when creating
runtime services is not the file provided to the CLI deploy command or
to the web console. It is a copy of that file stored in an internal
content repository. The repository is located in the
domain/data/content directory for a managed domain, or in
standalone/data/content for a standalone server. Actual binaries are
stored in a subdirectory:
ls domain/data/content/
  |---/47
  |-----95cc29338b5049e238941231b36b3946952991
  |---/dd
|-----a9881fa7811b22f1424b4c5acccb13c71202bd| The location of the content repository and its internal structure is subject to change at any time and should not be relied upon by end users. |
The description of a managed deployment in the domain or standalone configuration file includes an attribute recording the SHA1 hash of the deployment content:
<deployments>
   <deployment name="test-application.war"
               runtime-name="test-application.war">
       <content sha1="dda9881fa7811b22f1424b4c5acccb13c71202bd"/>
   </deployment>
</deployments>
The WildFly process calculates and records that hash when the user
invokes a management operation (e.g. CLI deploy command or using the
console) providing deployment content. The user is not expected to
calculate the hash.
The sha1 attribute in the content element tells the WildFly process where to find the deployment content in its internal content repository.
In a domain each host will have a copy of the content needed by its servers in its own local content repository. The WildFly domain controller and slave host controller processes take responsibility for ensuring each host has the needed content.
8.3.2. Unmanaged Deployments
An unmanaged deployment is one where the server directly deploys the content at a path you specify instead of making an internal copy and then deploying the copy.
Initially deploying an unmanaged deployment is much like deploying a managed one, except you tell WildFly that you do not want the deployment to be managed:
[standalone@localhost:9990 /] deploy ~/Desktop/test-application.war --unmanaged
'test-application.war' deployed successfully.
When you do this, instead of the server making a copy of the content at
/Desktop/test-application.war, calculating the hash of the content,
storing the hash in the configuration file and then installing the copy
into the runtime, instead it will convert
/Desktop/test-application.war to an absolute path, store the path in
the configuration file, and then install the original content in the
runtime.
You can also use unmanaged deployments in a domain:
[domain@localhost:9990 /] deploy /home/example/Desktop/test-application.war --server-group=main-server-group --unmanaged
'test-application.war' deployed successfully.
However, before you run this command you must ensure that a copy of the content is present on all machines that have servers in the target server groups, all at the same filesystem path. The domain will not copy the file for you.
Undeploy is no different from a managed undeploy:
[standalone@localhost:9990 /] undeploy test-application.war
Successfully undeployed test-application.war.
Doing a replacement of the deployment with a new version is a bit different, the server is using the file you want to replace. You should undeploy the deployment, replace the content, and then deploy again. Or you can stop the server, replace the deployment and deploy again.
8.4. Deployment Overlays
Deployment overlays are our way of 'overlaying' content into an existing deployment, without physically modifying the contents of the deployment archive. Possible use cases include swapping out deployment descriptors, modifying static web resources to change the branding of an application, or even replacing jar libraries with different versions.
Deployment overlays have a different lifecycle to a deployment. In order to use a deployment overlay, you first create the overlay, using the CLI or the management API. You then add files to the overlay, specifying the deployment paths you want them to overlay. Once you have created the overlay you then have to link it to a deployment name (which is done slightly differently depending on if you are in standalone or domain mode). Once you have created the link any deployment that matches the specified deployment name will have the overlay applied.
When you modify or create an overlay it will not affect existing deployments, they must be redeployed in order to take effect
8.4.1. Creating a deployment overlay
To create a deployment overlay the CLI provides a high level command to do all the steps specified above in one go. An example command is given below for both standalone and domain mode:
deployment-overlay add --name=myOverlay --content=/WEB-INF/web.xml=/myFiles/myWeb.xml,/WEB-INF/ejb-jar.xml=/myFiles/myEjbJar.xml --deployments=test.war,*-admin.war --redeploy-affecteddeployment-overlay add --name=myOverlay --content=/WEB-INF/web.xml=/myFiles/myWeb.xml,/WEB-INF/ejb-jar.xml=/myFiles/myEjbJar.xml --deployments=test.war,*-admin.war --server-groups=main-server-group --redeploy-affected9. Subsystem configuration
Subsystem configuration reference :author: tcerar@redhat.com :icons: font :source-highlighter: coderay :toc: macro :toclevels: 2
The following chapters will focus on the high level management use cases that are available through the CLI and the web interface. For a detailed description of each subsystem configuration property, please consult the respective component reference.
Schema Location
The configuration schemas can found in $JBOSS_HOME/docs/schema.
|
9.1. EE Subsystem Configuration
The EE subsystem provides common functionality in the Jakarta EE platform,
such as the EE Concurrency Utilities (JSR 236) and @Resource
injection. The subsystem is also responsible for managing the lifecycle
of Jakarta EE application’s deployments, that is, .ear files and configuration of global directories to share common libraries across all deployed applications.
The EE subsystem configuration may be used to:
-
customise the deployment of Jakarta EE applications
-
create EE Concurrency Utilities instances
-
define the default bindings
The subsystem name is ee and this document covers EE subsystem version
5.0, which XML namespace within WildFly XML configurations is
urn:jboss:domain:ee:5.0. The path for the subsystem’s XML schema,
within WildFly’s distribution, is docs/schema/jboss-as-ee_5_0.xsd.
Subsystem XML configuration example with all elements and attributes specified:
<subsystem xmlns="urn:jboss:domain:ee:5.0">
    <global-modules>
        <module name="org.jboss.logging"
                slot="main"/>
        <module name="org.apache.log4j"
                annotations="true"
                meta-inf="true"
                services="false" />
    </global-modules>
    <global-directories>
        <directory name="common-libs" path="libs" relative-to="jboss.server.base.dir"/>
    </global-directories>
    <ear-subdeployments-isolated>true</ear-subdeployments-isolated>
    <spec-descriptor-property-replacement>false</spec-descriptor-property-replacement>
    <jboss-descriptor-property-replacement>false</jboss-descriptor-property-replacement>
    <annotation-property-replacement>false</annotation-property-replacement>
    <concurrent>
        <context-services>
            <context-service
                    name="default"
                    jndi-name="java:jboss/ee/concurrency/context/default"
                    use-transaction-setup-provider="true" />
        </context-services>
        <managed-thread-factories>
            <managed-thread-factory
                    name="default"
                    jndi-name="java:jboss/ee/concurrency/factory/default"
                    context-service="default"
                    priority="1" />
        </managed-thread-factories>
        <managed-executor-services>
            <managed-executor-service
                    name="default"
                    jndi-name="java:jboss/ee/concurrency/executor/default"
                    context-service="default"
                    thread-factory="default"
                    hung-task-threshold="60000"
                    core-threads="5"
                    max-threads="25"
                    keepalive-time="5000"
                    queue-length="1000000"
                    reject-policy="RETRY_ABORT" />
        </managed-executor-services>
        <managed-scheduled-executor-services>
            <managed-scheduled-executor-service
                    name="default"
                    jndi-name="java:jboss/ee/concurrency/scheduler/default"
                    context-service="default"
                    thread-factory="default"
                    hung-task-threshold="60000"
                    core-threads="5"
                    keepalive-time="5000"
                    reject-policy="RETRY_ABORT" />
        </managed-scheduled-executor-services>
    </concurrent>
    <default-bindings
            context-service="java:jboss/ee/concurrency/context/default"
            datasource="java:jboss/datasources/ExampleDS"
            jms-connection-factory="java:jboss/DefaultJMSConnectionFactory"
            managed-executor-service="java:jboss/ee/concurrency/executor/default"
            managed-scheduled-executor-service="java:jboss/ee/concurrency/scheduler/default"
            managed-thread-factory="java:jboss/ee/concurrency/factory/default" />
</subsystem>
9.1.1. Jakarta EE Application Deployment
The EE subsystem configuration allows the customisation of the deployment behaviour for Jakarta EE Applications.
Global Modules
Global modules is a set of JBoss Modules that will be added as dependencies to the JBoss Modules module of every Jakarta EE deployment. Such dependencies allows Jakarta EE deployments to see the classes exported by the global modules.
Each global module is defined through the module resource, an example
of its XML configuration:
  <global-modules>
    <module name="org.jboss.logging" slot="main"/>
    <module name="org.apache.log4j" annotations="true" meta-inf="true" services="false" />
  </global-modules>
The only mandatory attribute is the JBoss Modules module name, the slot
attribute defaults to main, and both define the JBoss Modules module ID to
reference.
The optional annotations attribute, which defaults to false,
indicates if a pre-computed annotation index should be imported from
META-INF/jandex.idx
The optional services attribute indicates if any services exposed in
META-INF/services should be made available to the deployments class
loader, and defaults to false.
The optional meta-inf attribute, which defaults to true, indicates
if the Module’s META-INF path should be available to the deployment’s
class loader.
Global Directory
Global modules can be used to share common libraries across all deployed applications, but it could be impractical if the name of a shared library changes very often or if there are many libraries you want to share. Both cases will require changes in the underlying module.xml that represents this global module.
The EE subsystem allows the configuration of a global directory, which represents a directory tree scanned automatically to include .jar files and resources as a single additional dependency. This module dependency is added as a system dependency on each deployed application. Basically, with a global directory, you will be relying on WildFly to automate the maintenance and configuration of a JBoss Modules module that represents the jar files and resources of a specific directory.
You can configure a global directory using the following operation:
[standalone@localhost:9990 /] /subsystem=ee/global-directory=my-common-libs:add(path=lib, relative-to=jboss.home.dir)The following attributes are available on the global-directory resource:
-
path: The path of the directory to scan. (Mandatory)
-
relative-to: The name of another previously named path, or of one of the standard paths provided by the system. (Optional)
When a global-directory is created, the server establishes a JBoss Modules module with one Path Resource Loader created using 'path' and 'relative-to' attributes and one Jar Resource loader for each jar file included in this directory and its subdirectories.
The 'Path Resource Loader' will make available any file as a resource to the application. The 'Jar Resource loader' will make available any class inside of the jar file to the applications.
For example, suppose you have configured one global directory pointing to the following directory tree:
/my-common-libs/Z/a-lib.jar
/my-common-libs/A/A/z-lib.jar
/my-common-libs/A/a-lib.jar
/my-common-libs/A/b-lib.jar
/my-common-libs/a-lib.jar
/my-common-libs/A/B/a-lib.jar
/my-common-libs/properties-1.properties
/my-common-libs/A/B/properties-2.properties
The JBoss Modules module generated after scanning this global-directory will be equivalent to the following module.xml:
<module xmlns="urn:jboss:module:1.5" name="deployment.external.global-directory.my-common-libs">
    <resources>
        <resource-root path="/my-common-libs"/>
        <resource-root path="/my-common-libs/a-lib.jar"/>
        <resource-root path="/my-common-libs/A/a-lib.jar"/>
        <resource-root path="/my-common-libs/A/b-lib.jar"/>
        <resource-root path="/my-common-libs/A/A/z-lib.jar"/>
        <resource-root path="/my-common-libs/A/B/a-lib.jar"/>
        <resource-root path="/my-common-libs/Z/a-lib.jar"/>
    </resources>

    <dependencies>
        <module name="javaee.api"/>
    </dependencies>
</module>
The name of the generated module follows the pattern deployment.external.global-directory.{global-directory-name} and as such, it can be excluded selectively using your deployment-structure.xml.
All resources will be available from the application class loader. For example, you could access the above property files using the context ClassLoader of your current thread:
Thread.currentThread().getContextClassLoader().getResourceAsStream("properties-1.properties");
Thread.currentThread().getContextClassLoader().getResourceAsStream("A/B/properties-2.properties");
All classes inside of each jar file will also be available, and the order of how the resource-root are created internally will govern the order of the class loading. The jar resources of the generated module will be created iterating over all jar files found in the directory tree. Each directory is scanned alphabetically starting from the root, and on each level, each subdirectory is also explored alphabetically until visiting all the branch. Files found on each level are also added in alphabetical order.
Notice you should know which classes are exposed on each .jar file and avoid conflicts including the same class twice with incompatible binary change. In those cases, classloading errors are likely to occur. Specifically, you should not add classes that interfere with the classes the server already makes available for your application; the goal of a global directory is not to override and replace existing library versions shipped with the server. It is a facility that will allow moving common frameworks you usually add to your application libs to a common place to facilitate maintenance.
The module created from the shared directory is loaded as soon as the first application is deployed in the server after creating the global-directory. That means, if the server is started/restarted and there are no applications deployed, then the global directory is neither scanned nor the module loaded. Any change in any of the contents of the global-directory will require a server reload to make them available to the deployed applications.
In case of domain mode or distributed environments, it is the user responsibility to make the content of the configured global directory consistent across all the server instances, as well as distribute the jar files that they contain.
EAR Subdeployments Isolation
A flag indicating whether each of the subdeployments within a .ear can
access classes belonging to another subdeployment within the same
.ear. The default value is false, which allows the subdeployments to
see classes belonging to other subdeployments within the .ear.
<ear-subdeployments-isolated>true</ear-subdeployments-isolated>For example:
myapp.ear
|
|--- web.war
|
|--- ejb1.jar
|
|--- ejb2.jar
If the ear-subdeployments-isolated is set to false, then the classes
in web.war can access classes belonging to ejb1.jar and ejb2.jar.
Similarly, classes from ejb1.jar can access classes from ejb2.jar
(and vice-versa).
This flag has no effect on the isolated classloader of the .war
file(s), i.e. irrespective of whether this flag is set to true or
false, the .war within a .ear will have a isolated classloader,
and other subdeployments within that .ear will not be able to access
classes from that .war. This is as per spec.
|
Property Replacement
The EE subsystem configuration includes flags to configure whether system property replacement will be done on XML descriptors and Java Annotations included in Jakarta EE deployments.
| System properties etc are resolved in the security context of the application server itself, not the deployment that contains the file. This means that if you are running with a security manager and enable this property, a deployment can potentially access system properties or environment entries that the security manager would have otherwise prevented. |
Spec Descriptor Property Replacement
Flag indicating whether system property replacement will be performed on
standard Jakarta EE XML descriptors. If not configured this defaults to
true, however it is set to false in the standard configuration files
shipped with WildFly.
<spec-descriptor-property-replacement>false</spec-descriptor-property-replacement>When enabled, properties can be replaced in the following deployment descriptors:
-
ejb-jar.xml
-
persistence.xml
-
application.xml
-
web.xml
-
permissions.xml
JBoss Descriptor Property Replacement
Flag indicating whether system property replacement will be performed on
WildFly proprietary XML descriptors, such as jboss-app.xml. This
defaults to true.
<jboss-descriptor-property-replacement>false</jboss-descriptor-property-replacement>When enabled, properties can be replaced in the following deployment descriptors:
-
jboss-ejb3.xml
-
jboss-app.xml
-
jboss-web.xml
-
jboss-permissions.xml
-
*-jms.xml
-
*-ds.xml
Annotation Property Replacement
Flag indicating whether system property replacement will be performed on
Java annotations. The default value is false.
<annotation-property-replacement>false</annotation-property-replacement>9.1.2. EE Concurrency Utilities
EE Concurrency Utilities (JSR 236) were introduced to ease the task of writing multithreaded applications. Instances of these utilities are managed by WildFly, and the related configuration.
Context Services
The Context Service is a concurrency utility which creates contextual proxies from existent objects. WildFly Context Services are also used to propagate the context from a Jakarta EE application invocation thread, to the threads internally used by the other EE Concurrency Utilities. Context Service instances may be created using the subsystem XML configuration:
  <context-services>
    <context-service
 name="default"
 jndi-name="java:jboss/ee/concurrency/context/default"
 use-transaction-setup-provider="true" />
  </context-services>
The name attribute is mandatory, and it’s value should be a unique
name within all Context Services.
The jndi-name attribute is also mandatory, and defines where in the
JNDI the Context Service should be placed.
The optional use-trasaction-setup-provider attribute indicates if the
contextual proxies built by the Context Service should suspend
transactions in context, when invoking the proxy objects, and its value
defaults to true.
Management clients, such as the WildFly CLI, may also be used to
configure Context Service instances. An example to add and remove
one named other:
/subsystem=ee/context-service=other:add(jndi-name=java\:jboss\/ee\/concurrency\/other)
/subsystem=ee/context-service=other:remove
Managed Thread Factories
The Managed Thread Factory allows Jakarta EE applications to create new threads. WildFly Managed Thread Factory instances may also, optionally, use a Context Service instance to propagate the Jakarta EE application thread’s context to the new threads. Instance creation is done through the EE subsystem, by editing the subsystem XML configuration:
  <managed-thread-factories>
    <managed-thread-factory
 name="default"
 jndi-name="java:jboss/ee/concurrency/factory/default"
 context-service="default"
 priority="1" />
  </managed-thread-factories>
The name attribute is mandatory, and it’s value should be a unique
name within all Managed Thread Factories.
The jndi-name attribute is also mandatory, and defines where in the
JNDI the Managed Thread Factory should be placed.
The optional context-service references an existent Context Service by
its name. If specified then thread created by the factory will
propagate the invocation context, present when creating the thread.
The optional priority indicates the priority for new threads created
by the factory, and defaults to 5.
Management clients, such as the WildFly CLI, may also be used to
configure Managed Thread Factory instances. An example to add and
remove one named other:
/subsystem=ee/managed-thread-factory=other:add(jndi-name=java\:jboss\/ee\/factory\/other)
/subsystem=ee/managed-thread-factory=other:remove
Managed Executor Services
The Managed Executor Service is the Jakarta EE adaptation of Java SE Executor Service, providing to Jakarta EE applications the functionality of asynchronous task execution. WildFly is responsible to manage the lifecycle of Managed Executor Service instances, which are specified through the EE subsystem XML configuration:
<managed-executor-services>
    <managed-executor-service
        name="default"
        jndi-name="java:jboss/ee/concurrency/executor/default"
        context-service="default"
        thread-factory="default"
        hung-task-threshold="60000"
        core-threads="5"
        max-threads="25"
        keepalive-time="5000"
        queue-length="1000000"
        reject-policy="RETRY_ABORT" />
</managed-executor-services>
The name attribute is mandatory, and it’s value should be a unique
name within all Managed Executor Services.
The jndi-name attribute is also mandatory, and defines where in the
JNDI the Managed Executor Service should be placed.
The optional context-service references an existent Context Service by
its name. If specified then the referenced Context Service will
capture the invocation context present when submitting a task to the
executor, which will then be used when executing the task.
The optional thread-factory references an existent Managed Thread
Factory by its name, to handle the creation of internal threads. If
not specified then a Managed Thread Factory with default configuration
will be created and used internally.
The mandatory core-threads provides the number of threads to keep in
the executor’s pool, even if they are idle. If this is not defined or
is set to 0, the core pool size will be calculated based on the number
of available processors.
The optional queue-length indicates the number of tasks that can be
stored in the input queue. The default value is 0, which means the
queue capacity is unlimited.
The executor’s task queue is based on the values of the attributes
core-threads and queue-length:
-
If
queue-lengthis0, orqueue-lengthisInteger.MAX_VALUE (2147483647)andcore-threadsis0, direct handoff queuing strategy will be used and a synchronous queue will be created. -
If
queue-lengthisInteger.MAX_VALUEbutcore-threadsis not0, an unbounded queue will be used. -
For any other valid value for
queue-length, a bounded queue wil be created.
The optional hung-task-threshold defines a runtime threshold value, in
milliseconds, for tasks to be considered hung by the executor.
A value of 0 will never consider tasks to be hung.
The optional long-running-tasks is a hint to optimize the execution of
long running tasks, and defaults to false.
The optional max-threads defines the the maximum number of threads
used by the executor, which defaults to Integer.MAX_VALUE (2147483647).
The optional keepalive-time defines the time, in milliseconds, that an
internal thread may be idle. The attribute default value is 60000.
The optional reject-policy defines the policy to use when a task is
rejected by the executor. The attribute value may be the default
ABORT, which means an exception should be thrown, or RETRY_ABORT,
which means the executor will try to submit it once more, before
throwing an exception.
Management clients, such as the WildFly CLI, may also be used to
configure Managed Executor Service instances. An example to add and
remove one named other:
/subsystem=ee/managed-executor-service=other:add(jndi-name=java\:jboss\/ee\/executor\/other, core-threads=2)
/subsystem=ee/managed-executor-service=other:remove
Managed Scheduled Executor Services
The Managed Scheduled Executor Service is the Jakarta EE adaptation of Java SE Scheduled Executor Service, providing to Jakarta EE applications the functionality of scheduling task execution. WildFly is responsible to manage the lifecycle of Managed Scheduled Executor Service instances, which are specified through the EE subsystem XML configuration:
<managed-scheduled-executor-services>
    <managed-scheduled-executor-service
        name="default"
        jndi-name="java:jboss/ee/concurrency/scheduler/default"
        context-service="default"
        thread-factory="default"
        hung-task-threshold="60000"
        core-threads="5"
        keepalive-time="5000"
        reject-policy="RETRY_ABORT" />
</managed-scheduled-executor-services>
The name attribute is mandatory, and it’s value should be a unique
name within all Managed Scheduled Executor Services.
The jndi-name attribute is also mandatory, and defines where in the
JNDI the Managed Scheduled Executor Service should be placed.
The optional context-service references an existent Context Service by
its name. If specified then the referenced Context Service will
capture the invocation context present when submitting a task to the
executor, which will then be used when executing the task.
The optional thread-factory references an existent Managed Thread
Factory by its name, to handle the creation of internal threads. If
not specified then a Managed Thread Factory with default configuration
will be created and used internally.
The mandatory core-threads provides the number of threads to keep in
the executor’s pool, even if they are idle. A value of 0 means there
is no limit.
The optional hung-task-threshold defines a runtime threshold value, in
milliseconds, for tasks to be considered hung by the executor.
A value of 0 will never consider tasks to be hung.
The optional long-running-tasks is a hint to optimize the execution of
long running tasks, and defaults to false.
The optional keepalive-time defines the time, in milliseconds, that an
internal thread may be idle. The attribute default value is 60000.
The optional reject-policy defines the policy to use when a task is
rejected by the executor. The attribute value may be the default
ABORT, which means an exception should be thrown, or RETRY_ABORT,
which means the executor will try to submit it once more, before
throwing an exception.
Management clients, such as the WildFly CLI, may also be used to
configure Managed Scheduled Executor Service instances. An example to
add and remove one named other:
/subsystem=ee/managed-scheduled-executor-service=other:add(jndi-name=java\:jboss\/ee\/scheduler\/other, core-threads=2)
/subsystem=ee/managed-scheduled-executor-service=other:remove
9.1.3. Default EE Bindings
The Jakarta EE Specification mandates the existence of a default instance for each of the following resources:
-
Context Service
-
Datasource
-
JMS Connection Factory
-
Managed Executor Service
-
Managed Scheduled Executor Service
-
Managed Thread Factory
The EE subsystem looks up the default instances from JNDI, using the
names in the default bindings configuration, before placing those in the
standard JNDI names, such as java:comp/DefaultManagedExecutorService:
  <default-bindings
 context-service="java:jboss/ee/concurrency/context/default"
 datasource="java:jboss/datasources/ExampleDS"
 jms-connection-factory="java:jboss/DefaultJMSConnectionFactory"
 managed-executor-service="java:jboss/ee/concurrency/executor/default"
 managed-scheduled-executor-service="java:jboss/ee/concurrency/scheduler/default"
 managed-thread-factory="java:jboss/ee/concurrency/factory/default" />
Above bindings become application dependencies upon deployment. However in some cases they might not be required or covered by non-default resources. In such case default binding could be:
-
rewriten - to point to user configured resource( :write-attribute(name=…,value=…) )
-
undefined - if there is no need for runtime dependency( :undefine-attribute(name=…) )
| The default bindings are optional, if the jndi name for a default binding is not configured then the related resource will not be available to Jakarta EE applications. |
| If default EE resources are not required and bindings do not point at them, it is safe to remove or turn off default services. |
9.2. Naming Subsystem Configuration
The Naming subsystem provides the JNDI implementation on WildFly, and its configuration allows to:
-
bind entries in global JNDI namespaces
-
turn off/on the remote JNDI interface
The subsystem name is naming and this document covers Naming subsystem
version 2.0, which XML namespace within WildFly XML configurations is
urn:jboss:domain:naming:2.0. The path for the subsystem’s XML schema,
within WildFly’s distribution, is docs/schema/jboss-as-naming_2_0.xsd.
Subsystem XML configuration example with all elements and attributes specified:
<subsystem xmlns="urn:jboss:domain:naming:2.0">
    <bindings>
        <simple name="java:global/a" value="100" type="int" />
        <simple name="java:global/jboss.org/docs/url" value="https://docs.jboss.org" type="java.net.URL" />
        <object-factory name="java:global/foo/bar/factory" module="org.foo.bar" class="org.foo.bar.ObjectFactory" />
        <external-context name="java:global/federation/ldap/example" class="javax.naming.directory.InitialDirContext" cache="true">
            <environment>
                <property name="java.naming.factory.initial" value="com.sun.jndi.ldap.LdapCtxFactory" />
                <property name="java.naming.provider.url" value="ldap://ldap.example.com:389" />
                <property name="java.naming.security.authentication" value="simple" />
                <property name="java.naming.security.principal" value="uid=admin,ou=system" />
                <property name="java.naming.security.credentials" value="secret" />
            </environment>
        </external-context>
        <lookup name="java:global/c" lookup="java:global/b" />
    </bindings>
    <remote-naming/>
</subsystem>
9.2.1. Global Bindings Configuration
The Naming subsystem configuration allows binding entries into the following global JNDI namespaces:
-
java:global -
java:jboss -
java:
If WildFly is to be used as a Jakarta EE application server, then it’s
recommended to opt for java:global, since it is a standard (i.e.
portable) namespace.
|
Four different types of bindings are supported:
-
Simple
-
Object Factory
-
External Context
-
Lookup
In the subsystem’s XML configuration, global bindings are configured
through the <bindings /> XML element, as an example:
<bindings>
    <simple name="java:global/a" value="100" type="int" />
    <object-factory name="java:global/foo/bar/factory" module="org.foo.bar" class="org.foo.bar.ObjectFactory" />
    <external-context name="java:global/federation/ldap/example" class="javax.naming.directory.InitialDirContext" cache="true">
        <environment>
            <property name="java.naming.factory.initial" value="com.sun.jndi.ldap.LdapCtxFactory" />
            <property name="java.naming.provider.url" value="ldap://ldap.example.com:389" />
            <property name="java.naming.security.authentication" value="simple" />
            <property name="java.naming.security.principal" value="uid=admin,ou=system" />
            <property name="java.naming.security.credentials" value="secret" />
        </environment>
    </external-context>
    <lookup name="java:global/c" lookup="java:global/b" />
</bindings>
Simple Bindings
A simple binding is a primitive or java.net.URL entry, and it is defined
through the simple XML element. An example of its XML configuration:
<simple name="java:global/a" value="100" type="int" />The name attribute is mandatory and specifies the target JNDI name for
the entry.
The value attribute is mandatory and defines the entry’s value.
The optional type attribute, which defaults to java.lang.String,
specifies the type of the entry’s value. Besides java.lang.String,
allowed types are all the primitive types and their corresponding object
wrapper classes, such as int or java.lang.Integer, and java.net.URL.
Management clients, such as the WildFly CLI, may be used to configure
simple bindings. An example to add and remove the one in the XML
example above:
/subsystem=naming/binding=java\:global\/a:add(binding-type=simple, type=int, value=100)
/subsystem=naming/binding=java\:global\/a:remove
Object Factories
The Naming subsystem configuration allows the binding of
javax.naming.spi.ObjectFactory entries, through the object-factory
XML element, for instance:
<object-factory name="java:global/foo/bar/factory" module="org.foo.bar" class="org.foo.bar.ObjectFactory">
    <environment>
        <property name="p1" value="v1" />
        <property name="p2" value="v2" />
    </environment>
</object-factory>
The name attribute is mandatory and specifies the target JNDI name for
the entry.
The class attribute is mandatory and defines the object factory’s Java
type.
The module attribute is mandatory and specifies the JBoss Module ID
where the object factory Java class may be loaded from.
The optional environment child element may be used to provide a custom
environment to the object factory.
Management clients, such as the WildFly CLI, may be used to configure
object factory bindings. An example to add and remove the one in the
XML example above:
/subsystem=naming/binding=java\:global\/foo\/bar\/factory:add(binding-type=object-factory, module=org.foo.bar, class=org.foo.bar.ObjectFactory, environment=[p1=v1, p2=v2])
/subsystem=naming/binding=java\:global\/foo\/bar\/factory:remove
External Context Federation
Federation of external JNDI contexts, such as a LDAP context, are
achieved by adding External Context bindings to the global bindings
configuration, through the external-context XML element. An example of
its XML configuration:
<external-context name="java:global/federation/ldap/example" class="javax.naming.directory.InitialDirContext" cache="true">
    <environment>
        <property name="java.naming.factory.initial" value="com.sun.jndi.ldap.LdapCtxFactory" />
        <property name="java.naming.provider.url" value="ldap://ldap.example.com:389" />
        <property name="java.naming.security.authentication" value="simple" />
        <property name="java.naming.security.principal" value="uid=admin,ou=system" />
        <property name="java.naming.security.credentials" value="secret" />
    </environment>
</external-context>
The name attribute is mandatory and specifies the target JNDI name for
the entry.
The class attribute is mandatory and indicates the Java initial naming
context type used to create the federated context. Note that such type
must have a constructor with a single environment map argument.
The optional module attribute specifies the JBoss Module ID where any
classes required by the external JNDI context may be loaded from.
The optional cache attribute, which value defaults to false,
indicates if the external context instance should be cached.
The optional environment child element may be used to provide the
custom environment needed to lookup the external context.
Management clients, such as the WildFly CLI, may be used to configure
external context bindings. An example to add and remove the one in
the XML example above:
/subsystem=naming/binding=java\:global\/federation\/ldap\/example:add(binding-type=external-context, cache=true, class=javax.naming.directory.InitialDirContext, environment=[java.naming.factory.initial=com.sun.jndi.ldap.LdapCtxFactory, java.naming.provider.url=ldap\:\/\/ldap.example.com\:389, java.naming.security.authentication=simple, java.naming.security.principal=uid\=admin\,ou\=system, java.naming.security.credentials= secret])

/subsystem=naming/binding=java\:global\/federation\/ldap\/example:remove
Some JNDI providers may fail when their resources are looked up if they do not implement properly the lookup(Name) method. Their errors would look like:
| 11:31:49,047 ERROR org.jboss.resource.adapter.jms.inflow.JmsActivation (default-threads -1) javax.naming.InvalidNameException: Only support CompoundName namesat com.tibco.tibjms.naming.TibjmsContext.lookup(TibjmsContext.java:504)at javax.naming.InitialContext.lookup(InitialContext.java:421) |
|---|
To work around their shortcomings, the
org.jboss.as.naming.lookup.by.string property can be specified in the
external-context’s environment to use instead the lookup(String) method
(with a performance degradation):
<property name="org.jboss.as.naming.lookup.by.string" value="true"/>Binding Aliases
The Naming subsystem configuration allows the binding of existent
entries into additional names, i.e. aliases. Binding aliases are
specified through the lookup XML element. An example of its XML
configuration:
<lookup name="java:global/c" lookup="java:global/b" />The name attribute is mandatory and specifies the target JNDI name for
the entry.
The lookup attribute is mandatory and indicates the source JNDI name.
It can chain lookups on external contexts. For example, having an
external context bounded to java:global/federation/ldap/example,
searching can be done there by setting lookup attribute to
java:global/federation/ldap/example/subfolder.
Management clients, such as the WildFly CLI, may be used to configure
binding aliases. An example to add and remove the one in the XML
example above:
/subsystem=naming/binding=java\:global\/c:add(binding-type=lookup, lookup=java\:global\/b)
/subsystem=naming/binding=java\:global\/c:remove
9.2.2. Remote JNDI Configuration
The Naming subsystem configuration may be used to (de)activate the remote JNDI interface, which allows clients to lookup entries present in a remote WildFly instance.
Only entries within the java:jboss/exported context are accessible
over remote JNDI.
|
In the subsystem’s XML configuration, remote JNDI access bindings are
configured through the <remote-naming /> XML element:
<remote-naming />Management clients, such as the WildFly CLI, may be used to add/remove
the remote JNDI interface. An example to add and remove the one in
the XML example above:
/subsystem=naming/service=remote-naming:add
/subsystem=naming/service=remote-naming:remove
9.3. DataSource configuration
Datasources are configured through the datasource subsystem. Declaring a new datasource consists of two separate steps: You would need to provide a JDBC driver and define a datasource that references the driver you installed.
9.3.1. JDBC Driver Installation
The recommended way to install a JDBC driver into WildFly 19.1 is to deploy it as a regular JAR deployment. The reason for this is that when you run WildFly in domain mode, deployments are automatically propagated to all servers to which the deployment applies; thus distribution of the driver JAR is one less thing for you to worry about!
Any JDBC 4-compliant driver will automatically be recognized and
installed into the system by name and version. A JDBC JAR is identified
using the Java service provider mechanism. Such JARs will contain a text
a file named META-INF/services/java.sql.Driver, which contains the
name of the class(es) of the Drivers which exist in that JAR. If your
JDBC driver JAR is not JDBC 4-compliant, it can be made deployable in
one of a few ways.
Modify the JAR
The most straightforward solution is to simply modify the JAR and add the missing file. You can do this from your command shell by:
-
Change to, or create, an empty temporary directory.
-
Create a
META-INFsubdirectory. -
Create a
META-INF/servicessubdirectory. -
Create a
META-INF/services/java.sql.Driverfile which contains one line - the fully-qualified class name of the JDBC driver. -
Use the
jarcommand-line tool to update the JAR like this:
jar \-uf jdbc-driver.jar META-INF/services/java.sql.DriverFor a detailed explanation how to deploy JDBC 4 compliant driver jar, please refer to the chapter " Application Deployment".
9.3.2. Datasource Definitions
The datasource itself is defined within the subsystem datasources:
<subsystem xmlns="urn:jboss:domain:datasources:4.0">
    <datasources>
        <datasource jndi-name="java:jboss/datasources/ExampleDS" pool-name="ExampleDS">
            <connection-url>jdbc:h2:mem:test;DB_CLOSE_DELAY=-1</connection-url>
            <driver>h2</driver>
            <pool>
                <min-pool-size>10</min-pool-size>
                <max-pool-size>20</max-pool-size>
                <prefill>true</prefill>
            </pool>
            <security>
                <user-name>sa</user-name>
                <password>sa</password>
            </security>
        </datasource>
        <xa-datasource jndi-name="java:jboss/datasources/ExampleXADS" pool-name="ExampleXADS">
           <driver>h2</driver>
           <xa-datasource-property name="URL">jdbc:h2:mem:test</xa-datasource-property>
           <xa-pool>
                <min-pool-size>10</min-pool-size>
                <max-pool-size>20</max-pool-size>
                <prefill>true</prefill>
           </xa-pool>
           <security>
                <user-name>sa</user-name>
                <password>sa</password>
           </security>
        </xa-datasource>
        <drivers>
            <driver name="h2" module="com.h2database.h2">
                <xa-datasource-class>org.h2.jdbcx.JdbcDataSource</xa-datasource-class>
            </driver>
        </drivers>
  </datasources>

</subsystem>
(See standalone/configuration/standalone.xml )
As you can see the datasource references a driver by it’s logical name.
You can easily query the same information through the CLI:
[standalone@localhost:9990 /] /subsystem=datasources:read-resource(recursive=true)
{
    "outcome" => "success",
    "result" => {
        "data-source" => {"H2DS" => {
            "connection-url" => "jdbc:h2:mem:test;DB_CLOSE_DELAY=-1",
            "jndi-name" => "java:/H2DS",
            "driver-name" => "h2",
            "pool-name" => "H2DS",
            "use-java-context" => true,
            "enabled" => true,
            "jta" => true,
            "pool-prefill" => true,
            "pool-use-strict-min" => false,
            "user-name" => "sa",
            "password" => "sa",
            "flush-strategy" => "FailingConnectionOnly",
            "background-validation" => false,
            "use-fast-fail" => false,
            "validate-on-match" => false,
            "use-ccm" => true
        }},
        "xa-data-source" => undefined,
        "jdbc-driver" => {"h2" => {
            "driver-name" => "h2",
            "driver-module-name" => "com.h2database.h2",
            "driver-xa-datasource-class-name" => "org.h2.jdbcx.JdbcDataSource"
        }}
    }
}


[standalone@localhost:9990 /] /subsystem=datasources:installed-drivers-list
{
    "outcome" => "success",
    "result" => [{
        "driver-name" => "h2",
        "datasource-class-info" => [{"org.h2.jdbcx.JdbcDataSource" => {
            "URL" => "java.lang.String",
            "description" => "java.lang.String",
            "loginTimeout" => "int",
            "password" => "java.lang.String",
            "url" => "java.lang.String",
            "user" => "java.lang.String"
        }}],
        "deployment-name" => undefined,
        "driver-module-name" => "com.h2database.h2",
        "module-slot" => "main",
        "driver-xa-datasource-class-name" => "org.h2.jdbcx.JdbcDataSource",
        "driver-class-name" => "org.h2.Driver",
        "driver-major-version" => 1,
        "driver-minor-version" => 3,
        "jdbc-compliant" => true
    }]
}
datasource-class-info shows connection properties defined in the (xa-)datasource-class.
|
| Using the web console or the CLI greatly simplifies the deployment of JDBC drivers and the creation of datasources. |
The CLI offers a set of commands to create and modify datasources:
[standalone@localhost:9990 /] data-source --help

SYNOPSIS
  data-source --help [--properties | --commands] |
              (--name=<resource_id> (--<property>=<value>)*) |
              (<command> --name=<resource_id> (--<parameter>=<value>)*)
              [--headers={<operation_header> (;<operation_header>)*}]
DESCRIPTION
  The command is used to manage resources of type /subsystem=datasources/data-source.
[...]


[standalone@localhost:9990 /] xa-data-source --help

SYNOPSIS
  xa-data-source --help [--properties | --commands] |
                 (--name=<resource_id> (--<property>=<value>)*) |
                 (<command> --name=<resource_id> (--<parameter>=<value>)*)
                 [--headers={<operation_header> (;<operation_header>)*}]

DESCRIPTION
  The command is used to manage resources of type /subsystem=datasources/xa-data-source.

RESOURCE DESCRIPTION
  A JDBC XA data-source configuration

[...]
9.3.3. Using security domains
Information can be found at https://community.jboss.org/wiki/JBossAS7SecurityDomainModel
9.3.4. Component Reference
The datasource subsystem is provided by the IronJacamar project. For a detailed description of the available configuration properties, please consult the project documentation.
9.4. Agroal configuration
The Agroal subsystem allows the definition of datasources. Declaring a new datasource consists of two separate steps: provide a JDBC driver and define a datasource that references the driver you installed.
The Agroal subsystem is provided by the Agroal project. For a detailed description of the available configuration properties, please consult the project documentation.
9.4.1. Enabling the subsystem
If the WildFly configuration does not have Agroal subsystem enabled by default, it can be enabled in the following ways.
<extensions>
    <extension module="org.wildfly.extension.datasources-agroal"/>
    [...]
</extensions>
<subsystem xmlns="urn:jboss:domain:agroal:1.0">
    [...]
</subsystem>
[standalone@localhost:9990 /] /extension=org.wildfly.extension.datasources-agroal:add
{"outcome" => "success"}
[standalone@localhost:9990 /] /subsystem=datasources-agroal:add
{
"outcome" => "success",
"response-headers" => {
"operation-requires-reload" => true,
"process-state" => "reload-required"
}
}9.4.2. JDBC Driver Installation
A driver definition is a reference to a class in a JDBC driver. Multiple definitions can be created on the same JDBC driver for multiple classes in it. Agroal requires an implementation of java.sql.Driver or javax.sql.DataSource for non-XA datasources, while for XA a javax.sql.XADataSource implementation is required.
| Agroal will try to load an java.sql.Driver from the specified module if the class is not defined |
| Any installed driver provides an operation called class-info that lists all the properties available for that particular class, that can be set in the connection-factory. |
<subsystem xmlns="urn:jboss:domain:agroal:1.0">
    [...]
    <drivers>
        <driver name="h2" module="com.h2database.h2" class="org.h2.Driver"/>
    </drivers>
</subsystem>
[standalone@localhost:9990 /] /subsystem=datasources-agroal/driver=h2:read-resource
{
"outcome" => "success",
"result" => {
"class" => "org.h2.Driver",
"module" => "com.h2database.h2"
}
}9.4.3. Common Datasource Definitions
Agroal provides both XA and non-XA datasources and most of the attributes that define them are common. This definition is mainly split in two logical units: the connection factory and the connection pool. As the name implies, the connection factory has all that is required to create new connections and connection pool defines how connections are handled by the pool.
Connection Factory definition
The connection factory requires a reference to a driver (see agroal-driver-installation). With a java.sql.Driver the preferred way to 'point' to the database is to specify an url attribute while for javax.sql.DataSource and javax.sql.XADataSource the preferred way is to specify connection-properties.
| Attributes username and password are provided for basic authentication with the database. Agroal does not allow username and password to be set as connection-properties due to security requirements. |
Other features provided by the connection-factory definition include the possibility of executing a SQL statement right after the connection has been created and to specify the isolation level of transactions in the database.
<subsystem xmlns="urn:jboss:domain:agroal:1.0">
     <datasource [...]>
        [...]
        <connection-factory driver="h2" url="jdbc:h2:tcp://localhost:1701" transaction-isolation="SERIALIZABLE" new-connection-sql="SELECT 1" username="sa" password="sa">
            <connection-properties>
                <property name="aProperty" value="aValue"/>
                <property name="anotherProperty" value="anotherValue"/>
            </connection-properties>
        </connection-factory>
    </datasource>
    [...]
</subsystem>
---
[standalone@localhost:9990 /] /subsystem=datasources-agroal/datasource=sample:read-resource
{
"outcome" => "success",
"result" => {
"connection-factory" => {
"driver" => "h2",
"url" => "jdbc:h2:tcp://localhost:1701",
"transaction-isolation" => "SERIALIZABLE",
"new-connection-sql" => "SELECT 1",
"username" => "sa",
"password" => "sa",
"connection-properties" => {
"aProperty" => "aValue",
"anotherProperty" => "anotherValue"
}
}
[...]
}
}
---Connection Pool definition
The main attributes of the connection-pool definition are the ones that control it’s size. While the initial size attribute is only taken into account while bootstrapping the pool, min size and max size are always enforced and can be changed at any time without requiring a reload of the server.
Another important attribute of the connection-pool is the blocking timeout that defines the maximum amount of time a thread will wait for a connection. If that time elapses and still no connection is available an exception is thrown. Keep in mind that the default value is 0, meaning that a thread will wait forever for a connection to become available. Changing this setting does not require a reload of the server.
The connection pool provides other convenient features like background validation of connections on the pool, removal of idle connections from the pool and detection of connections held for too long by one thread. All these features are disabled by default and can be enabled by specifying an interval of time on the corresponding attribute.
| There is a set of flush operations that perform many of these features on-demand. These are flush-all to close all connections immediately, flush-graceful to close all connections under normal operation, flush-invalid to remove any invalid connections from the pool and flush-idle to remove any connections not being used. |
<subsystem xmlns="urn:jboss:domain:agroal:1.0">
     <datasource [...]>
        [...]
        <connection-pool max-size="30" min-size="10" initial-size="20" blocking-timeout="1000" background-validation="6000" leak-detection="5000" idle-removal="5"/>
    </datasource>
    [...]
</subsystem>
---
[standalone@localhost:9990 /] /subsystem=datasources-agroal/datasource=sample:read-resource
{
"outcome" => "success",
"result" => {
"connection-pool" => {
"max-size" => 30,
"min-size" => 10,
"initial-size" => 20,
"blocking-timeout" => 1000,
"background-validation" => 6000,
"leak-detection" => 5000,
"idle-removal" => 5
}
[...]
}
}
---Common datasource attributes
All datasources in Agroal have a name that’s used to locate them in the WildFly runtime model and are bound to a JNDI name.
The attribute statistics-enabled allow the collection of metrics regarding the pool that can be queried in the runtime model
| There is also a reset-statistics operation provided. |
<subsystem xmlns="urn:jboss:domain:agroal:1.0">
    <xa-datasource name="sample-xa" jndi-name="java:jboss/datasources/ExampleXADS" statistics-enabled="true">
        [...]
    </xa-datasource>
    [...]
</subsystem>
---
[standalone@localhost:9990 /] /subsystem=datasources-agroal/datasource=sample-xa:read-resource
{
"outcome" => "success",
"result" => {
"jndi-name" => "java:jboss/datasources/ExampleXADS",
"statistics-enabled" => true
[...]
}
}
---The available statistics include the number of created / destroyed connections and the number of connections in use / available in the pool. There are also statistics for the time it takes to create a connection and for how long have threads been blocked waiting for a connection.
[standalone@localhost:9990  /] /subsystem=datasources-agroal/datasource=sample:read-resource(include-runtime)
{
    "outcome" => "success",
    "result" => {
        "statistics" => {
            "acquire-count" => 10L,
            "active-count" => 3L,
            "available-count" => 17L,
            "awaiting-count" => 0L,
            "creation-count" => 20L,
            "destroy-count" => 0L,
            "flush-count" => 0L,
            "invalid-count" => 0L,
            "leak-detection-count" => 0L,
            "max-used-count" => 20L,
            "reap-count" => 0L,
            "blocking-time-average-ms" => 0L,
            "blocking-time-max-ms" => 0L,
            "blocking-time-total-ms" => 0L,
            "creation-time-average-ms" => 96L,
            "creation-time-max-ms" => 815L,
            "creation-time-total-ms" => 964L
        }
        [...]
    }
}
DataSource specific attributes
In addition to all the common attributes, a datasource definition may disable the JTA integration.
Deferred enlistment is not supported, meaning that if JTA is enabled a connection must always be obtained within the scope of a transaction. The connection will always be enlisted with that transaction (lazy enlistment is not supported).
| The connectable attribute allows a non-XA datasource to take part in an XA transaction ('Last Resource Commit Optimization (LRCO)' / 'Commit Markable Resource') |
<subsystem xmlns="urn:jboss:domain:agroal:1.0">
    <datasource name="sample" jndi-name="java:jboss/datasources/ExampleDS" jta="false" connectable="false" statistics-enabled="true">
        [...]
    </datasource>
    [...]
</subsystem>
---
[standalone@localhost:9990 /] /subsystem=datasources-agroal/datasource=sample-xa:read-resource
{
"outcome" => "success",
"result" => {
"connectable" => false,
"jta" => false,
[...]
}
}
---XADataSource specific attributes
At the moment there are no attributes specific to a XADataSource definition.
9.5. Logging Configuration
The overall server logging configuration is represented by the logging subsystem. It consists of four notable parts:handlerconfigurations,logger, theroot loggerdeclarations (aka log categories) and logging profiles. Each logger does reference a handler (or set of handlers). Each handler declares the log format and output:
<subsystem xmlns="urn:jboss:domain:logging:3.0">
   <console-handler name="CONSOLE" autoflush="true">
       <level name="DEBUG"/>
       <formatter>
           <named-formatter name="COLOR-PATTERN"/>
       </formatter>
   </console-handler>
   <periodic-rotating-file-handler name="FILE" autoflush="true">
       <formatter>
           <named-formatter name="PATTERN"/>
       </formatter>
       <file relative-to="jboss.server.log.dir" path="server.log"/>
       <suffix value=".yyyy-MM-dd"/>
   </periodic-rotating-file-handler>
   <logger category="com.arjuna">
       <level name="WARN"/>
   </logger>
   [...]
   <root-logger>
       <level name="DEBUG"/>
       <handlers>
           <handler name="CONSOLE"/>
           <handler name="FILE"/>
       </handlers>
   </root-logger>
   <formatter name="PATTERN">
       <pattern-formatter pattern="%d{yyyy-MM-dd HH:mm:ss,SSS} %-5p [%c] (%t) %s%e%n"/>
   </formatter>
   <formatter name="COLOR-PATTERN">
       <pattern-formatter pattern="%K{level}%d{HH:mm:ss,SSS} %-5p [%c] (%t) %s%e%n"/>
   </formatter>
</subsystem>
9.5.1. Attributes
The root resource contains two notable attributes
add-logging-api-dependencies and use-deployment-logging-config.
add-logging-api-dependencies
The add-logging-api-dependencies controls whether or not the container
adds
implicit
logging API dependencies to your deployments. If set to true, the
default, all the implicit logging API dependencies are added. If set to
false the dependencies are not added to your deployments.
use-deployment-logging-config
The use-deployment-logging-config controls whether or not your
deployment is scanned for
per-deployment
logging. If set to true, the default,
per-deployment
logging is enabled. Set to false to disable this feature.
9.5.2. Per-deployment Logging
Per-deployment logging allows you to add a logging configuration file to
your deployment and have the logging for that deployment configured
according to the configuration file. In an EAR the configuration should
be in the META-INF directory. In a WAR or JAR deployment the
configuration file can be in either the META-INF or WEB-INF/classes
directories.
The following configuration files are allowed:
-
logging.properties
-
jboss-logging.properties
-
log4j.properties
-
log4j.xml
-
jboss-log4j.xml
You can also disable this functionality by changing the
use-deployment-logging-config attribute to false.
9.5.3. Logging Profiles
Logging profiles are like additional logging subsystems. Each logging
profile constists of three of the four notable parts listed above:
handler configurations, logger and the root logger declarations.
You can assign a logging profile to a deployment via the deployments
manifest. Add a Logging-Profile entry to the MANIFEST.MF file with a
value of the logging profile id. For example a logging profile defined
on /subsystem=logging/logging-profile=ejbs the MANIFEST.MF would look
like:
Manifest-Version: 1.0
Logging-Profile: ejbs
A logging profile can be assigned to any number of deployments. Using a logging profile also allows for runtime changes to the configuration. This is an advantage over the per-deployment logging configuration as the redeploy is not required for logging changes to take affect.
9.5.4. Default Log File Locations
Managed Domain
In a managed domain two types of log files do exist: Controller and server logs. The controller components govern the domain as whole. It’s their responsibility to start/stop server instances and execute managed operations throughout the domain. Server logs contain the logging information for a particular server instance. They are co-located with the host the server is running on.
For the sake of simplicity we look at the default setup for managed domain. In this case, both the domain controller components and the servers are located on the same host:
| Process | Log File |
|---|---|
Host Controller |
./domain/log/host-controller.log |
Process Controller |
./domain/log/process-controller.log |
"Server One" |
./domain/servers/server-one/log/server.log |
"Server Two" |
./domain/servers/server-two/log/server.log |
"Server Three" |
./domain/servers/server-three/log/server.log |
Standalone Server
The default log files for a standalone server can be found in the log subdirectory of the distribution:
| Process | Log File |
|---|---|
Server |
./standalone/log/server.log |
9.5.5. List Log Files and Reading Log Files
Log files can be listed and viewed via management operations. The log
files allowed to be viewed are intentionally limited to files that exist
in the jboss.server.log.dir and are associated with a known file
handler. Known file handler types include file-handler,
periodic-rotating-file-handler and size-rotating-file-handler. The
operations are valid in both standalone and domain modes.
List Log Files
The logging subsystem has a log-file resource off the subsystem root
resource and off each logging-profile resource to list each log file.
[standalone@localhost:9990 /] /subsystem=logging:read-children-names(child-type=log-file)
{
    "outcome" => "success",
    "result" => [
        "server.log",
        "server.log.2014-02-12",
        "server.log.2014-02-13"
    ]
}
Read Log File
The read-log-file operation is available on each log-file resource.
This operation has 4 optional parameters.
| Name | Description |
|---|---|
encoding |
the encoding the file should be read in |
lines |
the number of lines from the file. A value of -1 indicates all lines should be read. |
skip |
the number of lines to skip before reading. |
tail |
true to read from the end of the file up or false to read top down. |
[standalone@localhost:9990 /] /subsystem=logging/log-file=server.log:read-log-file
{
    "outcome" => "success",
    "result" => [
        "2014-02-14 14:16:48,781 INFO  [org.jboss.as.server.deployment.scanner] (MSC service thread 1-11) JBAS015012: Started FileSystemDeploymentService for directory /home/jperkins/servers/wildfly-8.0.0.Final/standalone/deployments",
        "2014-02-14 14:16:48,782 INFO  [org.jboss.as.connector.subsystems.datasources] (MSC service thread 1-8) JBAS010400: Bound data source [java:jboss/myDs]",
        "2014-02-14 14:16:48,782 INFO  [org.jboss.as.connector.subsystems.datasources] (MSC service thread 1-15) JBAS010400: Bound data source [java:jboss/datasources/ExampleDS]",
        "2014-02-14 14:16:48,786 INFO  [org.jboss.as.server.deployment] (MSC service thread 1-9) JBAS015876: Starting deployment of \"simple-servlet.war\" (runtime-name: \"simple-servlet.war\")",
        "2014-02-14 14:16:48,978 INFO  [org.jboss.ws.common.management] (MSC service thread 1-10) JBWS022052: Starting JBoss Web Services - Stack CXF Server 4.2.3.Final",
        "2014-02-14 14:16:49,160 INFO  [org.wildfly.extension.undertow] (MSC service thread 1-16) JBAS017534: Registered web context: /simple-servlet",
        "2014-02-14 14:16:49,189 INFO  [org.jboss.as.server] (Controller Boot Thread) JBAS018559: Deployed \"simple-servlet.war\" (runtime-name : \"simple-servlet.war\")",
        "2014-02-14 14:16:49,224 INFO  [org.jboss.as] (Controller Boot Thread) JBAS015961: Http management interface listening on http://127.0.0.1:9990/management",
        "2014-02-14 14:16:49,224 INFO  [org.jboss.as] (Controller Boot Thread) JBAS015951: Admin console listening on http://127.0.0.1:9990",
        "2014-02-14 14:16:49,225 INFO  [org.jboss.as] (Controller Boot Thread) JBAS015874: WildFly {wildflyVersion}.0.0.Final \"WildFly\" started in 1906ms - Started 258 of 312 services (90 services are lazy, passive or on-demand)"
    ]
}
9.5.6. FAQ
Why is there a logging.properties file?
You may have noticed that there is a logging.properties file in the
configuration directory. This is logging configuration is used when the
server boots up until the logging subsystem kicks in. If the logging
subsystem is not included in your configuration, then this would act as
the logging configuration for the entire server.
The logging.properties file is overwritten at boot and with each
change to the logging subsystem. Any changes made to the file are not
persisted. Any changes made to the XML configuration or via management
operations will be persisted to the logging.properties file and used
on the next boot.
|
9.5.7. Logging Formatters
Formatters are used to format a log message. A formatter can be assigned to a logging handler.
The logging subsystem includes 4 types of handlers:
JSON Formatter
A formatter used to format log messages in JSON.
Examples
/subsystem=logging/json-formatter=json:add(pretty-print=true, exception-output-type=formatted)
/subsystem=logging/json-formatter=logstash:add(exception-output-type=formatted, key-overrides=[timestamp="@timestamp"],
meta-data=[@version=1])
Pattern Formatter
A formatter used to format log messages in plain text. The following table describes the format characters for the pattern formatter.
| Highlighted symbols indicate the calculation of the caller is required which can be expensive to resolve. |
| Symbol | Description | Examples | ||||||
|---|---|---|---|---|---|---|---|---|
%c |
The category of the logging event. A precision specifier can be used to alter the dot delimited category |
%c      org.jboss.example.Foo
%c{1}   Foo
%c{2}   example.Foo
%c{.}   ...Foo
%c{1.}  o.j.e.Foo
%c{1~.} o.~.~.Foo
|
||||||
%C |
The class of the code calling the log method. A precision specifier can be used to alter the dot delimited class name. |
%C      org.jboss.example.Foo
%C{1}   Foo
%C{2}   example.Foo
%C{.}   ...Foo
%C{1.}  o.j.e.Foo
%C{1~.} o.~.~.Foo
|
||||||
The timestamp the log message. Any valid |
%d{HH:mm:ss,SSS}
%d{yyyy-MM-dd'T'HH:mm:ss.SSSXXX}
|
|||||||
%D |
The name of the module the log message came from. A precision specifier can be used to alter the dot delimited module name. |
%D      org.jboss.example
%D{1}   example
%D{2}   jboss.example
%D{.}   ..example
%D{1.}  o.j.example
%D{1~.} o.~.example
|
||||||
%e |
The exception stack trace. Accepts an argument to indicate how many levels of suppressed messages to print. |
|
||||||
%F |
The name of the file the class that logged the message. |
|
||||||
%h |
The short host name. This will be the first portion of the qualified host name. |
%h localhost |
||||||
%H |
The qualified host name. A precision specifier can be used to alter the dot delimited host name. |
%H    developer.jboss.org
%H{1} developer
|
||||||
%i |
The process id. |
|
||||||
%k |
The resource bundle key. |
|
||||||
%K |
If colored output is supported defines the colors to map to the log message. |
|
||||||
%l |
The location information. This includes the callers class name, method name, file name and line number. |
%l org.jboss.example.Foo.bar(Foo.java:33) |
||||||
%L |
The line number of the caller. |
|
||||||
%m |
The formatted message including any stack traces. |
|
||||||
%M |
The callers method name. |
|
||||||
%n |
A platform independent line separator. |
|
||||||
%N |
The name of the process. |
|
||||||
%p |
The level of the logged message. |
|
||||||
%P |
The localized level of the logged message. |
|
||||||
%r |
The relative number of milliseconds since the given base time from the log message. |
|
||||||
%s |
The simple formatted message. This will not include the stack trace if a cause was logged. |
|
||||||
%t |
The name of the callers thread. |
|
||||||
%v |
The version of the module. A precision specifier can be used to alter the dot delimited module version. |
|
||||||
%x |
The nested diagnostic context entries. A precision specifier can be used to specify the number of entries to print. |
%x      value1.value2.value3
%x{1}   value3
%x{2}   value2.value3
|
||||||
%X |
The mapped diagnostic context entry. The entry must be followed by the key for the MDC entry. |
|
||||||
%z |
Allows the timezone to be overridden when formatting the timestamp. This must precede the timestamp. |
|
||||||
%# |
Allows a system property to be appended to the log message. |
|
||||||
%$ |
Allows a system property to be appended to the log message. |
|
||||||
%% |
Escapes the |
|
You can also modify the format by placing the optional format modifier between the percent sign and the symbol.
| Modifier | Left Justify | Min Width | Max Width | Example |
|---|---|---|---|---|
[%20c] |
false |
20 |
|
[ org.jboss.example] |
[%-20c] |
true |
20 |
|
[org.jboss.example ] |
[%.10c] |
|
|
10 |
[org.jboss] |
[%20.30c] |
false |
20 |
30 |
[ org.jboss.example] |
[%-20.30c] |
true |
20 |
30 |
[org.jboss.example ] |
Examples
/subsystem=logging/pattern-formatter=DEFAULT:add(pattern="%d{HH:mm:ssSSSXXX} %-5p [%c] (%t) %10.10#{jboss.node.name} %s%e%n")
/subsystem=logging/pattern-formatter=DEFAULT:add(color-map="info:cyan,warn:brightyellow,error:brightred,debug:magenta", pattern="%K{level}%d{yyyy-MM-dd'T'HH:mm:ssSSSXXX} %-5p [%c] (%t) %s%e%n")
XML Formatter
A formatter used to format log messages in XML.
Examples
/subsystem=logging/xml-formatter=xml:add(pretty-print=true, exception-output-type=detailed-and-formatted)
/subsystem=logging/xml-formatter=xml:add(pretty-print=true, print-namespace=true, namespace-uri="urn:custom:1.0", key-overrides={message=msg, record=logRecord, timestamp=date}, print-details=true)
Custom Formatter
A custom formatter to be used with handlers. Note that most log records are formatted in the printf format. Formatters
may require invocation of the org.jboss.logmanager.ExtLogRecord#getFormattedMessage() for the message to be properly
formatted.
Examples
/subsystem=logging/custom-formatter=custom:add(class=org.jboss.example.CustomFormatter, module=org.jboss.example, properties={prettyPrint=true,printDetails=true,bufferSize=1024})
9.5.8. Handlers
Overview
Handlers define how log messages are recorded. If a message is said to be loggable by a logger the message is then processed by the log handler.
The following are the available handlers for ;
async-handler
An async-handler is a handler that asynchronously writes log messages to it’s child handlers. This type of
handler is generally used to wrap other handlers that take a substantial time to write messages.
console-handler
A console-handler is a handler that writes log messages to the console. Generally this writes to stdout,
but can be set to write to stderr.
custom-handler
A custom-handler allows you to define any handler as a handler that
can be assigned to a logger or a async-handler.
file-handler
A file-handler is a handler that writes log messages to the specified file.
periodic-rotating-file-handler
A periodic-rotating-file-handler is a handler that writes log messages to the specified file. The file rotates on
the date pattern specified in the suffix attribute. The suffix must be a valid pattern recognized by the
java.text.SimpleDateFormat and must not rotate on seconds or
milliseconds.
| The rotate happens before the next message is written by the handler. |
periodic-size-rotating-file-handler
A periodic-size-rotating-file-handler is a handler that writes log messages to the specified file. The file rotates on
the date pattern specified in the suffix attribute or the rotate-size attribute. The suffix must be a valid
pattern recognized by the java.text.SimpleDateFormat and must
not rotate on seconds or milliseconds.
The max-backup-index works differently on this handler than the
size-rotating-file-handler. The date suffix of the file to be rotated must be the
same as the current expected suffix. For example with a suffix pattern of yyyy-MM and a rotate-size of 10m the
file will be rotated with the current month each time the 10Mb size is reached.
| The rotate happens before the next message is written by the handler. |
size-rotating-file-handler
A size-rotating-file-handler is a handler that writes log messages to the specified file. The file rotates when
the file size is greater than the rotate-size attribute. The rotated file will be kept and the index appended
to the name moving previously rotated file indexes up by 1 until the max-backup-index is reached. Once the
max-backup-index is reached, the indexed files will be overwritten.
| The rotate happens before the next message is written by the handler. |
socket-handler
A socket-handler is a handler which sends messages over a socket. This can be a TCP or UDP socket and must be
defined in a socket binding group under the local-destination-outbound-socket-binding or
remote-destination-outbound-socket-binding resource.
During the boot logging messages will be queued until the socket binding is configured and the logging subsystem is
added. This is important to note because setting the level of the handler to DEBUG or TRACE could result in
large memory consumption during boot.
|
A server booted in |
# Add the socket binding
/socket-binding-group=standard-sockets/remote-destination-outbound-socket-binding=log-server:add(host=localhost, port=4560)
# Add a json-formatter
/subsystem=logging/json-formatter=json:add
# Add the socket handler
/subsystem=logging/socket-handler=log-server-handler:add(named-formatter=json, level=INFO, outbound-socket-binding-ref=log-server)
# Add the handler to the root logger
/subsystem=logging/root-logger=ROOT:add-handler(name=log-server-handler)/subsystem=logging/socket-handler=log-server-handler:add(named-formatter=json, level=INFO, outbound-socket-binding-ref=log-server, protocol=UDP)# Add the socket binding
/socket-binding-group=standard-sockets/remote-destination-outbound-socket-binding=log-server:add(host=localhost, port=4560)
# Add the Elytron key store
/subsystem=elytron/key-store=log-server-ks:add(path=/path/to/keystore.jks, type=JKS, credential-reference={clear-text=mypassword})
# Add the Elytron trust manager
/subsystem=elytron/trust-manager=log-server-tm:add(key-store=log-server-ks)
# Add the client SSL context
/subsystem=elytron/client-ssl-context=log-server-context:add(trust-manager=log-server-tm, protocols=["TLSv1.2"])
# Add a json-formatter
/subsystem=logging/json-formatter=json:add
# Add the socket handler
/subsystem=logging/socket-handler=log-server-handler:add(named-formatter=json, level=INFO, outbound-socket-binding-ref=log-server, protocol=SSL_TCP, ssl-context=log-server-context)
# Add the handler to the root logger
/subsystem=logging/root-logger=ROOT:add-handler(name=log-server-handler)
Wrapping a socket-handler in a async-handler may improve performance.
|
syslog-handler
A syslog-handler is a handler that writes to a syslog server via UDP. The handler support
RFC3164 or RFC5424 formats.
|
The syslog-handler is missing some configuration properties that may be
useful in some scenarios like setting a formatter. Use the
|
9.5.9. How To
How do I add a log category?
/subsystem=logging/logger=com.your.category:addHow do I change a log level?
To change a handlers log level:
/subsystem=logging/console-handler=CONSOLE:write-attribute(name=level,value=DEBUG)Changing the level on a log category is the same:
/subsystem=logging/logger=com.your.category:write-attribute(name=level,value=ALL)How do I log my applications messages to their own file?
-
Create a file handler. There are 3 different types of file handlers to choose from;
file-handler,periodic-rotating-file-handlerandsize-rotating-file-handler. In this example we’ll just use a simplefile-handler./subsystem=logging/file-handler=fh:add(level=INFO, file={"relative-to"=>"jboss.server.log.dir", "path"=>"fh.log"}, append=false, autoflush=true) -
Now create the log category.
/subsystem=logging/logger=org.your.company:add(use-parent-handlers=false,handlers=["fh"])
How do I use log4j.properties or log4j.xml instead of using the
logging subsystem configuration?
First note that if you choose to use a log4j configuration file, you will no longer be able to make runtime logging changes to your deployments logging configuration.
If that is acceptable you can use per-deployment logging and just include a configuration file in your deployment.
How do I use my own version of log4j?
If you need/want to include your version of log4j then you need to do the following two steps.
-
Disable the adding of the logging dependencies to all your deployments with the add-logging-api-dependencies attribute and disable the use-deployment-logging-config attribute OR exclude the logging subsystem in a jboss-deployment-structure.xml.
-
Then need to include a log4j library in your deployment.
This only works for logging in your deployment. Server logs will continue to use the logging subsystem configuration.
9.5.10. Loggers
WIP
| This is still a work in progress. Please feel free to edit any mistakes you find |
Overview
Loggers are used to log messages. A logger is defined by a category generally consisting of a package name or a class name.
A logger is the first step to determining if a messages should be logged or not. If a logger is defined with a level, the level of the message must be greater than the level defined on the logger. The filter is then checked next and the rules of the filter will determine whether or not the messages is said to be loggable.
Logger Resource
A logger resource uses the path subsystem=logging/logger=$category
where $category is the of the logger. For example to a logger named
org.wildfly.example would have a resource path of
subsystem=logging/logger=org.wildfly.example.
A logger as 4 writeable attributes;
You may notice that the category and filter attributes are missing.
While filter is writable it may be deprecated and removed in the
future. Both attributes are still on the resource for legacy reasons.
|
The filter-spec attribute is an expression based string to define
filters for the logger.
| Filters on loggers are not inherited. |
The handlers attribute is a list of handler names that should be
attached to the logger. If the
use-parent-handlers
attribute is set to true and the log messages is determined to be
loggable, parent loggers will continue to be processed.
The level attribute allows the minimum level to allow messages to be
logged at for the logger.
The use-parent-handlers attribute is a boolean attribute to determine
whether or not parent loggers should also process the log message.
Root Logger Resource
The root-logger is similar to a
#Logger Resource only it has no
category and it’s name is must be ROOT.
Logger Hierarchy
A logger hierarchy is defined by it’s category. The category is a .
(dot) delimited string generally consisting of the package name or a
class name. For example the logger org.wildfly is the parent logger of
org.wildfly.example.
9.5.11. Logging Filters
Filters are used to add fine grained control over a log message. A filter can be assigned to a logger or log handler. See the Filter documentation for details on filters.
Filter
The filter resource allows a custom filter to be used. The custom filter must reside in a module and implement the Filter interface.
It’s generally suggested to add filters to a handler. By default loggers do no inherit filters. This means if a filter
is placed on a logger named org.jboss.as.logging is only checked if the logger name is equal to org.jboss.as.logging.
Examples
/subsystem=logging/filter=myFilter:add(class=org.jboss.example.MyFilter, module=org.jboss.example, properties={matches="true"}, constructor-properties={pattern="*.WFLYLOG.*"))
/subsystem=logging/console-handler=CONSOLE:write-attribute(name=filter-spec, value=not(myFilter))
Filter Expressions
| Filter Type | Expression | Description | Parameter(s) | Examples |
|---|---|---|---|---|
accept |
accept |
Accepts all log messages. |
None |
accept |
deny |
deny |
Denies all log messages. |
None |
deny |
not |
not(filterExpression) |
Accepts a filter as an argument and inverts the returned value. |
The expression takes a single filter for it’s argument. |
not(match("JBAS")) |
all |
all(filterExpressions) |
A filter consisting of several filters in a chain. If any filter find the log message to be unloggable, the message will not be logged and subsequent filters will not be checked. |
The expression takes a comma delimited list of filters for it’s argument. |
all(match("JBAS"), match("WELD")) |
any |
any(filterExpressions) |
A filter consisting of several filters in a chain. If any filter fins the log message to be loggable, the message will be logged and the subsequent filters will not be checked. |
The expression takes a comma delimited list of filters for it’s argument. |
any(match("JBAS"), match("WELD")) |
levelChange |
levelChange(level) |
A filter which modifies the log record with a new level. |
The expression takes a single string based level for it’s argument. |
levelChange(WARN) |
levels |
levels(levels) |
A filter which includes log messages with a level that is listed in the list of levels. |
The expression takes a comma delimited list of string based levels for it’s argument. |
levels(DEBUG, INFO, WARN, ERROR) |
levelRange |
levelRange([minLevel,maxLevel]) |
A filter which logs records that are within the level range. |
The filter expression uses a "[" to indicate a minimum inclusive level and a "]" to indicate a maximum inclusive level. Otherwise use "(" or ")" respectively indicate exclusive. The first argument for the expression is the minimum level allowed, the second argument is the maximum level allowed. |
minimum level must be less than ERROR and the maximum level must be greater than DEBUGlevelRange(ERROR, DEBUG) minimum level must be less than or equal to ERROR and the maximum level must be greater than DEBUGlevelRange[ERROR, DEBUG) minimum level must be less than or equal to ERROR and the maximum level must be greater or equal to INFOlevelRange[ERROR, INFO] |
match |
match("pattern") |
A regular-expression based filter. The raw unformatted message is used against the pattern. |
The expression takes a regular expression for it’s argument. match("JBAS\d+") |
|
substitute |
substitute("pattern", "replacement value") |
A filter which replaces the first match to the pattern with the replacement value. |
The first argument for the expression is the pattern the second argument is the replacement text. |
substitute("JBAS", "EAP") |
substituteAll |
substituteAll("pattern", "replacement value") |
A filter which replaces all matches of the pattern with the replacement value. |
The first argument for the expression is the pattern the second argument is the replacement text. |
substituteAll("JBAS", "EAP") |
filterName |
myCustomFilter |
A custom filter which is defined on a |
None |
myCustomFilter |
9.6. EJB3 subsystem configuration guide
This page lists the options that are available for configuring the EJB subsystem.
A complete example of the config is shown below, with a full explanation of each
<subsystem xmlns="urn:jboss:domain:ejb3:6.0">
  <session-bean>
    <stateless>
      <bean-instance-pool-ref pool-name="slsb-strict-max-pool"/>
    </stateless>
    <stateful default-access-timeout="5000" cache-ref="simple" clustered-cache-ref="clustered"/>
    <singleton default-access-timeout="5000"/>
  </session-bean>
  <mdb>
    <resource-adapter-ref resource-adapter-name="hornetq-ra"/>
    <bean-instance-pool-ref pool-name="mdb-strict-max-pool"/>
  </mdb>
  <entity-bean>
    <bean-instance-pool-ref pool-name="entity-strict-max-pool"/>
  </entity-bean>
  <pools>
    <bean-instance-pools>
      <strict-max-pool name="slsb-strict-max-pool" max-pool-size="20" instance-acquisition-timeout="5" instance-acquisition-timeout-unit="MINUTES"/>
      <strict-max-pool name="mdb-strict-max-pool" max-pool-size="20" instance-acquisition-timeout="5" instance-acquisition-timeout-unit="MINUTES"/>
      <strict-max-pool name="entity-strict-max-pool" max-pool-size="100" instance-acquisition-timeout="5" instance-acquisition-timeout-unit="MINUTES"/>
  </bean-instance-pools>
  </pools>
  <caches>
    <cache name="simple" aliases="NoPassivationCache"/>
    <cache name="passivating" passivation-store-ref="file" aliases="SimpleStatefulCache"/>
    <cache name="clustered" passivation-store-ref="infinispan" aliases="StatefulTreeCache"/>
  </caches>
  <passivation-stores>
    <file-passivation-store name="file"/>
    <cluster-passivation-store name="infinispan" cache-container="ejb"/>
  </passivation-stores>
  <async thread-pool-name="default"/>
  <timer-service thread-pool-name="default" default-data-store="default-file-store">
    <data-stores>
      <file-data-store name="default-file-store" path="timer-service-data" relative-to="jboss.server.data.dir"/>
    </data-stores>
  </timer-service>
  <remote connector-ref="remoting-connector" thread-pool-name="default"/>
  <thread-pools>
    <thread-pool name="default">
      <max-threads count="10"/>
      <core-threads count="10"/>
      <keepalive-time time="60" unit="seconds"/>
    </thread-pool>
  </thread-pools>
  <iiop enable-by-default="false" use-qualified-name="false"/>
  <in-vm-remote-interface-invocation pass-by-value="false"/> <!-- Warning see notes below about possible issues -->
</subsystem>
9.6.1. <session-bean>
<stateless>
This element is used to configure the instance pool that is used by
default for stateless session beans. If it is not present stateless
session beans are not pooled, but are instead created on demand for
every invocation. The instance pool can be overridden on a per
deployment or per bean level using jboss-ejb3.xml or the
org.jboss.ejb3.annotation.Pool annotation. The instance pools
themselves are configured in the <pools> element.
<stateful>
This element is used to configure Stateful Session Beans.
-
default-access-timeoutThis attribute specifies the default time concurrent invocations on the same bean instance will wait to acquire the instance lock. It can be overridden via the deployment descriptor or via thejavax.ejb.AccessTimeoutannotation. -
cache-refThis attribute is used to set the default cache for non-clustered beans. It can be overridden byjboss-ejb3.xml, or via theorg.jboss.ejb3.annotation.Cacheannotation. -
clustered-cache-refThis attribute is used to set the default cache for clustered beans.
<singleton>
This element is used to configure Singleton Session Beans.
-
default-access-timeoutThis attribute specifies the default time concurrent invocations will wait to acquire the instance lock. It can be overridden via the deployment descriptor or via thejavax.ejb.AccessTimeoutannotation.
9.6.2. <mdb>
<resource-adaptor-ref>
This element sets the default resource adaptor for Message Driven Beans.
<bean-instance-pool-ref>
This element is used to configure the instance pool that is used by
default for Message Driven Beans. If it is not present they are not
pooled, but are instead created on demand for every invocation. The
instance pool can be overridden on a per deployment or per bean level
using jboss-ejb3.xml or the org.jboss.ejb3.annotation.Pool
annotation. The instance pools themselves are configured in the
<pools> element.
9.6.3. <entity-bean>
This element is used to configure the behavior for EJB2 EntityBeans.
<bean-instance-pool-ref>
This element is used to configure the instance pool that is used by
default for Entity Beans. If it is not present they are not pooled, but
are instead created on demand for every invocation. The instance pool
can be overridden on a per deployment or per bean level using
jboss-ejb3.xml or the org.jboss.ejb3.annotation.Pool annotation. The
instance pools themselves are configured in the <pools> element.
9.6.7. <async>
This element enables async EJB invocations. It is also used to specify the thread pool that these invocations will use.
9.6.8. <timer-service>
This element enables the EJB timer service. It is also used to specify the thread pool that these invocations will use.
<data-store>
This is used to configure the directory that persistent timer information is saved to.
9.6.9. <remote>
This is used to enable remote EJB invocations. It specifies the remoting connector to use (as defined in the remoting subsystem configuration), and the thread pool to use for remote invocations.
9.6.10. <thread-pools>
This is used to configure the thread pools used by async, timer and remote invocations.
-
max-threadsspecifies the maximum number of threads in the thread pool. It is a required attribute and defaults to10. -
core-threadsspecifies the number of core threads in the thread pool. It is an optional attribute and defaults tomax-threadsvalue. -
keepalive-timespecifies the amount of time that non-core threads can stay idle before they become eligible for removal. It is an optional attribute and defaults to60seconds.
9.6.11. <iiop>
This is used to enable IIOP (i.e. CORBA) invocation of EJB’s. If this element is present then the JacORB subsystem must also be installed. It supports the following two attributes:
-
enable-by-defaultIf this is true then all EJB’s with EJB2.x home interfaces are exposed via IIOP, otherwise they must be explicitly enabled viajboss-ejb3.xml. -
use-qualified-nameIf this is true then EJB’s are bound to the corba naming context with a binding name that contains the application and modules name of the deployment (e.g. myear/myejbjar/MyBean), if this is false the default binding name is simply the bean name.
9.6.12. <in-vm-remote-interface-invocation>
By default remote interface invocations use pass by value, as required by the EJB spec. This element can use used to enable pass by reference, which can give you a performance boost. Note WildFly will do a shallow check to see if the caller and the EJB have access to the same class definitions, which means if you are passing something such as a List<MyObject>, WildFly only checks the List to see if it is the same class definition on the call & EJB side. If the top level class definition is the same, JBoss will make the call using pass by reference, which means that if MyObject or any objects beneath it are loaded from different classloaders, you would get a ClassCastException. If the top level class definitions are loaded from different classloaders, JBoss will use pass by value. JBoss cannot do a deep check of all of the classes to ensure no ClassCastExceptions will occur because doing a deep check would eliminate any performance boost you would have received by using call by reference. It is recommended that you configure pass by reference only on callers that you are sure will use the same class definitions and not globally. This can be done via a configuration in the jboss-ejb-client.xml as shown below.
To configure a caller/client use pass by reference, you configure your top level deployment with a META-INF/jboss-ejb-client.xml containing:
<jboss-ejb-client xmlns="urn:jboss:ejb-client:1.0">
    <client-context>
        <ejb-receivers local-receiver-pass-by-value="false"/>
    </client-context>
</jboss-ejb-client>
9.6.13. <server-interceptors>
This element configures a number of server-side interceptors which can be configured without changing the deployments.
Each interceptor is configured in <interceptor> tag which contains the following fields:
-
module- the module in which the interceptor is defined -
class- the class which implements the interceptor
In order to use server interceptors you have to create a module that implements them and place it into ${WILDFLY_HOME}/modules directory.
Interceptor implementations are POJO classes which use javax.interceptor.AroundInvoke and javax.interceptor.AroundTimeout to mark interceptor methods.
Sample configuration:
<server-interceptors>
        <interceptor module="org.foo:FooInterceptor:1.0" class="org.foo.FooInterceptor"/>
</server-interceptors>
Sample interceptor implementation:
package org.foo;

import javax.annotation.PostConstruct;
import javax.interceptor.AroundInvoke;
import javax.interceptor.InvocationContext;

public class FooInterceptor {

    @AroundInvoke
    public Object bar(final InvocationContext invocationContext) throws Exception {
        return invocationContext.proceed();
    }
}
9.6.14. <client-interceptors>
This element configures a number of client-side interceptors which can be configured without changing the deployments.
Each interceptor is configured in <interceptor> tag which contains the following fields:
-
module- the module in which the interceptor is defined -
class- the class which implements the interceptor
In order to use server interceptors you have to create a module that implements them and place it into ${WILDFLY_HOME}/modules directory.
Interceptor implementations must implement org.jboss.ejb.client.EJBClientInterceptor interface.
Sample configuration:
<client-interceptors>
        <interceptor module="org.foo:FooInterceptor:1.0" class="org.foo.FooInterceptor"/>
</client-interceptors>
Sample interceptor implementation:
package org.foo;

import org.jboss.ejb.client.EJBClientInterceptor;
import org.jboss.ejb.client.EJBClientInvocationContext;

public class FooInterceptor implements EJBClientInterceptor {

    @Override
    public void handleInvocation(EJBClientInvocationContext context) throws Exception {
        context.sendRequest();
    }

    @Override
    public Object handleInvocationResult(EJBClientInvocationContext context) throws Exception {
        return context.getResult();
    }
}
9.7. Undertow subsystem configuration
There are two main parts to the undertow subsystem, which are server and Servlet container configuration, as well as some ancillary items. Advanced topics like load balancing and failover are covered on the "High Availability Guide". The default configuration does is suitable for most use cases and provides reasonable performance settings.
Required extension:
<extension module="org.wildfly.extension.undertow" />Basic subsystem configuration example:
<subsystem xmlns="urn:jboss:domain:undertow:1.0">
        <buffer-caches>
            <buffer-cache name="default" buffer-size="1024" buffers-per-region="1024" max-regions="10"/>
        </buffer-caches>
        <server name="default-server">
            <http-listener name="default" socket-binding="http" />
            <host name="default-host" alias="localhost">
                <location name="/" handler="welcome-content" />
            </host>
        </server>
        <servlet-container name="default" default-buffer-cache="default" stack-trace-on-error="local-only" >
            <jsp-config/>
            <persistent-sessions/>
        </servlet-container>
        <handlers>
            <file name="welcome-content" path="${jboss.home.dir}/welcome-content" directory-listing="true"/>
        </handlers>
    </subsystem>
Dependencies on other subsystems:
IO Subsystem
9.7.1. Buffer cache configuration
The buffer cache is used for caching content, such as static files. Multiple buffer caches can be configured, which allows for separate servers to use different sized caches.
Buffers are allocated in regions, and are of a fixed size. If you are caching many small files then using a smaller buffer size will be better.
The total amount of space used can be calculated by multiplying the buffer size by the number of buffers per region by the maximum number of regions.
  <buffer-caches>
    <buffer-cache name="default" buffer-size="1024" buffers-per-region="1024" max-regions="10"/>
</buffer-caches>| Attribute | Description |
|---|---|
buffer-size |
The size of the buffers. Smaller buffers allow space to be utilised more effectively |
buffers-per-region |
The numbers of buffers per region |
max-regions |
The maximum number of regions. This controls the maximum amount of memory that can be used for caching |
9.7.2. Server configuration
A server represents an instance of Undertow. Basically this consists of a set of connectors and some configured handlers.
<server name="default-server" default-host="default-host" servlet-container="default" >| Attribute | Description |
|---|---|
default-host |
the virtual host that will be used if an incoming request as no Host: header |
servlet-container |
the servlet container that will be used by this server, unless is is explicitly overriden by the deployment |
Connector configuration
Undertow provides HTTP, HTTPS and AJP connectors, which are configured per server.
Common settings
The following settings are common to all connectors:
| Attribute | Description |
|---|---|
socket-binding |
The socket binding to use. This determines the address and port the listener listens on. |
worker |
A reference to an XNIO worker, as defined in the IO subsystem. The worker that is in use controls the IO and blocking thread pool. |
buffer-pool |
A reference to a buffer pool as defined in the IO subsystem. These buffers are used internally to read and write requests. In general these should be at least 8k, unless you are in a memory constrained environment. |
enabled |
If the connector is enabled. |
max-post-size |
The maximum size of incoming post requests that is allowed. |
buffer-pipelined-data |
If responses to HTTP pipelined requests should be buffered, and send out in a single write. This can improve performance if HTTP pipe lining is in use and responses are small. |
max-header-size |
The maximum size of a HTTP header block that is allowed. Responses with to much data in their header block will have the request terminated and a bad request response send. |
max-parameters |
The maximum number of query or path parameters that are allowed. This limit exists to prevent hash collision based DOS attacks. |
max-headers |
The maximum number of headers that are allowed. This limit exists to prevent hash collision based DOS attacks. |
max-cookies |
The maximum number of cookies that are allowed. This limit exists to prevent hash collision based DOS attacks. |
allow-encoded-slash |
Set this to true if you want the server to decode percent encoded slash characters. This is probably a bad idea, as it can have security implications, due to different servers interpreting the slash differently. Only enable this if you have a legacy application that requires it. |
decode-url |
If the URL should be decoded. If this is not set to true then percent encoded characters in the URL will be left as is. |
url-charset |
The charset to decode the URL to. |
always-set-keep-alive |
If the 'Connection: keep-alive' header should be added to all responses, even if not required by spec. |
disallowed-methods |
A comma separated list of HTTP methods that are not allowed. HTTP TRACE is disabled by default. |
HTTP Connector
<http-listener name="default" socket-binding="http" />| Attribute | Description |
|---|---|
certificate-forwarding |
If this is set to true then the HTTP listener will read a client certificate from the SSL_CLIENT_CERT header. This allows client cert authentication to be used, even if the server does not have a direct SSL connection to the end user. This should only be enabled for servers behind a proxy that has been configured to always set these headers. |
redirect-socket |
The socket binding to redirect requests that require security too. |
proxy-address-forwarding |
If this is enabled then the X-Forwarded-For and X-Forwarded-Proto headers will be used to determine the peer address. This allows applications that are behind a proxy to see the real address of the client, rather than the address of the proxy. |
HTTPS listener
Https listener provides secure access to the server. The most important configuration option is security realm which defines SSL secure context.
<https-listener name="default" socket-binding="https" security-realm="ssl-realm" />| Attribute | Description |
|---|---|
security-realm |
The security realm to use for the SSL configuration. See Security realm examples for how to configure it: Examples |
verify-client |
One of either NOT_REQUESTED, REQUESTED or REQUIRED. If client cert auth is in use this should be either REQUESTED or REQUIRED. |
enabled-cipher-suites |
A list of cypher suit names that are allowed. |
AJP listener
<ajp-listener name="default" socket-binding="ajp" />Host configuration
The host element corresponds to a virtual host.
| Attribute | Description |
|---|---|
name |
The virtual host name |
alias |
A whitespace separated list of additional host names that should be matched |
default-web-module |
The name of a deployment that should be used to serve up requests that do not match anything. |
Console Access Logging
Each host allows for access logging to the console which writes structured data in JSON format. This only writes to
stdout and is a single line of JSON structured data.
The attributes management model attribute is used to determine which exchange attributes should be logged. This is
similar to the pattern used for traditional access logging. The main difference being since the data is structured
the ability to use defined keys is essential.
A metadata attribute also exists which allows extra metadata to be added to the output. The value of the attribute is
a set of arbitrary key/value pairs. The values can include management model expressions, which must be resolvable when
the console access log service is started. The value is resolved once per start or reload of the server.
/subsystem=undertow/server=default-server/host=default-host/setting=console-access-log:add
/subsystem=undertow/server=default-server/host=default-host/setting=console-access-log:add(metadata={"@version"="1", "qualifiedHostName"=${jboss.qualified.host.name:unknown}}, attributes={bytes-sent={}, date-time={key="@timestamp", date-format="yyyy-MM-dd'T'HH:mm:ssSSS"}, remote-host={}, request-line={}, response-header={key-prefix="responseHeader", names=["Content-Type"]}, response-code={}, remote-user={}})
{
    "eventSource":"web-access",
    "hostName":"default-host",
    "@version":"1",
    "qualifiedHostName":"localhost.localdomain",
    "bytesSent":1504,
    "@timestamp":"2019-05-02T11:57:37123",
    "remoteHost":"127.0.0.1",
    "remoteUser":null,
    "requestLine":"GET / HTTP/2.0",
    "responseCode":200,
    "responseHeaderContent-Type":"text/html"
}| The above JSON is formatted only for readability. The output will be on a single line. |
9.7.3. Servlet container configuration
The servlet-container element corresponds to an instance of an Undertow Servlet container. Most servers will only need a single servlet container, however there may be cases where it makes sense to define multiple containers (in particular if you want applications to be isolated, so they cannot dispatch to each other using the RequestDispatcher. You can also use multiple Servlet containers to serve different applications from the same context path on different virtual hosts).
| Attribute | Description |
|---|---|
allow-non-standard-wrappers |
The Servlet specification requires applications to only wrap the request/response using wrapper classes that extend from the ServletRequestWrapper and ServletResponseWrapper classes. If this is set to true then this restriction is relaxed. |
default-buffer-cache |
The buffer cache that is used to cache static resources in the default Servlet. |
stack-trace-on-error |
Can be either all, none, or local-only. When set to none Undertow will never display stack traces. When set to All Undertow will always display them (not recommended for production use). When set to local-only Undertow will only display them for requests from local addresses, where there are no headers to indicate that the request has been proxied. Note that this feature means that the Undertow error page will be displayed instead of the default error page specified in web.xml. |
default-encoding |
The default encoding to use for requests and responses. |
use-listener-encoding |
If this is true then the default encoding will be the same as that used by the listener that received the request. |
preserve-path-on-forward |
If this is |
Session Cookie Configuration
This allows you to change the attributes of the session cookie.
| Attribute | Description |
|---|---|
name |
The cookie name |
domain |
The cookie domain |
comment |
The cookie comment |
http-only |
If the cookie is HTTP only |
secure |
If the cookie is marked secure |
max-age |
The max age of the cookie |
Persistent Session Configuration
Persistent sessions allow session data to be saved across redeploys and restarts. This feature is enabled by adding the persistent-sessions element to the server config. This is mostly intended to be a development time feature.
If the path is not specified then session data is stored in memory, and will only be persistent across redeploys, rather than restarts.
| Attribute | Description |
|---|---|
path |
The path to the persistent sessions data |
relative-to |
The location that the path is relevant to |
9.7.4. AJP listeners
The AJP listeners are child resources of the subsystem undertow. They are used with mod_jk, mod_proxy and mod_cluster of the Apache httpd front-end. Each listener does reference a particular socket binding:
[standalone@localhost:9999 /] /subsystem=undertow/server=default-server:read-children-names(child-type=ajp-listener)
{
    "outcome" => "success",
    "result" => [
        "ajp-listener",
    ]
}

[standalone@localhost:9999 /] /subsystem=undertow/server=default-server/ajp-listener=*:read-resource(recursive=true)
{
    "outcome" => "success",
    "result" => {
        "enabled" => "true",
        "scheme" => "http",
        "socket-binding" => "ajp",
    }
}
Creating a new ajp-listener requires you to declare a new
socket binding first:
[standalone@localhost:9999 /] /socket-binding-group=standard-sockets/socket-binding=ajp:add(port=8009)The newly created, unused socket binding can then be used to create a new connector configuration:
[standalone@localhost:9999 /] /subsystem=undertow/server=default-server/ajp-listener=myListener:add(socket-binding=ajp, scheme=http, enabled=true)9.7.5. Using WildFly as a Load Balancer
WildFly 10 added support for using the Undertow subsystem as a load balancer. WildFly supports two different approaches, you can either define a static load balancer, and specify the back end hosts in your configuration, or use it as a mod_cluster frontend, and use mod_cluster to dynamically update the hosts.
General Overview
Wildly uses Undertow’s proxy capabilities to act as a load balancer. Undertow will connect to the back end servers using its built in client, and proxies requests.
The following protocols are supported:
-
http
-
ajp
-
http2
-
h2c (clear text HTTP2)
Of these protocols h2c should give the best performance, if the back end servers support it.
The Undertow proxy uses async IO, the only threads that are involved in
the request is the IO thread that is responsible for the connection. The
connection to the back end server is made from the same thread, which
removes the need for any thread safety constructs.
If both the front and back end servers support server push, and HTTP2 is
in use then the proxy also supports pushing responses to the client. In
cases where proxy and backend are capable of server push, but the client
does not support it the server will send a X-Disable-Push header to let
the backend know that it should not attempt to push for this request.
Load balancer server profiles
WildFly 11 added load balancer profiles for both standalone and domain modes.
# configure correct path to WildFly installation
WILDFLY_HOME=/path/to/wildfly
# configure correct IP of the node
MY_IP=192.168.1.1

# run the load balancer profile
$WILDFLY_HOME/bin/standalone.sh -b $MY_IP -bprivate $MY_IP -c standalone-load-balancer.xml
It’s highly recommended to use private/internal network for communication between load balancer and nodes. To do this set the correct IP address to the {{private}} interface ({{-bprivate}} argument).
Run the server with the HA (or Full HA) profile, which has {{mod_cluster}} component included. If the UDP multicast is working in your environment, the workers should work out of the box without any change. If it’s not the case, then configure the IP address of the load-balancer statically.
# configure correct path to WildFly installation
WILDFLY_HOME=/path/to/wildfly
# configure correct IP of the node
MY_IP=192.168.1.2

# Configure static load balancer IP address.
# This is necessary when UDP multicast doesn't work in your environment.
LOAD_BALANCER_IP=192.168.1.1
$WILDFLY_HOME/bin/jboss-cli.sh <<EOT
embed-server -c=standalone-ha.xml
/subsystem=modcluster/mod-cluster-config=configuration:write-attribute(name=advertise,value=false)
/socket-binding-group=standard-sockets/remote-destination-outbound-socket-binding=proxy1:add(host=$LOAD_BALANCER_IP,port=8090)
/subsystem=modcluster/mod-cluster-config=configuration:list-add(name=proxies,value=proxy1)
EOT

# start the woker node with HA profile
$WILDFLY_HOME/bin/standalone.sh -c standalone-ha.xml -b $MY_IP -bprivate $MY_IP
Again, to make it safe, users should configure private/internal IP address into {{MY_IP}} variable.
Using WildFly as a static load balancer
To use WildFly as a static load balancer the first step is to create a proxy handler in the Undertow subsystem. For the purposes of this example we are going to assume that our load balancer is going to load balance between two servers, sv1.foo.com and sv2.foo.com, and will be using the AJP protocol.
The first step is to add a reverse proxy handler to the Undertow subsystem:
/subsystem=undertow/configuration=handler/reverse-proxy=my-handler:add()Then we need to define outbound socket bindings for remote hosts
/socket-binding-group=standard-sockets/remote-destination-outbound-socket-binding=remote-host1/:add(host=sv1.foo.com, port=8009)
/socket-binding-group=standard-sockets/remote-destination-outbound-socket-binding=remote-host2/:add(host=sv2.foo.com, port=8009)
and than we add them as hosts to reverse proxy handler
/subsystem=undertow/configuration=handler/reverse-proxy=my-handler/host=host1:add(outbound-socket-binding=remote-host1, scheme=ajp, instance-id=myroute, path=/test)
/subsystem=undertow/configuration=handler/reverse-proxy=my-handler/host=host2:add(outbound-socket-binding=remote-host2, scheme=ajp, instance-id=myroute, path=/test)
Now we need to actually add the reverse proxy to a location. I am going
to assume we are serving the path /app:
/subsystem=undertow/server=default-server/host=default-host/location=\/app:add(handler=my-handler)This is all there is to it. If you point your browser to
http://localhost:8080/app you should be able to see the proxied
content.
The full details of all configuration options available can be found in the subsystem reference.
9.8. Messaging configuration
The JMS server configuration is done through the messaging-activemq subsystem. In this chapter we are going outline the frequently used configuration options. For a more detailed explanation please consult the Artemis user guide (See "Component Reference").
9.8.1. Required Extension
The configuration options discussed in this section assume that the the
org.wildfly.extension.messaging-activemq extension is present in your
configuration. This extension is not included in the standard
standalone.xml and standalone-ha.xml configurations included in the
WildFly distribution. It is, however, included with the
standalone-full.xml and standalone-full-ha.xml configurations.
You can add the extension to a configuration without it either by adding
an <extension module="org.wildfly.extension.messaging-activemq"/>
element to the xml or by using the following CLI operation:
[standalone@localhost:9990 /]/extension=org.wildfly.extension.messaging-activemq:add9.8.2. Connectors
There are three kind of connectors that can be used to connect to WildFly JMS Server
-
invm-connectorcan be used by a local client (i.e. one running in the same JVM as the server) -
netty-connectorcan be used by a remote client (and uses Netty over TCP for the communication) -
http-connectorcan be used by a remote client (and uses Undertow Web Server to upgrade from a HTTP connection)
9.8.3. JMS Connection Factories
There are three kinds of basic JMS connection-factory that depends
on the type of connectors that is used.
There is also a pooled-connection-factory which is special in that it
is essentially a configuration facade for both the inbound and
outbound connectors of the the Artemis JCA Resource Adapter. An MDB can
be configured to use a pooled-connection-factory (e.g. using
@ResourceAdapter). In this context, the MDB leverages the inbound
connector of the Artemis JCA RA. Other kinds of clients can look up the
pooled-connection-factory in JNDI (or inject it) and use it to send
messages. In this context, such a client would leverage the outbound
connector of the Artemis JCA RA. A pooled-connection-factory is also
special because:
-
It is only available to local clients, although it can be configured to point to a remote server.
-
As the name suggests, it is pooled and therefore provides superior performance to the clients which are able to use it. The pool size can be configured via the
max-pool-sizeandmin-pool-sizeattributes. -
It should only be used to send (i.e. produce) messages when looked up in JNDI or injected.
-
It can be configured to use specific security credentials via the
userandpasswordattributes. This is useful if the remote server to which it is pointing is secured. -
Resources acquired from it will be automatically enlisted any on-going JTA transaction. If you want to send a message from an EJB using CMT then this is likely the connection factory you want to use so the send operation will be atomically committed along with the rest of the EJB’s transaction operations.
To be clear, the inbound connector of the Artemis JCA RA (which is for consuming messages) is only used by MDBs and other JCA-based components. It is not available to traditional clients.
Both a connection-factory and a pooled-connection-factory reference
a connector declaration.
A netty-connector is associated with a socket-binding which tells
the client using the connection-factory where to connect.
-
A
connection-factoryreferencing anetty-connectoris suitable to be used by a remote client to send messages to or receive messages from the server (assuming the connection-factory has an appropriately exportedentry). -
A
pooled-connection-factorylooked up in JNDI or injected which is referencing anetty-connectoris suitable to be used by a local client to send messages to a remote server granted thesocket-bindingreferences anoutbound-socket-bindingpointing to the remote server in question. -
A
pooled-connection-factoryused by an MDB which is referencing aremote-connectoris suitable to consume messages from a remote server granted thesocket-bindingreferences anoutbound-socket-bindingpointing to the remote server in question.
An in-vm-connector is associated with a server-id which tells the
client using the connection-factory where to connect (since multiple
Artemis servers can run in a single JVM).
-
A
connection-factoryreferencing anin-vm-connectoris suitable to be used by a local client to either send messages to or receive messages from a local server. -
A
pooled-connection-factorylooked up in JNDI or injected which is referencing anin-vm-connectoris suitable to be used by a local client only to send messages to a local server. -
A
pooled-connection-factoryused by an MDB which is referencing anin-vm-connectoris suitable only to consume messages from a local server.
A http-connector is associated with the socket-binding that
represents the HTTP socket (by default, named http).
-
A
connection-factoryreferencing ahttp-connectoris suitable to be used by a remote client to send messages to or receive messages from the server by connecting to its HTTP port before upgrading to the messaging protocol. -
A
pooled-connection-factoryreferencing ahttp-connectoris suitable to be used by a local client to send messages to a remote server granted thesocket-bindingreferences anoutbound-socket-bindingpointing to the remote server in question. -
A
pooled-connection-factoryused by an MDB which is referencing ahttp-connectoris suitable only to consume messages from a remote server granted thesocket-bindingreferences anoutbound-socket-bindingpointing to the remote server in question.
The entry declaration of a connection-factory or a
pooled-connection-factory specifies the JNDI name under which the
factory will be exposed. Only JNDI names bound in the
"java:jboss/exported" namespace are available to remote clients. If a
connection-factory has an entry bound in the "java:jboss/exported"
namespace a remote client would look-up the connection-factory using
the text after "java:jboss/exported". For example, the "
RemoteConnectionFactory`" is bound by default to
`"java:jboss/exported/jms/RemoteConnectionFactory"
which means a remote
client would look-up this connection-factory using "
jms/RemoteConnectionFactory`". A `pooled-connection-factory should
not have any entry bound in the " java:jboss/exported`" namespace
because a `pooled-connection-factory is not suitable for remote
clients.
Since JMS 2.0, a default JMS connection factory is accessible to EE
application under the JNDI name java:comp/DefaultJMSConnectionFactory.
WildFly messaging subsystem defines a pooled-connection-factory that
is used to provide this default connection factory. Any parameter change
on this pooled-connection-factory will be take into account by any EE
application looking the default JMS provider under the JNDI name
java:comp/DefaultJMSConnectionFactory.
<subsystem xmlns="urn:jboss:domain:messaging-activemq:1.0">
<server name="default">
[...]
<http-connector name="http-connector"
socket-binding="http"
endpoint="http-acceptor" />
<http-connector name="http-connector-throughput"
socket-binding="http"
endpoint="http-acceptor-throughput">
<param name="batch-delay"
value="50"/>
</http-connector>
<in-vm-connector name="in-vm"
server-id="0"/>
[...]
<connection-factory name="InVmConnectionFactory"
connectors="in-vm"
entries="java:/ConnectionFactory" />
<pooled-connection-factory name="activemq-ra"
transaction="xa"
connectors="in-vm"
entries="java:/JmsXA java:jboss/DefaultJMSConnectionFactory"/>
[...]
</server>
</subsystem>~(See standalone/configuration/standalone-full.xml)~
9.8.4. JMS Queues and Topics
JMS queues and topics are sub resources of the messaging-actively
subsystem. One can define either a jms-queue or jms-topic. Each
destination must be given a name and contain at least one entry in
its entries element (separated by whitespace).
Each entry refers to a JNDI name of the queue or topic. Keep in mind
that any jms-queue or jms-topic which needs to be accessed by a
remote client needs to have an entry in the "java:jboss/exported"
namespace. As with connection factories, if a jms-queue or or
jms-topic has an entry bound in the "java:jboss/exported" namespace a
remote client would look it up using the text after
"java:jboss/exported`". For example, the following `jms-queue
"testQueue" is bound to "java:jboss/exported/jms/queue/test" which means
a remote client would look-up this \{{kms-queue} using
"jms/queue/test". A local client could look it up using
"java:jboss/exported/jms/queue/test", "java:jms/queue/test", or more
simply "jms/queue/test":
<subsystem xmlns="urn:jboss:domain:messaging-activemq:1.0">
<server name="default">
[...]
<jms-queue name="testQueue"
entries="jms/queue/test java:jboss/exported/jms/queue/test" />
<jms-topic name="testTopic"
entries="jms/topic/test java:jboss/exported/jms/topic/test" />
</subsystem>~(See standalone/configuration/standalone-full.xml)~
JMS endpoints can easily be created through the CLI:
[standalone@localhost:9990 /] jms-queue add --queue-address=myQueue --entries=queues/myQueue[standalone@localhost:9990 /] /subsystem=messaging-activemq/server=default/jms-queue=myQueue:read-resource
{
"outcome" => "success",
"result" => {
"durable" => true,
"entries" => ["queues/myQueue"],
"selector" => undefined
}
}A number of additional commands to maintain the JMS subsystem are available as well:
[standalone@localhost:9990 /] jms-queue --help --commands
add
...
remove
To read the description of a specific command execute 'jms-queue command_name --help'.9.8.5. Dead Letter & Redelivery
Some of the settings are applied against an address wild card instead of a specific messaging destination. The dead letter queue and redelivery settings belong into this group:
<subsystem xmlns="urn:jboss:domain:messaging-activemq:1.0">
<server name="default">
[...]
<address-setting name="#"
dead-letter-address="jms.queue.DLQ"
expiry-address="jms.queue.ExpiryQueue"
[...] />~(See standalone/configuration/standalone-full.xml)~
9.8.6. Security Settings for Artemis addresses and JMS destinations
Security constraints are matched against an address wildcard, similar to the DLQ and redelivery settings.
<subsystem xmlns="urn:jboss:domain:messaging-activemq:1.0">
<server name="default">
[...]
<security-setting name="#">
<role name="guest"
send="true"
consume="true"
create-non-durable-queue="true"
delete-non-durable-queue="true"/>~(See standalone/configuration/standalone-full.xml)~
9.8.7. Security Domain for Users
By default, Artemis will use the " other`" JAAS security domain. This
domain is used to authenticate users making connections to Artemis and
then they are authorized to perform specific functions based on their
role(s) and the `security-settings described above. This domain can be
changed by using the security-domain, e.g.:
<subsystem xmlns="urn:jboss:domain:messaging-activemq:1.0">
<server name="default">
<security domain="mySecurityDomain" />
[...]9.8.8. Using the Elytron Subsystem
You can also use the elytron subsystem to secure the messaging-activemq subsystem.
To use an Elytron security domain:
-
Undefine the legacy security domain.
/subsystem=messaging-activemq/server=default:undefine-attribute(name=security-domain) -
Set an Elytron security domain.
/subsystem=messaging-activemq/server=default:write-attribute(name=elytron-domain, value=myElytronSecurityDomain)
You can only define either security-domain or elytron-domain, but
you cannot have both defined at the same time. If neither is defined,
WildFly will use the security-domain default value of other, which
maps to the other legacy security domain.
|
9.8.9. Cluster Authentication
If the Artemis server is configured to be clustered, it will use the
cluster 's user and password attributes to connect to other
Artemis nodes in the cluster.
If you do not change the default value of <cluster-password>, Artemis will fail to authenticate with the error:
HQ224018: Failed to create session: HornetQExceptionerrorType=CLUSTER_SECURITY_EXCEPTION message=HQ119099: Unable to authenticate cluster user: HORNETQ.CLUSTER.ADMIN.USERTo prevent this error, you must specify a value for
<cluster-password>. It is possible to encrypt this value by following
this
guide.
Alternatively, you can use the system property jboss.messaging.cluster.password to specify the cluster password from the command line.
9.8.10. Deployment of -jms.xml files
Starting with WildFly 19.1, you have the ability to deploy a -jms.xml file defining JMS destinations, e.g.:
<?xml version="1.0" encoding="UTF-8"?>
<messaging-deployment xmlns="urn:jboss:messaging-activemq-deployment:1.0">
<server name="default">
<jms-destinations>
<jms-queue name="sample">
<entry name="jms/queue/sample"/>
<entry name="java:jboss/exported/jms/queue/sample"/>
</jms-queue>
</jms-destinations>
</server>
</messaging-deployment>| This feature is primarily intended for development as destinations deployed this way can not be managed with any of the provided management tools (e.g. console, CLI, etc). |
9.8.11. JMS Bridge
The function of a JMS bridge is to consume messages from a source JMS destination, and send them to a target JMS destination. Typically either the source or the target destinations are on different servers. The bridge can also be used to bridge messages from other non Artemis JMS servers, as long as they are JMS 1.1 compliant.
The JMS Bridge is provided by the Artemis project. For a detailed description of the available configuration properties, please consult the project documentation.
Modules for other messaging brokers
Source and target JMS resources (destination and connection factories) are looked up using JNDI. If either the source or the target resources are managed by another messaging server than WildFly, the required client classes must be bundled in a module. The name of the module must then be declared when the JMS Bridge is configured.
The use of a JMS bridges with any messaging provider will require to create a module containing the jar of this provider.
Let’s suppose we want to use an hypothetical messaging provider named AcmeMQ. We want to bridge messages coming from a source AcmeMQ destination to a target destination on the local WildFly messaging server. To lookup AcmeMQ resources from JNDI, 2 jars are required, acmemq-1.2.3.jar, mylogapi-0.0.1.jar (please note these jars do not exist, this is just for the example purpose). We must not include a JMS jar since it will be provided by a WildFly module directly.
To use these resources in a JMS bridge, we must bundle them in a WildFly module:
in JBOSS_HOME/modules, we create the layout:
modules/
`-- org
`-- acmemq
`-- main
|-- acmemq-1.2.3.jar
|-- mylogapi-0.0.1.jar
`-- module.xmlWe define the module in module.xml:
<?xml version="1.0" encoding="UTF-8"?>
<module xmlns="urn:jboss:module:1.1" name="org.acmemq">
<properties>
<property name="jboss.api" value="private"/>
</properties>
<resources>
<!-- insert resources required to connect to the source or target -->
<!-- messaging brokers if it not another WildFly instance -->
<resource-root path="acmemq-1.2.3.jar" />
<resource-root path="mylogapi-0.0.1.jar" />
</resources>
<dependencies>
<!-- add the dependencies required by JMS Bridge code -->
<module name="javax.api" />
<module name="javax.jms.api" />
<module name="javax.transaction.api"/>
<module name="org.jboss.remote-naming"/>
<!-- we depend on org.apache.activemq.artemis module since we will send messages to -->
<!-- the Artemis server embedded in the local WildFly instance -->
<module name="org.apache.activemq.artemis" />
</dependencies>
</module>Configuration
A JMS bridge is defined inside a jms-bridge section of the
messaging-activemq subsystem in the XML configuration files.
<subsystem xmlns="urn:jboss:domain:messaging-activemq:1.0">
<jms-bridge name="myBridge" module="org.acmemq">
<source connection-factory="ConnectionFactory"
destination="sourceQ"
user="user1"
password="pwd1"
quality-of-service="AT_MOST_ONCE"
failure-retry-interval="500"
max-retries="1"
max-batch-size="500"
max-batch-time="500"
add-messageID-in-header="true">
<source-context>
<property name="java.naming.factory.initial"
value="org.acmemq.jndi.AcmeMQInitialContextFactory"/>
<property name="java.naming.provider.url"
value="tcp://127.0.0.1:9292"/>
</source-context>
</source>
<target connection-factory"/jms/invmTargetCF"
destination="/jms/targetQ" />
</target>
</jms-bridge>
</subsystem>The source and target sections contain the name of the JMS resource
( connection-factory and destination) that will be looked up in
JNDI.
It optionally defines the user and password credentials. If they are
set, they will be passed as arguments when creating the JMS connection
from the looked up ConnectionFactory.
It is also possible to define JNDI context properties in the
source-context and target-context sections. If these sections are
absent, the JMS resources will be looked up in the local WildFly
instance (as it is the case in the target section in the example
above).
Management commands
A JMS Bridge can also be managed using the WildFly command line interface:
[standalone@localhost:9990 /] /subsystem=messaging/jms-bridge=myBridge/:add(module="org.acmemq",
source-destination="sourceQ",
source-connection-factory="ConnectionFactory",
source-user="user1",
source-password="pwd1",
source-context={"java.naming.factory.initial" => "org.acmemq.jndi.AcmeMQInitialContextFactory",
"java.naming.provider.url" => "tcp://127.0.0.1:9292"},
target-destination="/jms/targetQ",
target-connection-factory="/jms/invmTargetCF",
quality-of-service=AT_MOST_ONCE,
failure-retry-interval=500,
max-retries=1,
max-batch-size=500,
max-batch-time=500,
add-messageID-in-header=true)
{"outcome" => "success"}You can also see the complete JMS Bridge resource description from the CLI:
[standalone@localhost:9990 /] /subsystem=messaging/jms-bridge=*/:read-resource-description
{
"outcome" => "success",
"result" => [{
"address" => [
("subsystem" => "messaging"),
("jms-bridge" => "*")
],
"outcome" => "success",
"result" => {
"description" => "A JMS bridge instance.",
"attributes" => {
...
}
}]
}Statistics of a JMS Bridge
Currently two statistics are available on a JMS bridge: the number of processed messages and the number of aborted/rolled back messages. Those are available with the following command :
/subsystem=messaging/jms-bridge=myBridge:read-attribute(name=message-count)
{
"outcome" => "success",
"result" => 0L
}
/subsystem=messaging/jms-bridge=myBridge:read-attribute(name=aborted-message-count)
{
"outcome" => "success",
"result" => 0L
}9.8.12. Component Reference
The messaging-activemq subsystem is provided by the Artemis project. For a detailed description of the available configuration properties, please consult the project documentation.
Controlling internal broker usage of memory and disk space
You can configure the disk space usage of the journal by using the global-max-disk-usage attribute, thus blocking the paging and processing of new messages until some disk space is available.
This is done from the CLI:
[standalone@localhost:9990 /] /subsystem=messaging-activemq/server=default:write-attribute(name=global-max-disk-usage, value=70)
{
"outcome" => "success",
"response-headers" => {
"operation-requires-reload" => true,
"process-state" => "reload-required"
}
}You can define at which frequency the disk usage is checked using the disk-scan-period attribute.
In the same way configure the maximal memory affected to processing messages by using the global-max-memory-size attribute, thus blocking the processing of new messages until some memory space is available.
This is done from the CLI:
[standalone@localhost:9990 /] /subsystem=messaging-activemq/server=default:write-attribute(name=global-max-memory-size, value=960000000)
{
"outcome" => "success",
"response-headers" => {
"operation-requires-reload" => true,
"process-state" => "reload-required"
}
}9.8.13. Connect a pooled-connection-factory to a Remote Artemis Server
The messaging-activemq subsystem allows to configure a
pooled-connection-factory resource to let a local client deployed in
WildFly connect to a remote Artemis server.
The configuration of such a pooled-connection-factory is done in 3
steps:
-
create an outbound-socket-binding pointing to the remote messaging server:
/socket-binding-group=standard-sockets/remote-destination-outbound-socket-binding=remote-artemis:add(host=<server host>, port=61616) -
create a remote-connector referencing the outbound-socket-binding created at step (1).
/subsystem=messaging-activemq/remote-connector=remote-artemis:add(socket-binding=remote-artemis) -
create a pooled-connection-factory referencing the remote-connector created at step (2).
/subsystem=messaging-activemq/pooled-connection-factory=remote-artemis:add(connectors=[remote-artemis], entries=[java:/jms/remoteCF])
In Artemis 1.x topics and queues used had a prefix(jms.topic. and jms.queue.) that were prepended to the destination name.
In Artemis 2.x this is no longer the case, but for compatibility reasons WildFly still prepend those prefixes and tells Artemis to run in compatibility mode.
If you are connecting to a remote Artemis 2.x, it may not be in compatibility mode and thus the old prefixes may not be used anymore.
If you need to use destinations without those prefixes, you can configure your connection factory not to use them by setting the attribute enable-amq1-prefix to false.
/subsystem=messaging-activemq/pooled-connection-factory=remote-artemis:write-attribute(name="enable-amq1-prefix", value="false")JMS Queues and Topics on a remote Artemis Server
You can also add queues and topics defined on a remote Artemis server to be used as if they were local to the server. This mean,s that you can make those remote destinations available viza JNDI just like local destinations. Those destinations are defined out-of the server element:
<subsystem xmlns="urn:jboss:domain:messaging-activemq:1.0">
<external-jms-queue name="testQueue"
entries="jms/queue/test java:jboss/exported/jms/queue/test" />
<external-jms-topic name="testTopic"
entries="jms/topic/test java:jboss/exported/jms/topic/test" />
</subsystem>JMS endpoints can easily be created through the CLI:
[standalone@localhost:9990 /] /subsystem=messaging-activemq/external-jms-queue=myQueue:read-resource
{
"outcome" => "success",
"result" => {
"entries" => ["queues/myQueue"]
}
}You don’t have operations to see or manage attributes of those destinations.
Configuration of a MDB using a pooled-connection-factory
When a pooled-connection-factory is configured to connect to a remote
Artemis, it is possible to configure Message-Driven Beans (MDB) to have
them consume messages from this remote server.
The MDB must be annotated with the @ResourceAdapter annotation using
the name of the pooled-connection-factory resource
import org.jboss.ejb3.annotation.ResourceAdapter;
@ResourceAdapter("remote-artemis")
@MessageDriven(name = "MyMDB", activationConfig = {
...
})
public class MyMDB implements MessageListener {
public void onMessage(Message message) {
...
}
}If the MDB needs to produce messages to the remote server, it must
inject the pooled-connection-factory by looking it up in JNDI using
one of its entries.
@Inject
@JMSConnectionFactory("java:/jms/remoteCF")
private JMSContext context;Configuration of the destination
A MDB must also specify which destination it will consume messages from.
The standard way is to define a destinationLookup activation config
property that corresponds to a JNDI lookup on the local server.
When the MDB is consuming from a remote Artemis server it will now create those bindings locally.
It is possible to use the naming subsystem to configure
external context federation to have local JNDI
bindings delegating to external bindings.
However there is a simpler solution to configure the destination when
using the Artemis Resource Adapter.
Instead of using JDNI to lookup the JMS Destination resource, you can
just specify the name of the destination (as configured in the remote
Artemis server) using the destination activation config property and
set the useJNDI activation config property to false to let the Artemis
Resource Adapter create automatically the JMS destination without
requiring any JNDI lookup.
@ResourceAdapter("remote-artemis")
@MessageDriven(name = "MyMDB", activationConfig = {
@ActivationConfigProperty(propertyName = "useJNDI", propertyValue = "false"),
@ActivationConfigProperty(propertyName = "destination", propertyValue = "myQueue"),
@ActivationConfigProperty(propertyName = "destinationType", propertyValue = "javax.jms.Queue"),
@ActivationConfigProperty(propertyName = "acknowledgeMode", propertyValue = "Auto-acknowledge")
})
public class MyMDB implements MessageListener {
...
}These properties configure the MDB to consume messages from the JMS
Queue named myQueue hosted on the remote Artemis server.
In most cases, such a MDB does not need to lookup other destinations to
process the consumed messages and it can use the JMSReplyTo destination
if it is defined on the message.
If the MDB needs any other JMS destinations defined on the remote
server, it must use client-side JNDI by following the
Artemis
documentation or configure external configuration context in the naming
subsystem (which allows to inject the JMS resources using the
@Resource annotation).
[[configuration of a remote destination using annotations]] ==== Configuration of a remote destination using annotations
The annotation @JMSDestinationDefinition can be used to create a destination on a remote Artemis Server. This will work in the same way as for a local server.+
For this it needs to be able to access Artemis management queue. If your remote Artemis Server management queue is not the default one you can pass the management queue address as a property to the @JMSDestinationDefinition.
Please note that the destination is created remotely but won’t be removed once the deployement is undeployed/removed.
@JMSDestinationDefinition(
// explicitly mention a resourceAdapter corresponding to a pooled-connection-factory resource to the remote server
resourceAdapter = "activemq-ra",
name="java:global/env/myQueue2",
interfaceName="javax.jms.Queue",
destinationName="myQueue2",
properties = {
"management-address=my.management.queue",
"selector=color = 'red'"
}
)[[Messaging_Backward_&_Forward_Compatibility]] = Backward & Forward Compatibility
WildFly 10 supports both backwards and forwards compatibility with
legacy versions that were using HornetQ as their messaging brokers (such
as JBoss AS7, WildFly 19.1 & 9).
These two compatibility modes are provided by the ActiveMQ Artemis
project that supports the HornetQ’s CORE protocol:
-
backward compatibility: WildFly 10 JMS clients (using Artemis) can connect to legacy app server (running HornetQ)
-
forward compatibility: legacy JMS clients (using HornetQ) can connect to WildFly 10 app server (running Artemis).
Forward Compatibility
Forward compatibility requires no code change in legacy JMS clients. It is provided by WildFly 10 messaging-activemq subsystem and its resources.
-
legacy-connection-factoryis a subresource of themessaging-activemq’s `serverand can be used to store in JNDI a HornetQ-based JMS ConnectionFactory.
<subsystem xmlns="urn:jboss:domain:messaging-activemq:1.0">
<server name="default">
...
<legacy-connection-factory name="legacyConnectionFactory-discovery"
entries="java:jboss/exported/jms/RemoteConnectionFactory"
... />
</server>
</subsystem>-
Legacy HornetQ-based JMS destinations can also be configured by providing a
legacy-entriesattribute to thejms-queueandjms-topicresource.
<jms-queue name="myQueue"
entries="java:jboss/exported/jms/myQueue-new"
legacy-entries="java:jboss/exported/jms/myQueue" />
<jms-topic name="testTopic"
entries="java:jboss/exported/jms/myTopic-new"
legacy-entries="java:jboss/exported/jms/myTopic" />The legacy-entries must be used by legacy JMS clients (using HornetQ)
while the regular entries are for WildFly 10 JMS clients (using
Artemis).
The legacy JMS client will then lookup this legacy JMS resources to
communicate with WildFly 10.
To avoid any code change in the legacy JMS clients, the legacy JNDI
entries must match the lookup expected by the legacy JMS client.
Migration
During migration, the legacy messaging subsystem will create
legacy-connection-factory resource and add legacy-entries to the
jms-queue and jms-topic resource if the boolean attribute
add-legacy-entries is set to true for its migrate operation. If
that is the case, the legacy entries in the migrated
messaging-activemq subsystem will correspond to the entries specified
in the legacy messaging subsystem and the regular entries will be
created with a -new suffix.
If add-legacy-entries is set to false during migration, no legacy
resources will be created in the messaging-activemq subsystem and
legacy JMS clients will not be able to communicate with WildFly 10
servers.
Backward Compatibility
Backward compatibility requires no configuration change in the legacy
server.
WildFly 10 JMS clients do not look up resources on the legacy server but
uses client-side JNDI to create their JMS resources. Artemis JMS client
can then uses these resources to communicate with the legacy server
using the HornetQ CORE protocol.
Artemis supports
Client-side
JNDI to create JMS resources ( ConnectionFactory and Destination).
For example, if a WidFly 10 JMS clients wants to communicate with a
legacy server using a JMS queue named myQueue, it must use the
following properties to configure its JNDI InitialContext:
java.naming.factory.initial=org.apache.activemq.artemis.jndi.ActiveMQInitialContextFactory
connectionFactory.jms/ConnectionFactory=tcp://<legacy server address>:5445? \
protocolManagerFactoryStr=org.apache.activemq.artemis.core.protocol.hornetq.client.HornetQClientProtocolManagerFactory
queue.jms/myQueue=myQueueIt can then use the jms/ConnectionFactory name to create the JMS
ConnectionFactory and jms/myQueue to create the JMS Queue.
Note that the property
protocolManagerFactoryStr=org.apache.activemq.artemis.core.protocol.hornetq.client.HornetQClientProtocolManagerFactory
is mandatory when specifying the URL of the legacy connection factory so
that the Artemis JMS client can communicate with the HornetQ broker in
the legacy server.
9.8.14. AIO - NIO for messaging journal
Apache ActiveMQ Artemis (like HornetQ beforehand) ships with a high performance journal. Since Apache ActiveMQ Artemis handles its own persistence, rather than relying on a database or other 3rd party persistence engine it is very highly optimised for the specific messaging use cases. The majority of the journal is written in Java, however we abstract out the interaction with the actual file system to allow different pluggable implementations.
Apache ActiveMQ Artemis ships with two implementations:
-
Java NIO.
The first implementation uses standard Java NIO to interface with the file system. This provides extremely good performance and runs on any platform where there’s a Java 6+ runtime.
-
Linux Asynchronous IO
The second implementation uses a thin native code wrapper to talk to the Linux asynchronous IO library (AIO). With AIO, Apache ActiveMQ Artemis will be called back when the data has made it to disk, allowing us to avoid explicit syncs altogether and simply send back confirmation of completion when AIO informs us that the data has been persisted.
Using AIO will typically provide even better performance than using Java NIO.
The AIO journal is only available when running Linux kernel 2.6 or later and after having installed libaio (if it’s not already installed). If AIO is not supported on the system then Artemis will fallback to NIO. To know which type of journal is effectively used you can execute the following command using jboss-cli:
/subsystem=messaging-activemq/server=default:read-attribute(name=runtime-journal-type)Please note that AIO is represented by ASYNCIO in the WildFly model configuration.
Also, please note that AIO will only work with the following file systems: ext2, ext3, ext4, jfs, xfs. With other file systems, e.g. NFS it may appear to work, but it will fall back to a slower synchronous behaviour. Don’t put the journal on a NFS share!
One point that should be added is that AIO doesn’t work well with encrypted partitions, thus you have to move to NIO on those.
What are the symptoms of an AIO isssue ?
AIO issue on WildFly 10
If you see the following exception in your WildFly log file / console
[org.apache.activemq.artemis.core.server] (ServerService Thread Pool -- 64) AMQ222010: Critical IO Error, shutting down the server. file=AIOSequentialFile:/home/wildfly/wildfly-10.0.0.Final/standalone/data/activemq/journal/activemq-data-2.amq, message=Cannot open file:The Argument is invalid: java.io.IOException: Cannot open file:The Argument is invalid at org.apache.activemq.artemis.jlibaio.LibaioContext.open(Native Method)
that means that AIO isn’t working properly on your system.
To use NIO instead execute the following command using jboss-cli:
/subsystem=messaging-activemq/server=default:write-attribute(name=journal-type, value=NIO)You need to reload or restart your server and you should see the following trace in your server console :
INFO [org.apache.activemq.artemis.core.server] (ServerService Thread Pool -- 64) AMQ221013: Using NIO Journal
AIO issue on WildFly 9
[org.hornetq.core.server] (ServerService Thread Pool -- 64) HQ222010: Critical IO Error, shutting down the server. file=AIOSequentialFile:/home/wildfly/wildfly-9.0.2.Final/standalone/data/messagingjournal/hornetq-data-1.hq, message=Can't open file: HornetQException[errorType=NATIVE_ERROR_CANT_OPEN_CLOSE_FILE message=Can't open file] at org.hornetq.core.libaio.Native.init(Native Method)
that means that AIO isn’t working properly on your system.
To use NIO instead execute the following commnd using jboss-cli :
/subsystem=messaging/hornetq-server=default:write-attribute(name=journal-type,value=NIO)You need to reload or restart your server and you see the following trace in your server console :
INFO [org.hornetq.core.server] (ServerService Thread Pool -- 64) HQ221013: Using NIO Journal
9.8.15. JDBC Store for Messaging Journal
The Artemis server that are integrated to WildFly can be configured to
use a JDBC store for its messaging journal instead of its file-based
journal.
The server resource of the messaging-activemq subsystem needs to
configure its journal-datasource attribute to be able to use JDBC
store. If this attribute is not defined, the regular file-base journal
will be used for the Artemis server.
This attribute value must correspond to a data source defined in the
datasource subsystem.
For example, if the datasources subsystem defines an ExampleDS data
source at /subsystem=datasources/data-source=ExampleDS, the Artemis
server can use it for its JDBC store with the operation:
/subsystem=messaging-activemq/server=default:write-attribute(name=journal-datasource, value=ExampleDS)Artemis JDBC store uses SQL commands to create the tables used to
persist its information.
These SQL commands may differ depending on the type of database. The SQL
commands used by the JDBC store are located in the file at:
$JBOSS_HOME/modules/system/layers/base/org/wildfly/extension/messaging-activemq/main/database/journal-sql.properties
By default, "vanilla" SQL commands are used to communicate with the database. However some databases requires specific commands to create table, update content, etc.
The journal-sql.properties can also specify these provider-specific commands. You can customize them by adding a suffix to the vanilla SQL properties.
The suffix is determined based on information from the JDBC driver and the connection metadata. If the type of database is not supported by the code, you can specify it explicitly with the journal-database property on the server resource.
Artemis uses different JDBC tables to store its bindings information, the persistent messages and the large messages (paging is not supported yet).
The name of these tables can be configured with the
journal-bindings-table, journal-messages-table,
journal-page-store-table, and journal-large-messages-table.
9.8.16. Configuring Broadcast/Discovery
Each Artemis server can be configured to broadcast itself and/or discovery other Artemis servers within a cluster. Artemis supports two mechanisms for configuring broadcast/discovery:
JGroups-based broadcast/discovery
Artemis can leverage the membership of an existing JGroups channel to both broadcast its identity and discover nodes on which Artemis servers are deployed. WildFly’s default full-ha profile uses this mechanism for broadcast/discovery using the default JGroups channel of the server (as defined by the JGroups subsystem).
To add this support to a profile that does not include it by default, use the following:
[standalone@localhost:9990 /] /subsystem=messaging-activemq/server=default/broadcast-group=bg-group1:add(jgroups-cluster=activemq-cluster,connectors=http-connector)
[standalone@localhost:9990 /] /subsystem=messaging-activemq/server=default/discovery-group=dg-group1:add(jgroups-cluster=activemq-cluster)To segregate Artemis servers use a distinct membership, configure broadcast/discovery using a separate channel. To do this, first create the channel resource:
[standalone@localhost:9990 /] /subsystem=jgroups/channel=messaging:add(stack=tcp)This creates a new JGroups channel resource based on the "tcp" protocol stack. Now create your broadcast/discovery groups using this channel:
[standalone@localhost:9990 /] /subsystem=messaging-activemq/server=default/broadcast-group=bg-group2:add(jgroups-channel=messaging, jgroups-cluster=activemq-cluster, connectors=http-connector)
[standalone@localhost:9990 /] /subsystem=messaging-activemq/server=default/discovery-group=dg-group2:add(jgroups-channel=messaging, jgroups-cluster=activemq-cluster)Multicast broadcast/discovery
To broadcast identity to standalone messaging clients, you can additionally configure broadcast/discovery using multicast sockets.
e.g.
[standalone@localhost:9990 /] /socket-binding-group=standard-sockets/socket-binding=messaging(interface=private, multicast-address=230.0.0.4, multicast-port=45689)
[standalone@localhost:9990 /] /subsystem=messaging-activemq/server=default/broadcast-group=bg-group3:add(socket-binding=messaging, connectors=http-connector)
[standalone@localhost:9990 /] /subsystem=messaging-activemq/server=default/discovery-group=dg-group3:add(socket-binding=messaging)Cluster behind an HTTP load-balancer
If the cluster is behind an HTTP load-balancer we need to indicate to the clients that they must not use the cluster topology to connect to it but keep on using the initial connection to the load-balancer. For this you need to specify on the (pooled) connection factory not to use the topology by setting the attribute "use-topology-for-load-balancing" to false.
/subsystem=messaging-activemq/pooled-connection-factory=remote-artemis:write-attribute(name="use-topology-for-load-balancing", value="false")9.9. MicroProfile Config Subsystem Configuration
Support for Eclipse MicroProfile Config is provided by the microprofile-config-smallrye subsystem.
9.9.1. Required Extension
This extension is included in the standard configurations included in the WildFly distribution.
You can also add the extension to a configuration without it either by adding
an <extension module="org.wildfly.extension.microprofile.config-smallrye"/>
element to the xml or by using the following CLI operation:
[standalone@localhost:9990 /] /extension=org.wildfly.extension.microprofile.config-smallrye:add9.9.2. Supported ConfigSources
In addition to the default ConfigSources specified by the MicroProfile Config specification
(environment variables, System properties and META-INF/microprofile-config.properties file), the
microprofile-config-smallrye provides additional types of ConfigSource
ConfigSource from Properties
You can store properties directly in a config-source in the subsystem by using the properties
attribute when you add the config-source:
/subsystem=microprofile-config-smallrye/config-source=props:add(properties={"prop1" = "foo", "prop2" = "bar"})This results in the XML configuration:
<subsystem xmlns="urn:wildfly:microprofile-config-smallrye:1.0">
<config-source name="props">
<property name="prop1" value="foo"/>
<property name="prop2" value="bar"/>
</config-source>
</subsystem>ConfigSource from Directory
You can also read properties from a directory where each file is the name of a property and the file content is the value of the property.
For example, let’s imagine that the directory /etc/config/numbers-app/ contains 2 files:
-
the
num.sizefile contains the value5 -
the
num.maxfile contains the value100
We can create a config-source` to access these properties by using the operation:
/subsystem=microprofile-config-smallrye/config-source=file-props:add(dir={path=/etc/config/numbers-app})This results in the XML configuration:
<subsystem xmlns="urn:wildfly:microprofile-config-smallrye:1.0">
<config-source name="file-props">
<dir path="/etc/config/numbers-app"/>
</config-source>
</subsystem>With that configuration, any application deployed in WildFly can use the num.size and
num.max properties that are stored in the directory:
@Inject
@ConfigProperty(name = "num.size")
int numSize; (1)
@Inject
@ConfigProperty(name = "num.max")
int numMax; (2)| 1 | will be set to 5 |
| 2 | will be set to 100 |
This corresponds to the layout used by OpenShift ConfigMaps.
The dir value corresponds to the mountPath in the ConfigMap definition in OpenShift or Kubernetes.
|
ConfigSource from Class
You can create a specific type of ConfigSource implementation by creating a config-source resource
with a class attribute.
For example, you can provide an implementation of org.eclipse.microprofile.config.spi.ConfigSource
that is named org.example.MyConfigSource and provided by a JBoss module named org.example:
/subsystem=microprofile-config-smallrye/config-source=my-config-source:add(class={name=org.example.MyConfigSource, module=org.example})
This results in the XML configuration:
<subsystem xmlns="urn:wildfly:microprofile-config-smallrye:1.0">
<config-source name="my-config-source">
<class name="org.example.MyConfigSource" module="org.example"/>
</config-source>
</subsystem>All properties from this ConfigSource will be available to any WildFly deployment.
ConfigSourceProvider from Class
You can create a specific type of ConfigSourceProvider implementation by creating a config-source-provider resource
with a class attribute.
For example, you can provide an implementation of org.eclipse.microprofile.config.spi.ConfigSourceProvider
that is named org.example.MyConfigSourceProvider and provided by a JBoss module named org.example:
/subsystem=microprofile-config-smallrye/config-source-provider=my-config-source-provider:add(class={name=org.example.MyConfigSourceProvider, module=org.example})
This results in the XML configuration:
<subsystem xmlns="urn:wildfly:microprofile-config-smallrye:1.0">
<config-source-provider name="my-config-source-provider">
<class name="org.example.MyConfigSourceProvider" module="org.example"/>
</config-source-provider>
</subsystem>All properties from the ConfigSource`s provided by this `ConfigSourceProvider will be available to any WildFly deployment.
9.9.3. Deployment
Applications that are deployed in WildFly must have CDI enabled (e.g. with a META-INF/beans.xml
or by having CDI Bean annotation) to be able to use MicroProfile Config in their code.
9.9.4. Component Reference
The Eclipse MicroProfile Config is implemented by the SmallRye Config project.
9.10. MicroProfile Health Subsystem Configuration
Support for Eclipse MicroProfile Health is provided by the microprofile-health-smallrye subsystem.
9.10.1. Required Extension
This extension is included in the standalone configurations included in the WildFly distribution.
You can also add the extension to a configuration without it either by adding
an <extension module="org.wildfly.extension.microprofile.health-smallrye"/>
element to the xml or by using the following CLI operation:
[standalone@localhost:9990 /]/extension=org.wildfly.extension.microprofile.health-smallrye:add9.10.2. Management Operation
The healthiness of the application server can be queried by calling the check:
[standalone@localhost:9990 /] /subsystem=microprofile-health-smallrye:check
{
"outcome" => "success", (1)
"result" => {
"outcome" => "UP", (2)
"checks" => []
}
}| 1 | this outcome means that the management operation is successful |
| 2 | this outcome corresponds to the health check, UP if the application server is healthy, DOWN else. |
9.10.3. HTTP Endpoints
The MicroProfile Health Check specifications defines three HTTP endpoints:
* /health to test both the liveness and readiness of the runtime.
* /health/live to test the liveness of the runtime.
* /health/ready to test the readiness of the runtime.
The Health HTTP endpoints are accessible on WildFly HTTP management interface (e.g. http://localhost:9990/health).
Secured Access to the HTTP endpoints
Secured access to the HTTP endpoint is controlled by the security-enabled attribute of the /subsystem=microprofile-health-smallrye resource.
If it is set to true, the HTTP client must be authenticated.
If the application server is healthy, it will return a 200 OK response:
$ curl -v http://localhost:9990/health
< HTTP/1.1 200 OK
...
{"outcome":"UP","checks":[]}If the application server (and its deployment) is not healthy, it returns 503 Service Unavailable
$ curl -v http://localhost:9990/health
< HTTP/1.1 503 Service Unavailable
...
{"outcome":"DOWN","checks":[{"name":"myFailingProbe","state":"DOWN","data":{"foo":"bar"}}]}If security has been enabled, the HTTP client must pass the credentials corresponding to a management user
created by the add-user script. For example:
$ curl -v --digest -u myadminuser:myadminpassword http://localhost:9990/health
< HTTP/1.1 200 OK
...
{"outcome":"UP","checks":[]}If the authentication fails, the server will reply with a 401 NOT AUTHORIZED response.
Global Status when probes are not defined
By default, the HTTP endpoints will return UP if there are no health check probes defined by the application.
However, it is possible to change this behaviour.
The /health/live HTTP endpoint (as well as the check-live management operation) can return DOWN when there are no liveness check probes by setting the empty-liveness-checks-status attribute
on the subsystem resource to DOWN.
Similarly, the /health/ready HTTP endpoint (as well as the check-ready management operation) can return DOWN when there are no readiness check probes by setting the empty-readiness-checks-status attribute
on the subsystem resource to DOWN.
This allows application to ensure that the HTTP liveness and readiness endpoints will return DOWN until their probes are deployed and used to determine the actual
liveness and readiness state of the application.
There is a specific behaviour for deployments that provides no readiness probes. In that the case, WildFly automatically adds a readiness probe for the deployment that always return
UP. This allows existing deployments that do not provide readiness probes to configure WildFly so it will not be ready until this deployment is actually deployed.
|
9.10.4. Component Reference
The Eclipse MicroProfile Health is implemented by the SmallRye Health project.
9.11. MicroProfile JWT Subsystem Configuration
Support for Eclipse MicroProfile JWT RBAC is provided by the microprofile-jwt-smallrye subsystem.
The MicroProfile JWT specification describes how authentication can be performed using cryptographically signed JWT tokens and the contents of the token to be used to establish a resuting identity without relying on access to external repositories of identities such as databases or directory servers.
9.11.1. Subsystem
The MicroProfile JWT integration is provided by the microprofile-jwt-smallrye subsystem and is included in the default configuration, if not present the subsystem can be added using the following CLI commands.
[standalone@localhost:9990 /] /extension=org.wildfly.extension.microprofile.jwt-smallrye:add
[standalone@localhost:9990 /] /subsystem=microprofile-jwt-smallrye:addAt this point the server would need to be reloaded to activate the change.
9.11.2. Configuration
The microprofile-jwt-smallrye subsystem contains no configurable attributes or resources, it’s presence is required however to detect if a deployment is making use of the MP-JWT authentication mechanism and to activate support for JWT making use of the SmallRye JWT project.
Activation
The subsystem will scan all deployments to detect if the MP-JWT mechanism is required for any web components and if true activate the integration and the authentication mechanism.
The classes in the deployment will be scanned to identify if there is a class which extends javax.ws.rs.core.Application annotated with the org.eclipse.microprofile.auth.LoginConfig to specify an auth-method. Additionally the auth-method contained within the deployments web.xml will be checked.
If authentication configuration is defined within the @LoginConfig annotation and within the web.xml deployment descriptor the contents of the web.xml are given precedence.
If after evaluating the deployment the resulting auth-method is MP-JWT then this integration will be activated, in all other cases no activation will occur and deployment will continue as normal.
MicroProfile Config
For an individual deployment the configuration in relation to MicroProfile JWT can be provided using MicroProfile Config properties, many are defined within the MicroProfile JWT specification however SmallRye JWT also supports some additional properties.
Standard Properties
| Property | Default | Description |
|---|---|---|
mp.jwt.verify.publickey |
NONE |
String representation of the public key encoded using one of the supported formats. Must not be set at the same time as |
mp.jwt.verify.publickey.location |
NONE |
The location of the public key, may be a relative path or URL. Must not be set at the same time as |
mp.jwt.verify.issuer |
NONE |
The expected value of any |
A minimal microprofile-config.properties could look like: -
mp.jwt.verify.publickey.location=META-INF/public.pem
mp.jwt.verify.issuer=quickstart-jwt-issuerUnavailable Options
There are presently a couple of limitations with support for JWKS which we are looking to address.
-
If a JWKS is inlined using the
mp.jwt.verify.publickeyproperty then only the first key from the set will be used with the remainder being ignored. -
Encoding of JWKS using Base64 is presently unsupported.
In both cases a clear text JWKS can be referenced instead using the mp.jwt.verify.publickey.location config property.
Support for Base64 encoded JWKS keys and inlined JWKS keys within the mp.jwt.verify.publickey property will be further evaluation and either support added or a contibution to the specification to remove these options.
SmallRye JWT Properties
The SmallRye JWT specific properties allow for a lot of customisation not covered by the specification, however as these are not specification defined they could be subject to change.
| Property | Default | Description |
|---|---|---|
smallrye.jwt.token.header |
Authorization |
The HTTP header to extract the token from. |
smallrye.jwt.token.cookie |
NONE |
The name of the cookie to extract the token from, only applicable if |
smallrye.jwt.token.kid |
NONE |
The expected |
smallrye.jwt.require.named-principal |
false |
When set to true require any token being validated to contain at least one of |
smallrye.jwt.claims.sub |
NONE |
The default value to use for any |
smallrye.jwt.path.sub |
NONE |
Path to the claim containing the |
smallrye.jwt.claims.groups |
NONE |
The default value for any |
smallrye.jwt.path.groups |
NONE |
Path to the claim containing the |
smallrye.jwt.groups-separator |
|
Where |
smallrye.jwt.expiration.grace |
60 |
The grace period in seconds a token will be accepted after it’s expiration. |
smallrye.jwt.jwks.refresh-interval |
60 |
The refresh inerval where |
smallrye.jwt.whitelist.algorithms |
RS256 |
List of supported algorithms. |
smallrye.jwt.verify.aud |
NONE |
The expected audience values for a token. |
9.11.3. Virtual Security
For traditional deployments to WildFly where security is required a security domain name would be identified during deployment and this in turn would be mapped to use configured resources either within the elytron or legacy security subsystems.
One of the main motivations for using MicroProfile JWT is the ability to describe an identity from the incoming token without relying on access to external resources. For this reason MicroProfile JWT deployments will not depend on managed SecurityDomain resources, instead a virtual SecurityDomain will be created and used across the deployment.
As the deployment is configured entirely within the MicroProfile Config properties other than the presence of the microprofile-jwt-smallrye subsystem the virtual SecurityDomain means no other managed configuration is required for the deployment.
9.12. MicroProfile Metrics Subsystem Configuration
Support for Eclipse MicroProfile Metrics is provided by the microprofile-metrics-smallrye subsystem.
9.12.1. Required Extension
This extension is included in all the standalone configurations included in the WildFly distribution.
You can also add the extension to a configuration without it either by adding
an <extension module="org.wildfly.extension.microprofile.metrics-smallrye"/>
element to the xml or by using the following CLI operation:
[standalone@localhost:9990 /] /extension=org.wildfly.extension.microprofile.metrics-smallrye:add9.12.2. Management Model
The /subsystem=microprofile-metrics-smallrye resource defines two attributes:
-
security-enabled- a boolean to indicate whether authentication is required to access the HTTP metrics endpoint (described below). By default, it istrue. The standalone configurations explicitly sets it tofalseto accept unauthenticated access to the HTTP endpoints. -
exposed-subsystems- a list of strings corresponding to the names of subsystems that exposes their metrics in the HTTP metrics endpoints. By default, it is not defined (there will be no metrics exposed by subsystem. The special wildcardcan be used to expose metrics from all subsystems. The standalone configuration sets this attribute to. -
prefix- A string to prepend to WildFly metrics that are exposed by the HTTP endpoint/metricswith the Prometheus output format.
9.12.3. HTTP Endpoint
The Metric HTTP endpoint is accessible on WildFly HTTP management interface http://localhost:9990/metrics.
Secured access to the HTTP endpoint is controlled by the security-enabled attribute of the /subsystem=microprofile-metrics-smallrye resource.
If it is set to true, the HTTP client must be authenticated.
If the application server is healthy, it will return a 200 OK response:
$ curl -v http://localhost:9990/metrics < HTTP/1.1 200 OK ... # HELP base:classloader_total_loaded_class_count Displays the total number of classes that have been loaded since the Java virtual machine has started execution . # TYPE base:classloader_total_loaded_class_count counter base:classloader_total_loaded_class_count 10822.0 ...
If security has been enabled, the HTTP client must pass the credentials corresponding to a management user
created by the add-user script. For example:
$ curl -v --digest -u myadminuser:myadminpassword http://localhost:9990/metrics < HTTP/1.1 200 OK ... # HELP base:classloader_total_loaded_class_count Displays the total number of classes that have been loaded since the Java virtual machine has started execution . # TYPE base:classloader_total_loaded_class_count counter base:classloader_total_loaded_class_count 10822.0 ...
If the authentication fails, the server will reply with a 401 NOT AUTHORIZED response.
9.12.4. Exposed Metrics
The HTTP endpoint exposes the following metrics:
-
Base metrics - Required metrics specified in the MicroProfile 1.1 specification are exposed in the
basescope. -
Vendor metrics - Vendor-specific metrics (e.g. for memory pools)
-
Application metrics - Metrics from the application and from the deployment’s subsystems are exposed in the
applicationscope.
The WildFly metrics (that measures activity in the subsystem or application deployments) are exposed only on the /metrics
endpoint with the Prometheus format.
WildFly Metrics Description
WildFly metrics names is based on the subsystem that provides them as well as the name of the attribute from the management model.
Their name can also be prepended with a prefix (specified on the /subsystem=microprofile-metrics resource).
Other information are stored using labels.
For example Undertow exposes a metric attribute request-count for every Servlet in an application deployment.
This attribute will be exposed to Prometheus with the name wildfly_undertow_request_count.
Other information such as the name of the Servlet are added to the labels of the metrics.
The [helloworld-rs quickstart](https://github.com/wildfly/quickstart/tree/master/helloworld-rs) creates a JAX-RS application that can be deployed in WildFly. A corresponding metric will be exposed for it with the name and labels:
-
wildfly_undertow_request_count_total{deployment="helloworld-rs.war",servlet="org.jboss.as.quickstarts.rshelloworld.JAXActivator",subdeployment="helloworld-rs.war"}
Some subsystems (such as undertow or messaging-activemq) do not enable their statistics by default
as they have an impact on performance and memory usage. These subsystems provides a statistics-enabled attribute that must
be set to true to enable them.
For convenience, WildFly standalone configuration provides expression to enable the statistics by setting a
System property -Dwildfly.statistics-enabled=true to enable statistics on the subsystems provided by the configuration.
|
9.12.5. Component Reference
The Eclipse MicroProfile Metrics is implemented by the SmallRye Metrics project.
9.13. MicroProfile OpenAPI Subsystem Configuration
The OpenAPI specification defines a contract for JAX-RS applications in the same way that WSDL defined a contract for legacy web services. The MicroProfile OpenAPI specification defines a mechanism for generating an OpenAPI v3 document from a JAX-RS application as well as an API for customizing production of the document.
9.13.1. Subsystem
The MicroProfile OpenAPI capability is provided by the microprofile-openapi-smallrye subsystem. This subsystem is included in the default standalone-microprofile.xml configuration of the WildFly distribution.
You can also add the subsystem manually to any profile via the CLI:
[standalone@localhost:9990 /] /extension=org.wildfly.extension.microprofile.openapi-smallrye:add()
[standalone@localhost:9990 /] /subsystem=microprofile-openapi-smallrye:add()9.13.2. Configuration
The microprofile-openapi-smallrye subsytem obtains all of its configuration via MicroProfile Config. Thus the subsystem itself defines no attributes.
In addition to the standard Open API configuration properties, WildFly supports the following additional MicroProfile Config properties:
| Property | Default | Description |
|---|---|---|
mp.openapi.extensions.enabled |
true |
Enables/disables registration of an OpenAPI endpoint. Many users will want to parameterize this to selectively enable/disable OpenAPI in different environments. |
mp.openapi.extensions.path |
/openapi |
Used to customize the path of the OpenAPI endpoint. |
mp.openapi.extensions.servers.relative |
true |
Indicates whether auto-generated Server records are absolute or relative to the location of the OpenAPI endpoint. If absolute, WildFly will generate Server records including the protocols, hosts, and ports at which the given deployment is accessible. |
e.g. /META-INF/microprofile-config.properties:
mp.openapi.extensions.enabled=${microprofile.openapi.enabled}
mp.openapi.extensions.path=/swagger
mp.openapi.extensions.servers.relative=false9.13.3. HTTP/S Endpoint
The MicroProfile OpenAPI specification defines an HTTP endpoint that serves an OpenAPI 3.0 document describing the REST endpoints for the host. The OpenAPI endpoint is registered using the configured path (e.g. http://localhost:8080/openapi) local to the root of the host associated with a given deployment.
| Currently, the OpenAPI endpoint for a given virtual host can only document a single JAX-RS deployment. To use OpenAPI with multiple JAX-RS deployments registered with different context paths on the same virtual host, each deployment should use a distinct endpoint path. |
By default, the OpenAPI endpoint returns a YAML document.
Alternatively, a JSON document can be requested via an Accept HTTP header, or a format query parameter.
e.g.
$ curl -v http://localhost:8080/openapi?format=JSON
< HTTP/1.1 200 OK
...
{"openapi": "3.0.1" ... }
$ curl -v -H'Accept: application/json' http://localhost:8080/openapi
< HTTP/1.1 200 OK
...
{"openapi": "3.0.1" ... }If the Undertow server/host of a given application defines an HTTPS listener, then the OpenAPI document will also be available via HTTPS, e.g. https://localhost:8443/openapi
9.13.4. Component Reference
The Eclipse MicroProfile OpenAPI implementation is provided by the SmallRye OpenAPI project.
9.14. MicroProfile OpenTracing Subsystem Configuration
Support for Eclipse MicroProfile OpenTracing is provided as a Tech Preview feature by the microprofile-opentracing-smallrye subsystem.
9.14.1. Required Extension
This extension is included in the standard configurations included in the WildFly distribution.
You can also add the extension to a configuration without it either by adding
an <extension module="org.wildfly.extension.microprofile.opentracing-smallrye"/>
element to the xml or by using the following CLI operation:
[standalone@localhost:9990 /] /extension=org.wildfly.extension.microprofile.opentracing-smallrye:add
{"outcome" => "success"}
[standalone@localhost:9990 /] /subsystem=microprofile-opentracing-smallrye:add
{
"outcome" => "success",
"response-headers" => {
"operation-requires-reload" => true,
"process-state" => "reload-required"
}
}9.14.2. Supported instrumentation libraries
WildFly’s MicroProfile OpenTracing subsystem implements MicroProfile 1.3, which includes support for tracing JAX-RS and CDI.
Currently the subsystem allows the configuration of Jaeger Java Client. You can then specify which tracer to use in your deployment by specifying a smallrye.opentracing.tracer.configuration init-parameter in your deployment descriptor. If this value is wrong the deployment will fail.
You can also set the default tracer to be injected by using the default-tracer attribute on the subsystem configuration.
Additionally, applications being deployed are able to provide their own tracers via the
TracerResolver facility. In that case, the default tracer will not be used.
For compatibility if no tracer is defined in the subsystem and no tracer can be resolved, then a Jaeger Tracer instance will be created from the environment variables.
9.14.3. Configuring a Jaeger tracer
To add a new Jaeger tracer instance you can use the following CLI operation:
[standalone@localhost:9990 /] /subsystem=microprofile-opentracing-smallrye/jaeger-tracer=my-tracer:add()
{"outcome" => "success"}Those are the configuration attributes:
-
propagation: The supported trace context propagation formats:-
JAEGER: The default Jaeger trace context propagation format.
-
B3: The Zipkin B3 trace context propagation format.
-
-
sampler-type: The type of sampler to use in the tracer. Optional. Valid values: remote (default),ratelimiting, probabilistic, const. -
sampler-param: The floating point value that makes sense for the correct samplerType. -
sampler-manager-host-port: the port of the sampling manager that can provide sampling strategy to this service. -
sender-binding: The outbound socket binding to connecto the Agent. -
sender-endpoint: The endpoint, like https://jaeger-collector:14268/api/traces -
sender-user: The Basic Auth username to be added on Authorization headers for requests sent to the endpoint. -
sender-auth-password: The Basic Auth password to be added on Authorization headers for requests sent to the endpoint. -
sender-auth-token: The Auth Token to be added as "Bearer" on Authorization headers for requests sent to the endpoint. -
reporter-log-spans: Boolean to indicates whether the reporter should log the spans. -
reporter-flush-interval: The flush interval when reporting spans remotely in milliseconds. -
reporter-max-queue-size: The reporter’s maximum queue size. -
tracer_id_128bit: Opt-in to use 128 bit traceIds. By default, uses 64 bits. -
tracer-tags: A comma separated list of name = value tracer level tags, which get added to all reported spans. The value can also refer to an environment variable using the format ${envVarName:default}, where the :default is optional, and identifies a value to be used if the environment variable cannot be found.
By default, the service name used with the Jaeger Client is derived from the deployment’s name, which is usually the WAR file name.
As defined by the MicroProfile OpenTracing specification, CDI beans are traced if the annotation
org.eclipse.microprofile.opentracing.Traced is present, either at the type or method level. Tracing can be disabled
by setting the annotation’s value to false. Similarly, a custom operation name can be set by specifying the parameter
operationName for that annotation. The semantics are ruled by the MicroProfile OpenTracing specification.
Note that CDI support for the deployment is required in order to activate the MicroProfile OpenTracing support. A simple JAX-RS application with no CDI support will not be traced.
Managed beans with multiple facets, such as EJBs, can also be traced by annotating them with @Traced, but with
limitations. For instance, asynchronous invocations will yield a new trace, instead of having the span to join an
existing trace.
9.14.4. Component Reference
The Eclipse MicroProfile OpenTracing is implemented by the SmallRye OpenTracing project.
9.15. MicroProfile Fault Tolerance Subsystem Configuration
Support for Eclipse MicroProfile Fault Tolerance is
provided as by the microprofile-fault-tolerance-smallrye subsystem.
9.15.1. Required Extension
This extension is not included by default in the standard configurations in the WildFly distribution.
You can add the extension to a configuration without it either by adding an
<extension module="org.wildfly.extension.microprofile.fault-tolerance-smallrye"/>
element to the XML or by using the following CLI operation:
[standalone@localhost:9990 /] /extension=org.wildfly.extension.microprofile.fault-tolerance-smallrye:add
{"outcome" => "success"}
[standalone@localhost:9990 /] /subsystem=microprofile-fault-tolerance-smallrye:add
{
"outcome" => "success",
"response-headers" => {
"operation-requires-reload" => true,
"process-state" => "reload-required"
}
}
[standalone@localhost:9990 /] reloadThe subsystem does not have any configurable elements.
9.15.2. Specification
WildFly’s MicroProfile Fault Tolerance subsystem implements MicroProfile 2.1.
This MicroProfile specification provides the following interceptor bindings:
-
@Timeout -
@Retry -
@Fallback -
@CircuitBreaker -
@Bulkhead -
@Asynchronous
For usage please refer to MicroProfile Fault Tolerance 2.1 specification.
9.15.3. Configuration
Apart from configuration properties defined by the specification, the SmallRye implementation provides the following configuration properties:
| Name | Default | Description |
|---|---|---|
|
100 |
Number of threads used by the fault tolerance mechanisms. This does not include bulkhead thread pools. |
|
5 |
Size of the thread pool used for scheduling timeouts. |
9.15.4. Component Reference
The Eclipse MicroProfile Fault Tolerance is implemented by the SmallRye Fault Tolerance project.
9.16. Security subsystem configuration
The security subsystem is the subsystem that brings the security services provided by PicketBox to the WildFly 19.1 server instances.
If you are looking to secure the management interfaces for the management of the domain then you should read the Securing the Management Interfaces chapter as the management interfaces themselves are not run within a WildFly process so use a custom configuration.
9.16.1. Structure of the Security Subsystem
When deploying applications to WildFly most of the time it is likely that you would be deploying a web application or EJBs and just require a security domain to be defined with login modules to verify the users identity, this chapter aims to provide additional detail regarding the architecture and capability of the security subsystem however if you are just looking to define a security domain and leave the rest to the container please jump to the security-domains section.
The security subsystem operates by using a security context associated with the current request, this security context then makes available to the relevant container a number of capabilities from the configured security domain, the capabilities exposed are an authentication manager, an authorization manager, an audit manager and a mapping manager.
Authentication Manager
The authentication manager is the component that performs the actual authentication taking the declared users identity and their credential so that the login context for the security domain can be used to 'login' the user using the configured login module or modules.
Authorization Manager
The authorization manager is a component which can be obtained by the container from the current security context to either obtain information about a users roles or to perform an authorization check against a resource for the currently authenticated user.
Audit Manager
The audit manager from the security context is the component that can be used to log audit events in relation to the security domain.
Mapping Manager
The mapping manager can be used to assign additional principals, credentials, roles or attributes to the authenticated subject.
9.16.2. Security Subsystem Configuration
By default a lot of defaults have already been selected for the security subsystem and unless there is a specific implementation detail you need to change, these defaults should not require modification. This chapter describes all of the possible configuration attributes for completeness but do keep in mind that not all will need to be changed.
The security subsystem is enabled by default by the addition of the
following extension: -
<extension module="org.jboss.as.security"/>
The namespace used for the configuration of the security subsystem is urn:jboss:domain:security:1.0, the configuration is defined within the <subsystem> element from this namespace.
The <subsystem> element can optionally contain the following child elements.
-
security-management
-
subject-factory
-
security-domains
-
security-properties
security-management
This element is used to override some of the high level implementation details of the PicketBox implementation if you have a need to change some of this behaviour.
The element can have any or the following attributes set, all of which are optional.
| authentication-manager-class-name | Specifies the AuthenticationManager implementation class name to use. |
|---|---|
deep-copy-subject-mode |
Sets the copy mode of subjects done by the security managers to be deep copies that makes copies of the subject principals and credentials if they are cloneable. It should be set to true if subject include mutable content that can be corrupted when multiple threads have the same identity and cache flushes/logout clearing the subject in one thread results in subject references affecting other threads. Default value is "false". |
default-callback-handler-class-name |
Specifies a global class name for the CallbackHandler implementation to be used with login modules. |
authorization-manager-class-name |
Attribute specifies the AuthorizationManager implementation class name to use. |
audit-manager-class-name |
Specifies the AuditManager implementation class name to use. |
identity-trust-manager-class-name |
Specifies the IdentityTrustManager implementation class name to use. |
mapping-manager-class-name |
Specifies the MappingManager implementation class name to use. |
subject-factory
The subject factory is responsible for creating subject instances, this also makes use of the authentication manager to actually verify the caller. It is used mainly by JCA components to establish a subject. It is not likely this would need to be overridden but if it is required the "subject-factory-class-name" attribute can be specified on the subject-factory element.
security-domains
This portion of the configuration is where the bulk of the security subsystem configuration will actually take place for most administrators, the security domains contain the configuration which is specific to a deployment.
The security-domains element can contain numerous <security-domain> definitions, a security-domain can have the following attributes set:
| name | The unique name of this security domain. |
|---|---|
extends |
Although version 1.0 of the security subsystem schema contained an 'extends' attribute, security domain inheritance is not supported and this attribute should not be used. |
cache-type |
The type of authentication cache to use with this domain. If this attribute is removed no cache will be used. Allowed values are "default" or "infinispan" |
The following elements can then be set within the security-domain to configure the domain behaviour.
authentication
The authentication element is used to hold the list of login modules that will be used for authentication when this domain is used, the structure of the login-module element is:
<login-module code="..." flag="..." module="...">
<module-option name="..." value="..."/>
</login-module>The code attribute is used to specify the implementing class of the login module which can either be the full class name or one of the abbreviated names from the following list:
| Code | Classname |
|---|---|
Client |
org.jboss.security.ClientLoginModule |
Certificate |
org.jboss.security.auth.spi.BaseCertLoginModule |
CertificateUsers |
org.jboss.security.auth.spi.BaseCertLoginModule |
CertificateRoles |
org.jboss.security.auth.spi.CertRolesLoginModule |
Database |
org.jboss.security.auth.spi.DatabaseServerLoginModule |
DatabaseCertificate |
org.jboss.security.auth.spi.DatabaseCertLoginModule |
DatabaseUsers |
org.jboss.security.auth.spi.DatabaseServerLoginModule |
Identity |
org.jboss.security.auth.spi.IdentityLoginModule |
Ldap |
org.jboss.security.auth.spi.LdapLoginModule |
LdapExtended |
org.jboss.security.auth.spi.LdapExtLoginModule |
RoleMapping |
org.jboss.security.auth.spi.RoleMappingLoginModule |
RunAs |
org.jboss.security.auth.spi.RunAsLoginModule |
Simple |
org.jboss.security.auth.spi.SimpleServerLoginModule |
ConfiguredIdentity |
org.picketbox.datasource.security.ConfiguredIdentityLoginModule |
SecureIdentity |
org.picketbox.datasource.security.SecureIdentityLoginModule |
PropertiesUsers |
org.jboss.security.auth.spi.PropertiesUsersLoginModule |
SimpleUsers |
org.jboss.security.auth.spi.SimpleUsersLoginModule |
LdapUsers |
org.jboss.security.auth.spi.LdapUsersLoginModule |
Kerberos |
com.sun.security.auth.module.Krb5LoginModule |
SPNEGOUsers |
org.jboss.security.negotiation.spnego.SPNEGOLoginModule |
AdvancedLdap |
org.jboss.security.negotiation.AdvancedLdapLoginModule |
AdvancedADLdap |
org.jboss.security.negotiation.AdvancedADLoginModule |
UsersRoles |
org.jboss.security.auth.spi.UsersRolesLoginModule |
The module attribute specifies the name of the JBoss Modules module from which the class specified by the code attribute should be loaded. Specifying it is not necessary if one of the abbreviated names in the above list is used.
The flag attribute is used to specify the JAAS flag for this module and should be one of required, requisite, sufficient, or optional.
The module-option element can be repeated zero or more times to specify the module options as required for the login module being configured. It requires the name and value attributes.
authentication-jaspi
The authentication-jaspi is used to configure a Java Authentication SPI (JASPI) provider as the authentication mechanism. A security domain can have either a <authentication> or a <authentication-jaspi> element, but not both. We set up JASPI by configuring one or more login modules inside the login-module-stack element and setting up an authentication module. Here is the structure of the authentication-jaspi element:
<login-module-stack name="...">
<login-module code="..." flag="..." module="...">
<module-option name="..." value="..."/>
</login-module>
</login-module-stack>
<auth-module code="..." login-module-stack-ref="...">
<module-option name="..." value="..."/>
</auth-module>The login-module-stack-ref attribute value must be the name of the login-module-stack element to be used. The sub-element login-module is configured just like in the authentication part
authorization
Authorization in the AS container is normally done with RBAC (role based access control) but there are situations where a more fine grained authorization policy is required. The authorization element allows definition of different authorization modules to used, such that authorization can be checked with JACC (Java Authorization Contract for Containers) or XACML (eXtensible Access Control Markup Language). The structure of the authorization element is:
<policy-module code="..." flag="..." module="...">
<module-option name="..." value="..."/>
</policy-module>The code attribute is used to specify the implementing class of the policy module which can either be the full class name or one of the abbreviated names from the following list:
| Code | Classname |
|---|---|
DenyAll |
org.jboss.security.authorization.modules.AllDenyAuthorizationModule |
PermitAll |
org.jboss.security.authorization.modules.AllPermitAuthorizationModule |
Delegating |
org.jboss.security.authorization.modules.DelegatingAuthorizationModule |
Web |
org.jboss.security.authorization.modules.WebAuthorizationModule |
JACC |
org.jboss.security.authorization.modules.JACCAuthorizationModule |
XACML |
org.jboss.security.authorization.modules.XACMLAuthorizationModule |
The module attribute specifies the name of the JBoss Modules module from which the class specified by the code attribute should be loaded. Specifying it is not necessary if one of the abbreviated names in the above list is used.
The flag attribute is used to specify the JAAS flag for this module and should be one of required, requisite, sufficient, or optional.
The module-option element can be repeated zero or more times to specify the module options as required for the login module being configured. It requires the name and value attributes.
mapping
The mapping element defines additional mapping of principals, credentials, roles and attributes for the subject. The structure of the mapping element is:
<mapping-module type="..."code="..." module="...">
<module-option name="..." value="..."/>
</mapping-module>The type attribute reflects the type of mapping of the provider and should be one of principal, credential, role or attribute. By default "role" is the type used if the attribute is not set.
The code attribute is used to specify the implementing class of the login module which can either be the full class name or one of the abbreviated names from the following list:
| Code | Classname |
|---|---|
PropertiesRoles |
org.jboss.security.mapping.providers.role.PropertiesRolesMappingProvider |
SimpleRoles |
org.jboss.security.mapping.providers.role.SimpleRolesMappingProvider |
DeploymentRoles |
org.jboss.security.mapping.providers.DeploymentRolesMappingProvider |
DatabaseRoles |
org.jboss.security.mapping.providers.role.DatabaseRolesMappingProvider |
LdapRoles |
org.jboss.security.mapping.providers.role.LdapRolesMappingProvider |
The module attribute specifies the name of the JBoss Modules module from which the class specified by the code attribute should be loaded. Specifying it is not necessary if one of the abbreviated names in the above list is used.
The module-option element can be repeated zero or more times to specify the module options as required for the login module being configured. It requires the name and value attributes.
audit
The audit element can be used to define a custom audit provider. The
default implementation used is
org.jboss.security.audit.providers.LogAuditProvider. The structure of
the audit element is:
<provider-module code="..." module="...">
<module-option name="..." value="..."/>
</provider-module>The code attribute is used to specify the implementing class of the provider module.
The module attribute specifies the name of the JBoss Modules module from which the class specified by the code attribute should be loaded.
The module-option element can be repeated zero or more times to specify the module options as required for the login module being configured. It requires the name and value attributes.
jsse
The jsse element defines configuration for keystores and truststores that can be used for SSL context configuration or for certificate storing/retrieving.
The set of attributes (all of them optional) of this element are:
| keystore-password | Password of the keystore |
|---|---|
keystore-type |
Type of the keystore. By default it’s "JKS" |
keystore-url |
URL where the keystore file can be found |
keystore-provider |
Provider of the keystore. The default JDK provider for the keystore type is used if this attribute is null |
keystore-provider-argument |
String that can be passed as the argument of the keystore Provider constructor |
key-manager-factory-algorithm |
Algorithm of the KeyManagerFactory. The default JDK algorithm of the key manager factory is used if this attribute is null |
key-manager-factory-provider |
Provider of the KeyManagerFactory. The default JDK provider for the key manager factory algorithm is used if this attribute is null |
truststore-password |
Password of the truststore |
truststore-type |
Type of the truststore. By deafult it’s "JKS" |
truststore-url |
URL where the truststore file can be found |
truststore-provider |
Provider of the truststore. The default JDK provider for the truststore type is used if this attribute is null |
truststore-provider-argument |
String that can be passed as the argument of the truststore Provider constructor |
trust-manager-factory-algorithm |
Algorithm of the TrustManagerFactory. The default JDK algorithm of the trust manager factory is used if this attribute is null |
trust-manager-factory-provider |
Provider of the TrustManagerFactory. The default JDK provider for the trust manager factory algorithm is used if this attribute is null |
client-alias |
Alias of the keystore to be used when creating client side SSL sockets |
server-alias |
Alias of the keystore to be used when creating server side SSL sockets |
service-auth-token |
Validation token to enable third party services to retrieve a keystore Key. This is typically used to retrieve a private key for signing purposes |
client-auth |
Flag to indicate if the server side SSL socket should require client authentication. Default is "false" |
cipher-suites |
Comma separated list of cipher suites to be used by a SSLContext |
protocols |
Comma separated list of SSL protocols to be used by a SSLContext |
The optional additional-properties element can be used to include other options. The structure of the jsse element is:
<jsse keystore-url="..." keystore-password="..." keystore-type="..." keystore-provider="..." keystore-provider-argument="..." key-manager-factory-algorithm="..." key-manager-factory-provider="..." truststore-url="..." truststore-password="..." truststore-type="..." truststore-provider="..." truststore-provider-argument="..." trust-manager-factory-algorithm="..." trust-manager-factory-provider="..." client-alias="..." server-alias="..." service-auth-token="..." client-auth="..." cipher-suites="..." protocols="...">
<additional-properties>x=y
a=b
</additional-properties>
</jsse>security-properties
This element is used to specify additional properties as required by the security subsystem, properties are specified in the following format:
<security-properties>
<property name="..." value="..."/>
</security-properties>The property element can be repeated as required for as many properties need to be defined.
Each property specified is set on the java.security.Security class.
9.16.3. Authentication Modules
In this section we will describe each login module’s options available.
Client
This login module is designed to establish caller identity and credentials when WildFly is acting a client. It should never be used as part of a security domain used for actual server authentication.
| Options | Usage | Description |
|---|---|---|
multi-threaded |
optional |
Set to true if each thread has its own principal and credential storage. Set to false to indicate that all threads in the VM share the same identity and credential. Default is false |
restore-login-identity |
optional |
Set to true if the identity and credential seen at the start of the login() method should be restored after the logout() method is invoked. Default is false |
password-stacking |
optional |
Set to useFirstPass to indicate that this login module should look for information stored in the LoginContext to use as the identity. This option can be used when stacking other login modules with this one. Default is false |
Database
This login module is designed to be used for authenticating users against a database backend.
| Options | Usage | Description |
|---|---|---|
dsJndiName |
required |
JNDI name of the datasource containing the tables for users and roles |
principalsQuery |
required |
SQL prepared statement to be executed in order to match the password. Default is select Password from Principals where PrincipalID=? |
rolesQuery |
optional |
SQL prepared statement to be executed in order to map roles. It should be an equivalent to select Role, RoleGroup from Roles where PrincipalID=?, where Role is the role name and RoleGroup column value should always be "Roles" with capital R. |
suspendResume |
optional |
A boolean flag that specifies that any existing JTA transaction be suspended during DB operations. The default is true |
Certificate
This login module is designed to authenticate users based on X509Certificates. A use case for this is CLIENT-CERT authentication of a web application.
| Options | Usage | Description |
|---|---|---|
securityDomain |
optional |
Name of the security domain that has the jsse configuration for the truststore holding the trusted certificates |
verifier |
optional |
The class name of the org.jboss.security.auth.certs.X509CertificateVerifier to use for verification of the login certificate |
If there is no verifier set, this login module will try to validate the user’s certificate with a public certificate stored in the truststore. The public certificate must be stored in the truststore using the DN of the certificate as the truststore alias.
CertificateRoles
This login module extends the Certificate login module to add role mapping capabilities from a properties file. It has the same options plus these additional options:
| Options | Usage | Description |
|---|---|---|
rolesProperties |
optional |
Name of the resource/file containing the roles to assign to each user. Default is roles.properties |
defaultRolesProperties |
optional |
Name of the resource/file to fall back to if the rolesProperties file can’t be found. Default is defaultRoles.properties |
roleGroupSeperator |
optional |
Character to use as the role group separator in the role properties file. Default character is '.' (period) |
The role properties file must be in the format username=role1,role2 where the username is the DN of the certificate, escaping any equals and space characters. Here is an example:
CN\=unit-tests-client,\ OU\=JBoss\ Inc.,\ O\=JBoss\ Inc.,\ ST\=Washington,\ C\=US=JBossAdmin
This would assign the JBossAdmin role to an user that presents a certificate with CN=unit-tests-client, OU=JBoss Inc., O=JBoss Inc., ST=Washington, C=US as the DN.
DatabaseCertificate
This login module extends the Certificate login to add role mapping capabilities from a database table. It has the same options plus these additional options:
| Options | Usage | Description |
|---|---|---|
dsJndiName |
required |
JNDI name of the datasource containing the tables for users and roles |
rolesQuery |
optional |
SQL prepared statement to be executed in order to map roles. It should be an equivalent to select Role, RoleGroup from Roles where PrincipalID=?, where Role is the role name and RoleGroup column value should always be "Roles" with capital R. Default is select Role, RoleGroup from Roles where PrincipalID=? |
suspendResume |
optional |
A boolean flag that specifies that any existing JTA transaction be suspended during DB operations. The default is true select Role, RoleGroup from Roles where PrincipalID=? |
9.17. Web services configuration
JBossWS components are provided to the application server through the webservices subsystem. JBossWS components handle the processing of WS endpoints. The subsystem supports the configuration of published endpoint addresses, and endpoint handler chains. A default webservice subsystem is provided in the server’s domain and standalone configuration files.
9.17.1. Structure of the webservices subsystem
Published endpoint address
JBossWS supports the rewriting of the <soap:address> element of
endpoints published in WSDL contracts. This feature is useful for
controlling the server address that is advertised to clients for each
endpoint.
The following elements are available and can be modified (all are optional):
| Name | Type | Description |
|---|---|---|
modify-wsdl-address |
boolean |
This boolean enables and disables the address rewrite functionality.When modify-wsdl-address is set to true and the content of <soap:address> is a valid URL, JBossWS will rewrite the URL using the values of wsdl-host and wsdl-port or wsdl-secure-port.When modify-wsdl-address is set to false and the content of <soap:address> is a valid URL, JBossWS will not rewrite the URL. The <soap:address> URL will be used.When the content of <soap:address> is not a valid URL, JBossWS will rewrite it no matter what the setting of modify-wsdl-address.If modify-wsdl-address is set to true and wsdl-host is not defined or explicitly set to 'jbossws.undefined.host' the content of <soap:address> URL is use. JBossWS uses the requester’s host when rewriting the <soap:address>When modify-wsdl-address is not defined JBossWS uses a default value of true. |
wsdl-host |
string |
The hostname / IP address to be used for rewriting <soap:address>.If wsdl-host is set to jbossws.undefined.host, JBossWS uses the requester’s host when rewriting the <soap:address>When wsdl-host is not defined JBossWS uses a default value of 'jbossws.undefined.host'. |
wsdl-port |
int |
Set this property to explicitly define the HTTP port that will be used for rewriting the SOAP address.Otherwise the HTTP port will be identified by querying the list of installed HTTP connectors. |
wsdl-secure-port |
int |
Set this property to explicitly define the HTTPS port that will be used for rewriting the SOAP address.Otherwise the HTTPS port will be identified by querying the list of installed HTTPS connectors. |
wsdl-uri-scheme |
string |
This property explicitly sets the URI scheme to use for rewriting <soap:address> . Valid values are http and https. This configuration overrides scheme computed by processing the endpoint (even if a transport guaranteeis specified). The provided values for wsdl-port and wsdl-secure-port (or their default values) are used depending on specified scheme. |
wsdl-path-rewrite-rule |
string |
This string defines a SED substitution command (e.g., 's/regexp/replacement/g') that JBossWS executes against the path component of each <soap:address> URL published from the server.When wsdl-path-rewrite-rule is not defined, JBossWS retains the original path component of each <soap:address> URL.When 'modify-wsdl-address' is set to "false" this element is ignored. |
Predefined endpoint configurations
JBossWS enables extra setup configuration data to be predefined and associated with an endpoint implementation. Predefined endpoint configurations can be used for JAX-WS client and JAX-WS endpoint setup. Endpoint configurations can include JAX-WS handlers and key/value properties declarations. This feature provides a convenient way to add handlers to WS endpoints and to set key/value properties that control JBossWS and Apache CXF internals ( see Apache CXF configuration).
The webservices subsystem provides schema to support the definition of named sets of endpoint configuration data. Annotation, org.jboss.ws.api.annotation.EndpointConfig is provided to map the named configuration to the endpoint implementation.
There is no limit to the number of endpoint configurations that can be defined within the webservices subsystem. Each endpoint configuration must have a name that is unique within the webservices subsystem. Endpoint configurations defined in the webservices subsystem are available for reference by name through the annotation to any endpoint in a deployed application.
WildFly ships with two predefined endpoint configurations. Standard-Endpoint-Config is the default configuration. Recording-Endpoint-Config is an example of custom endpoint configuration and includes a recording handler.
[standalone@localhost:9999 /] /subsystem=webservices:read-resource
{
"outcome" => "success",
"result" => {
"endpoint" => {},
"modify-wsdl-address" => true,
"wsdl-host" => expression "${jboss.bind.address:127.0.0.1}",
"endpoint-config" => {
"Standard-Endpoint-Config" => undefined,
"Recording-Endpoint-Config" => undefined
}
}
}
The Standard-Endpoint-Config is a special endpoint configuration. It
is used for any endpoint that does not have an explicitly assigned
endpoint configuration.
|
Endpoint configs
Endpoint configs are defined using the endpoint-config element. Each
endpoint configuration may include properties and handlers set to the
endpoints associated to the configuration.
[standalone@localhost:9999 /] /subsystem=webservices/endpoint-config=Recording-Endpoint-Config:read-resource
{
"outcome" => "success",
"result" => {
"post-handler-chain" => undefined,
"property" => undefined,
"pre-handler-chain" => {"recording-handlers" => undefined}
}
}A new endpoint configuration can be added as follows:
[standalone@localhost:9999 /] /subsystem=webservices/endpoint-config=My-Endpoint-Config:add
{
"outcome" => "success",
"response-headers" => {
"operation-requires-restart" => true,
"process-state" => "restart-required"
}
}Handler chains
Each endpoint configuration may be associated with zero or more PRE and POST handler chains. Each handler chain may include JAXWS handlers. For outbound messages the PRE handler chains are executed before any handler that is attached to the endpoint using the standard means, such as with annotation @HandlerChain, and POST handler chains are executed after those objects have executed. For inbound messages the POST handler chains are executed before any handler that is attached to the endpoint using the standard means and the PRE handler chains are executed after those objects have executed.
* Server inbound messages Client --> ... --> POST HANDLER --> ENDPOINT HANDLERS --> PRE HANDLERS --> Endpoint * Server outbound messages Endpoint --> PRE HANDLER --> ENDPOINT HANDLERS --> POST HANDLERS --> ... --> Client
The protocol-binding attribute must be used to set the protocols for which the chain will be triggered.
[standalone@localhost:9999 /] /subsystem=webservices/endpoint-config=Recording-Endpoint-Config/pre-handler-chain=recording-handlers:read-resource
{
"outcome" => "success",
"result" => {
"protocol-bindings" => "##SOAP11_HTTP ##SOAP11_HTTP_MTOM ##SOAP12_HTTP ##SOAP12_HTTP_MTOM",
"handler" => {"RecordingHandler" => undefined}
},
"response-headers" => {"process-state" => "restart-required"}
}A new handler chain can be added as follows:
[standalone@localhost:9999 /] /subsystem=webservices/endpoint-config=My-Endpoint-Config/post-handler-chain=my-handlers:add(protocol-bindings="##SOAP11_HTTP")
{
"outcome" => "success",
"response-headers" => {
"operation-requires-restart" => true,
"process-state" => "restart-required"
}
}
[standalone@localhost:9999 /] /subsystem=webservices/endpoint-config=My-Endpoint-Config/post-handler-chain=my-handlers:read-resource
{
"outcome" => "success",
"result" => {
"handler" => undefined,
"protocol-bindings" => "##SOAP11_HTTP"
},
"response-headers" => {"process-state" => "restart-required"}
}Handlers
JAXWS handler can be added in handler chains:
[standalone@localhost:9999 /] /subsystem=webservices/endpoint-config=Recording-Endpoint-Config/pre-handler-chain=recording-handlers/handler=RecordingHandler:read-resource
{
"outcome" => "success",
"result" => {"class" => "org.jboss.ws.common.invocation.RecordingServerHandler"},
"response-headers" => {"process-state" => "restart-required"}
}
[standalone@localhost:9999 /] /subsystem=webservices/endpoint-config=My-Endpoint-Config/post-handler-chain=my-handlers/handler=foo-handler:add(class="org.jboss.ws.common.invocation.RecordingServerHandler")
{
"outcome" => "success",
"response-headers" => {
"operation-requires-restart" => true,
"process-state" => "restart-required"
}
}Endpoint-config handler classloading
The class attribute is used to provide the fully qualified class name
of the handler. At deploy time, an instance of the class is created for
each referencing deployment. For class creation to succeed, the
deployment classloader must to be able to load the handler class.
|
9.17.2. Runtime information
Each web service endpoint is exposed through the deployment that provides the endpoint implementation. Each endpoint can be queried as a deployment resource. For further information please consult the chapter "Application Deployment". Each web service endpoint specifies a web context and a WSDL Url:
[standalone@localhost:9999 /] /deployment="*"/subsystem=webservices/endpoint="*":read-resource
{
"outcome" => "success",
"result" => [{
"address" => [
("deployment" => "jaxws-samples-handlerchain.war"),
("subsystem" => "webservices"),
("endpoint" => "jaxws-samples-handlerchain:TestService")
],
"outcome" => "success",
"result" => {
"class" => "org.jboss.test.ws.jaxws.samples.handlerchain.EndpointImpl",
"context" => "jaxws-samples-handlerchain",
"name" => "TestService",
"type" => "JAXWS_JSE",
"wsdl-url" => "http://localhost:8080/jaxws-samples-handlerchain?wsdl"
}
}]
}9.17.3. Component Reference
The web service subsystem is provided by the JBossWS project. For a detailed description of the available configuration properties, please consult the project documentation.
9.18. Resource adapters
Resource adapters are configured through the resource-adapters subsystem. Declaring a new resource adapter consists of two separate steps: You would need to deploy the .rar archive and define a resource adapter entry in the subsystem.
9.18.1. Resource Adapter Definitions
The resource adapter itself is defined within the subsystem resource-adapters:
<subsystem xmlns="urn:jboss:domain:resource-adapters:1.0">
<resource-adapters>
<resource-adapter>
<archive>eis.rar</archive>
<!-- Resource adapter level config-property -->
<config-property name="Server">localhost</config-property>
<config-property name="Port">19000</config-property>
<transaction-support>XATransaction</transaction-support>
<connection-definitions>
<connection-definition class-name="com.acme.eis.ra.EISManagedConnectionFactory"
jndi-name="java:/eis/AcmeConnectionFactory"
pool-name="AcmeConnectionFactory">
<!-- Managed connection factory level config-property -->
<config-property name="Name">Acme Inc</config-property>
<pool>
<min-pool-size>10</min-pool-size>
<max-pool-size>100</max-pool-size>
</pool>
<security>
<application/>
</security>
</connection-definition>
</connection-definitions>
<admin-objects>
<admin-object class-name="com.acme.eis.ra.EISAdminObjectImpl"
jndi-name="java:/eis/AcmeAdminObject">
<config-property name="Threshold">10</config-property>
</admin-object>
</admin-objects>
</resource-adapter>
</resource-adapters>
</subsystem>Note, that only JNDI bindings under java:/ or java:jboss/ are supported.
(See standalone/configuration/standalone.xml )
9.18.2. Using security domains
Information about using security domains can be found at https://community.jboss.org/wiki/JBossAS7SecurityDomainModel
9.18.3. Automatic activation of resource adapter archives
A resource adapter archive can be automatically activated with a configuration by including an META-INF/ironjacamar.xml in the archive.
The schema can be found at http://docs.jboss.org/ironjacamar/schema/ironjacamar_1_0.xsd
9.18.4. Component Reference
The resource adapter subsystem is provided by the IronJacamar project. For a detailed description of the available configuration properties, please consult the project documentation.
-
IronJacamar homepage: http://www.jboss.org/ironjacamar
-
Project Documentation: http://www.jboss.org/ironjacamar/docs
-
Schema description: http://docs.jboss.org/ironjacamar/userguide/1.0/en-US/html/deployment.html#deployingra_descriptor
[[Batch_(JSR-352)]] = Batch (JSR-352) Subsystem Configuration
The batch subsystem is used to configure an environment for running
batch applications. WildFly uses
JBeret for it’s batch implementation.
Specific information about JBeret can be found in the
user guide. The
resource path, in CLI notation, for the subsystem
is subsystem=batch-jberet.
9.18.5. Default Subsystem Configuration
For up to date information about subsystem configuration options see the WildFly model reference.
9.18.6. Security
A new security-domain attribute was added to the batch-jberet
subsystem to allow batch jobs to be executed under that security domain.
Jobs that are stopped as part of a suspend operation will be restarted
on execution of a resume with the original user that started job.
There was a
org.wildfly.extension.batch.jberet.deployment.BatchPermission added to
allow a security restraint to various batch functions. The following
functions can be controlled with this permission.
-
start
-
stop
-
restart
-
abandon
-
read
The read function allows users to use the getter methods from the
javax.batch.operations.JobOperator or read the batch-jberet
deployment resource, for example
/deployment=my.war/subsystem=batch-jberet:read-resource.
9.18.7. Deployment Descriptors
There are no deployment descriptors for configuring a batch environment
defined by the JSR-352
specification. In WildFly you can use a
jboss-all.xml deployment descriptor to define aspects of the batch
environment for your deployment.
In the jboss-all.xml deployment descriptor you can define a named job
repository, a new job repository and/or a named thread pool. A named job
repository and named thread pool are resources defined on the batch
subsystem. Only a named thread pool is allowed to be defined in the
deployment descriptor.
<jboss xmlns="urn:jboss:1.0">
<batch xmlns="urn:jboss:batch-jberet:1.0">
<job-repository>
<named name="batch-ds"/>
</job-repository>
<thread-pool name="deployment-thread-pool"/>
</batch>
</jboss><jboss xmlns="urn:jboss:1.0">
<batch xmlns="urn:jboss:batch-jberet:1.0">
<job-repository>
<jdbc jndi-name="java:jboss/datasources/ExampleDS"/>
</job-repository>
</batch>
</jboss>9.18.8. Deployment Resources
Some subsystems in WildFly register runtime resources for deployments. The batch subsystem registers jobs and executions. The jobs are registered using the job name, this is not the job XML name. Executions are registered using the execution id.
[standalone@localhost:9990 /] /deployment=batch-jdbc-chunk.war/subsystem=batch-jberet:read-resource(recursive=true,include-runtime=true)
{
"outcome" => "success",
"result" => {"job" => {
"reader-3" => {
"instance-count" => 1,
"running-executions" => 0,
"execution" => {"1" => {
"batch-status" => "COMPLETED",
"create-time" => "2015-08-07T15:37:06.416-0700",
"end-time" => "2015-08-07T15:37:06.519-0700",
"exit-status" => "COMPLETED",
"instance-id" => 1L,
"last-updated-time" => "2015-08-07T15:37:06.519-0700",
"start-time" => "2015-08-07T15:37:06.425-0700"
}}
},
"reader-5" => {
"instance-count" => 0,
"running-executions" => 0,
"execution" => undefined
}
}}
}The batch subsystem resource on a deployment also has 3 operations to
interact with batch jobs on the selected deployment. There is a
start-job, stop-job and restart-job operation. The execution
resource also has a stop-job and restart-job operation.
[standalone@localhost:9990 /] /deployment=batch-chunk.war/subsystem=batch-jberet:start-job(job-xml-name=simple, properties={writer.sleep=5000})
{
"outcome" => "success",
"result" => 1L
}[standalone@localhost:9990 /] /deployment=batch-chunk.war/subsystem=batch-jberet:stop-job(execution-id=2)[standalone@localhost:9990 /] /deployment=batch-chunk.war/subsystem=batch-jberet:restart-job(execution-id=2)
{
"outcome" => "success",
"result" => 3L
}[standalone@localhost:9990 /] /deployment=batch-chunk.war/subsystem=batch-jberet:read-resource(recursive=true, include-runtime=true)
{
"outcome" => "success",
"result" => {"job" => {"chunkPartition" => {
"instance-count" => 2,
"running-executions" => 0,
"execution" => {
"1" => {
"batch-status" => "COMPLETED",
"create-time" => "2015-08-07T15:41:55.504-0700",
"end-time" => "2015-08-07T15:42:15.513-0700",
"exit-status" => "COMPLETED",
"instance-id" => 1L,
"last-updated-time" => "2015-08-07T15:42:15.513-0700",
"start-time" => "2015-08-07T15:41:55.504-0700"
},
"2" => {
"batch-status" => "STOPPED",
"create-time" => "2015-08-07T15:44:39.879-0700",
"end-time" => "2015-08-07T15:44:54.882-0700",
"exit-status" => "STOPPED",
"instance-id" => 2L,
"last-updated-time" => "2015-08-07T15:44:54.882-0700",
"start-time" => "2015-08-07T15:44:39.879-0700"
},
"3" => {
"batch-status" => "COMPLETED",
"create-time" => "2015-08-07T15:45:48.162-0700",
"end-time" => "2015-08-07T15:45:53.165-0700",
"exit-status" => "COMPLETED",
"instance-id" => 2L,
"last-updated-time" => "2015-08-07T15:45:53.165-0700",
"start-time" => "2015-08-07T15:45:48.163-0700"
}
}
}}}
}Pro Tip
You can filter jobs by an attribute on the execution resource with the
query operation.
|
/deployment=batch-chunk.war/subsystem=batch-jberet/job=*/execution=*:query(where=["batch-status", "STOPPED"])As with all operations you can see details about the operation using the
:read-operation-description operation.
Tab completion
| Don’t forget that CLI has tab completion which will complete operations and attributes (arguments) on operations. |
[standalone@localhost:9990 /] /deployment=batch-chunk.war/subsystem=batch-jberet:read-operation-description(name=start-job)
{
"outcome" => "success",
"result" => {
"operation-name" => "start-job",
"description" => "Starts a batch job.",
"request-properties" => {
"job-xml-name" => {
"type" => STRING,
"description" => "The name of the job XML file to use when starting the job.",
"expressions-allowed" => false,
"required" => true,
"nillable" => false,
"min-length" => 1L,
"max-length" => 2147483647L
},
"properties" => {
"type" => OBJECT,
"description" => "Optional properties to use when starting the batch job.",
"expressions-allowed" => false,
"required" => false,
"nillable" => true,
"value-type" => STRING
}
},
"reply-properties" => {"type" => LONG},
"read-only" => false,
"runtime-only" => true
}
}9.19. JSF Configuration
JSF configuration is handled by the JSF subsystem. The JSF subsystem allows multiple JSF implementations to be installed on the same WildFly server. In particular, any version of Mojarra or MyFaces that implements spec level 2.1 or higher can be installed. For each JSF implementation, a new slot needs to be created undercom.sun.jsf-impl,javax.faces.api, andorg.jboss.as.jsf-injection. When the JSF subsystem starts up, it scans the module path to find all of the JSF implementations that have been installed. The default JSF implementation that WildFly should use is defined by thedefault-jsf-impl-slotattribute.
9.19.1. Installing a new JSF implementation manually
A new JSF implementation can be manually installed as follows:
Add a module slot for the new JSF implementation JAR
-
Create the following directory structure under the WILDFLY_HOME/modules directory:
WILDFLY_HOME/modules/com/sun/jsf-impl/<JSF_IMPL_NAME>-<JSF_VERSION>
For example, for Mojarra 2.2.11, the above path would resolve to:
WILDFLY_HOME/modules/com/sun/jsf-impl/mojarra-2.2.11 -
Place the JSF implementation JAR in the <JSF_IMPL_NAME>-<JSF_VERSION> subdirectory. In the same subdirectory, add a
module.xmlfile similar to the Mojarra or MyFaces template examples. Change theresource-root-pathto the name of your JSF implementation JAR and fill in appropriate values for $\{jsf-impl-name} and $\{jsf-version}.
Add a module slot for the new JSF API JAR
-
Create the following directory structure under the WILDFLY_HOME/modules directory:
WILDFLY_HOME/modules/javax/faces/api/<JSF_IMPL_NAME>-<JSF_VERSION> -
Place the JSF API JAR in the <JSF_IMPL_NAME>-<JSF_VERSION> subdirectory. In the same subdirectory, add a
module.xmlfile similar to the Mojarra or MyFaces template examples. Change theresource-root-pathto the name of your JSF API JAR and fill in appropriate values for $\{jsf-impl-name} and $\{jsf-version}.
Add a module slot for the JSF injection JAR
-
Create the following directory structure under the WILDFLY_HOME/modules directory:
WILDFLY_HOME/modules/org/jboss/as/jsf-injection/<JSF_IMPL_NAME>-<JSF_VERSION> -
Copy the wildfly-jsf-injection JAR and the weld-core-jsf JAR from WILDFLY_HOME/modules/system/layers/base/org/jboss/as/jsf-injection/main to the <JSF_IMPL_NAME>-<JSF_VERSION> subdirectory.
-
In the <JSF_IMPL_NAME>-<JSF_VERSION> subdirectory, add a
module.xmlfile similar to the Mojarra or MyFaces template examples and fill in appropriate values for $\{jsf-impl-name}, $\{jsf-version}, $\{version.jboss.as}, and $\{version.weld.core}. (These last two placeholders depend on the versions of the wildfly-jsf-injection and weld-core-jsf JARs that were copied over in the previous step.)
For MyFaces only - add a module for the commons-digester JAR
-
Create the following directory structure under the WILDFLY_HOME/modules directory:
WILDFLY_HOME/modules/org/apache/commons/digester/main -
Place the commons-digester JAR in WILDFLY_HOME/modules/org/apache/commons/digester/main. In the
mainsubdirectory, add amodule.xmlfile similar to this template. Fill in the appropriate value for $\{version.commons-digester}.
Start the server
After starting the server, the following CLI command can be used to verify that your new JSF implementation has been installed successfully. The new JSF implementation should appear in the output of this command.
[standalone@localhost:9990 /] /subsystem=jsf:list-active-jsf-impls()9.19.2. Changing the default JSF implementation
The following CLI command can be used to make a newly installed JSF implementation the default JSF implementation used by WildFly:
/subsystem=jsf/:write-attribute(name=default-jsf-impl-slot,value=<JSF_IMPL_NAME>-<JSF_VERSION>)A server restart will be required for this change to take effect.
9.19.3. Configuring a JSF app to use a non-default JSF implementation
A JSF app can be configured to use an installed JSF implementation
that’s not the default implementation by adding a
org.jboss.jbossfaces.JSF_CONFIG_NAME context parameter to its
web.xml file. For example, to indicate that a JSF app should use
MyFaces 2.2.12 (assuming MyFaces 2.2.12 has been installed on the
server), the following context parameter would need to be added:
<context-param>
<param-name>org.jboss.jbossfaces.JSF_CONFIG_NAME</param-name>
<param-value>myfaces-2.2.12</param-value>
</context-param>If a JSF app does not specify this context parameter, the default JSF implementation will be used for that app.
9.19.4. Disallowing DOCTYPE declarations
The following CLI commands can be used to disallow DOCTYPE declarations in JSF deployments:
/subsystem=jsf:write-attribute(name=disallow-doctype-decl, value=true)
reloadThis setting can be overridden for a particular JSF deployment by
adding the com.sun.faces.disallowDoctypeDecl context parameter
to the deployment’s web.xml file:
<context-param>
<param-name>com.sun.faces.disallowDoctypeDecl</param-name>
<param-value>false</param-value>
</context-param>9.20. JMX subsystem configuration
The JMX subsystem registers a service with the Remoting endpoint so that remote access to JMX can be obtained over the exposed Remoting connector.
This is switched on by default in standalone mode and accessible over port 9990 but in domain mode is switched off so needs to be enabled - in domain mode the port will be the port of the Remoting connector for the WildFly instance to be monitored.
To use the connector you can access it in the standard way using a
service:jmx URL:
import javax.management.MBeanServerConnection;
import javax.management.remote.JMXConnector;
import javax.management.remote.JMXConnectorFactory;
import javax.management.remote.JMXServiceURL;
public class JMXExample {
public static void main(String[] args) throws Exception {
//Get a connection to the WildFly MBean server on localhost
String host = "localhost";
int port = 9990; // management-web port
String urlString =
System.getProperty("jmx.service.url","service:jmx:remote+http://" + host + ":" + port);
JMXServiceURL serviceURL = new JMXServiceURL(urlString);
JMXConnector jmxConnector = JMXConnectorFactory.connect(serviceURL, null);
MBeanServerConnection connection = jmxConnector.getMBeanServerConnection();
//Invoke on the WildFly MBean server
int count = connection.getMBeanCount();
System.out.println(count);
jmxConnector.close();
}
}You also need to set your classpath when running the above example. The following script covers Linux. If your environment is much different, paste your script when you have it working.
!/bin/bash
# specify your WildFly folder +
export YOUR_JBOSS_HOME=~/WildFly
java -classpath $YOUR_JBOSS_HOME/bin/client/jboss-client.jar:./
JMXExampleYou can also connect using jconsole.
If using jconsole use the jconsole.sh and jconsole.bat scripts
included in the /bin directory of the WildFly distribution as these set
the classpath as required to connect over Remoting.
|
In addition to the standard JVM MBeans, the WildFly MBean server contains the following MBeans:
| JMX ObjectName | Description |
|---|---|
jboss.msc:type=container,name=jboss-as |
Exposes management operations on the JBoss Modular Service Container, which is the dependency injection framework at the heart of WildFly. It is useful for debugging dependency problems, for example if you are integrating your own subsystems, as it exposes operations to dump all services and their current states |
jboss.naming:type=JNDIView |
Shows what is bound in JNDI |
jboss.modules:type=ModuleLoader,name=* |
This collection of MBeans exposes management operations on JBoss Modules classloading layer. It is useful for debugging dependency problems arising from missing module dependencies |
9.20.1. Audit logging
Audit logging for the JMX MBean server managed by the JMX subsystem. The
resource is at /subsystem=jmx/configuration=audit-log and its
attributes are similar to the ones mentioned for
/core-service=management/access=audit/logger=audit-log in
Audit logging.
| Attribute | Description |
|---|---|
enabled |
true to enable logging of the JMX operations |
log-boot |
true to log the JMX operations when booting the server, false otherwise |
log-read-only |
If true all operations will be audit logged, if false only operations that change the model will be logged |
Then which handlers are used to log the management operations are
configured as handler=* children of the logger. These handlers and
their formatters are defined in the global
/core-service=management/access=audit section mentioned in
Audit logging.
JSON Formatter
The same JSON Formatter is used as described in Audit logging. However the records for MBean Server invocations have slightly different fields from those logged for the core management layer.
2013-08-29 18:26:29 - {
"type" : "jmx",
"r/o" : false,
"booting" : false,
"version" : "10.0.0.Final",
"user" : "$local",
"domainUUID" : null,
"access" : "JMX",
"remote-address" : "127.0.0.1/127.0.0.1",
"method" : "invoke",
"sig" : [
"javax.management.ObjectName",
"java.lang.String",
"[Ljava.lang.Object;",
"[Ljava.lang.String;"
],
"params" : [
"java.lang:type=Threading",
"getThreadInfo",
"[Ljava.lang.Object;@5e6c33c",
"[Ljava.lang.String;@4b681c69"
]
}It includes an optional timestamp and then the following information in the json record
| Field name | Description |
|---|---|
type |
This will have the value jmx meaning it comes from the jmx subsystem |
r/o |
true if the operation has read only impact on the MBean(s) |
booting |
true if the operation was executed during the bootup process, false if it was executed once the server is up and running |
version |
The version number of the WildFly instance |
user |
The username of the authenticated user. |
domainUUID |
This is not currently populated for JMX operations |
access |
This can have one of the following values:*NATIVE - The operation came in through the native management interface, for example the CLI*HTTP - The operation came in through the domain HTTP interface, for example the admin console*JMX - The operation came in through the JMX subsystem. See JMX for how to configure audit logging for JMX. |
remote-address |
The address of the client executing this operation |
method |
The name of the called MBeanServer method |
sig |
The signature of the called called MBeanServer method |
params |
The actual parameters passed in to the MBeanServer method, a simple Object.toString() is called on each parameter. |
error |
If calling the MBeanServer method resulted in an error, this field will be populated with Throwable.getMessage() |
9.21. Deployment Scanner configuration
The deployment scanner is only used in standalone mode. Its job is to
monitor a directory for new files and to deploy those files. It can be
found in standalone.xml:
<subsystem xmlns="urn:jboss:domain:deployment-scanner:2.0">
<deployment-scanner scan-interval="5000"
relative-to="jboss.server.base.dir" path="deployments" />
</subsystem>You can define more deployment-scanner entries to scan for deployments
from more locations. The configuration showed will scan the
JBOSS_HOME/standalone/deployments directory every five seconds. The
runtime model is shown below, and uses default values for attributes not
specified in the xml:
[standalone@localhost:9999 /] /subsystem=deployment-scanner:read-resource(recursive=true)
{
"outcome" => "success",
"result" => {"scanner" => {"default" => {
"auto-deploy-exploded" => false,
"auto-deploy-zipped" => true,
"deployment-timeout" => 60L,
"name" => "default",
"path" => "deployments",
"relative-to" => "jboss.server.base.dir",
"scan-enabled" => true,
"scan-interval" => 5000
}}}
}The attributes are
| Name | Type | Description |
|---|---|---|
name |
STRING |
The name of the scanner. default is used if not specified |
path |
STRING |
The actual filesystem path to be scanned. Treated as an absolute path, unless the 'relative-to' attribute is specified, in which case the value is treated as relative to that path. |
relative-to |
STRING |
Reference to a filesystem path defined in the "paths" section of the server configuration, or one of the system properties specified on startup. In the example above jboss.server.base.dir resolves to JBOSS_HOME/standalone |
scan-enabled |
BOOLEAN |
If true scanning is enabled |
scan-interval |
INT |
Periodic interval, in milliseconds, at which the repository should be scanned for changes. A value of less than 1 indicates the repository should only be scanned at initial startup. |
auto-deploy-zipped |
BOOLEAN |
Controls whether zipped deployment content should be automatically deployed by the scanner without requiring the user to add a .dodeploy marker file. |
auto-deploy-exploded |
BOOLEAN |
Controls whether exploded deployment content should be automatically deployed by the scanner without requiring the user to add a .dodeploy marker file. Setting this to 'true' is not recommended for anything but basic development scenarios, as there is no way to ensure that deployment will not occur in the middle of changes to the content. |
auto-deploy-xml |
BOOLEAN |
Controls whether XML content should be automatically deployed by the scanner without requiring a .dodeploy marker file. |
deployment-timeout |
LONG |
Timeout, in seconds, a deployment is allows to execute before being canceled. The default is 60 seconds. |
Deployment scanners can be added by modifying standalone.xml before
starting up the server or they can be added and removed at runtime using
the CLI
[standalone@localhost:9990 /] /subsystem=deployment-scanner/scanner=new:add(scan-interval=10000,relative-to="jboss.server.base.dir",path="other-deployments")
{"outcome" => "success"}
[standalone@localhost:9990 /] /subsystem=deployment-scanner/scanner=new:remove
{"outcome" => "success"}You can also change the attributes at runtime, so for example to turn off scanning you can do
[standalone@localhost:9990 /] /subsystem=deployment-scanner/scanner=default:write-attribute(name="scan-enabled",value=false)
{"outcome" => "success"}
[standalone@localhost:9990 /] /subsystem=deployment-scanner:read-resource(recursive=true)
{
"outcome" => "success",
"result" => {"scanner" => {"default" => {
"auto-deploy-exploded" => false,
"auto-deploy-zipped" => true,
"deployment-timeout" => 60L,
"name" => "default",
"path" => "deployments",
"relative-to" => "jboss.server.base.dir",
"scan-enabled" => false,
"scan-interval" => 5000
}}}
}9.22. Core Management Subsystem Configuration
The core management subsystem is composed services used to manage the
server or monitor its status.
The core management subsystem configuration may be used to:
-
register a listener for a server lifecycle events.
-
list the last configuration changes on a server.
9.22.1. Lifecycle listener
You can create an implementation of org.wildfly.extension.core.management.client.ProcessStateListener which will be notified on running and runtime configuration state changes thus enabling the developer to react to those changes.
In order to use this feature you need to create your own module then configure and deploy it using the core management subsystem.
For example let’s create a simple listener :
public class SimpleListener implements ProcessStateListener {
private File file;
private FileWriter fileWriter;
private ProcessStateListenerInitParameters parameters;
@Override
public void init(ProcessStateListenerInitParameters parameters) {
this.parameters = parameters;
this.file = new File(parameters.getInitProperties().get("file"));
try {
fileWriter = new FileWriter(file, true);
} catch (IOException e) {
e.printStackTrace();
}
}
@Override
public void cleanup() {
try {
fileWriter.close();
} catch (IOException e) {
e.printStackTrace();
} finally {
fileWriter = null;
}
}
@Override
public void runtimeConfigurationStateChanged(RuntimeConfigurationStateChangeEvent evt) {
try {
fileWriter.write(String.format("%s %s %s %s\n", parameters.getProcessType(), parameters.getRunningMode(), evt.getOldState(), evt.getNewState()));
} catch (IOException e) {
e.printStackTrace();
}
}
@Override
public void runningStateChanged(RunningStateChangeEvent evt) {
try {
fileWriter.write(String.format("%s %s %s %s\n", parameters.getProcessType(), parameters.getRunningMode(), evt.getOldState(), evt.getNewState()));
} catch (IOException e) {
e.printStackTrace();
}
}
}To compile it you need to depend on the org.wildfly.core:wildfly-core-management-client maven module. Now let’s add the module to the wildfly modules :
module add --name=org.simple.lifecycle.events.listener --dependencies=org.wildfly.extension.core-management-client --resources=/home/ehsavoie/dev/demo/simple-listener/target/simple-process-state-listener.jar
Now we can register or listener :
/subsystem=core-management/process-state-listener=simple-listener:add(class=org.simple.lifecycle.events.listener.SimpleListener, module=org.simple.lifecycle.events.listener, properties={file=/home/wildfly/tmp/events.txt})
9.22.2. Configuration changes
You can use the core management subsystem to enable and configure an
in-memory history of the last configuration changes.
For example to track the last 5 configuration changes let’s active this
:
/subsystem=core-management/service=configuration-changes:add(max-history=5)
Now we can list the last configuration changes :
/subsystem=core-management/service=configuration-changes:list-changes()
{
"outcome" => "success",
"result" => [{
"operation-date" => "2016-12-05T11:05:12.867Z",
"access-mechanism" => "NATIVE",
"remote-address" => "/127.0.0.1",
"outcome" => "success",
"operations" => [{
"address" => [
("subsystem" => "core-management"),
("service" => "configuration-changes")
],
"operation" => "add",
"max-history" => 5,
"operation-headers" => {
"caller-type" => "user",
"access-mechanism" => "NATIVE"
}
}]
}]
}9.23. Simple configuration subsystems
The following subsystems currently have no configuration beyond its root element in the configuration
<subsystem xmlns="urn:jboss:domain:jdr:1.0"/>
<subsystem xmlns="urn:jboss:domain:pojo:1.0"/>
<subsystem xmlns="urn:jboss:domain:sar:1.0"/>The presence of each of these turns on a piece of functionality:
| Name | Description |
|---|---|
jdr |
Enables the gathering of diagnostic data for use in remote analysis of error conditions. Although the data is in a simple format and could be useful to anyone, primarily useful for JBoss EAP subscribers who would provide the data to Red Hat when requesting support |
pojo |
Enables the deployment of applications containing JBoss Microcontainer services, as supported by previous versions of JBoss Application Server |
sar |
Enables the deployment of .SAR archives containing MBean services, as supported by previous versions of JBoss Application Server |
10. Domain Setup
To run a group of servers as a managed domain you need to configure both the domain controller and each host that joins the domain. This sections focuses on the network configuration for the domain and host controller components. For background information users are encouraged to review the Operating modes and Configuration Files sections.
10.1. Domain Controller Configuration
The domain controller is the central government for a managed domain. A domain controller configuration requires two steps:
-
A host needs to be configured to act as the Domain Controller for the whole domain
-
The host must expose an addressable management interface binding for the managed hosts to communicate with it
Example IP Addresses
| In this example the domain controller uses 192.168.0.101 and the host controller 192.168.0.10 |
Configuring a host to act as the Domain Controller is done through the
domain-controller declaration in host.xml. If it includes the
<local/> element, then this host will become the domain controller:
<domain-controller>
<local/>
</domain-controller>~(See domain/configuration/host.xml)~
A host acting as the Domain Controller must expose a management interface on an address accessible to the other hosts in the domain. Exposing an HTTP(S) management interface is not required, but is recommended as it allows the Administration Console to work:
<management-interfaces>
<native-interface security-realm="ManagementRealm">
<socket interface="management" port="${jboss.management.native.port:9999}"/>
</native-interface>
<http-interface security-realm="ManagementRealm">
<socket interface="management" port="${jboss.management.http.port:9990}"/>
</http-interface>
</management-interfaces>The interface attributes above refer to a named interface declaration later in the host.xml file. This interface declaration will be used to resolve a corresponding network interface.
<interfaces>
<interface name="management">
<inet-address value="192.168.0.101"/>
</interface>
</interfaces>~(See domain/configuration/host.xml)~
Please consult the chapter "Interface Configuration" for a more detailed explanation on how to configure network interfaces.
Next by default the master domain controller is configured to require authentication so a user needs to be added that can be used by the slave domain controller to connect.
Make use of the add-user utility to add a new user, for this example I
am adding a new user called slave.
add-user MUST be run on the master domain controller and NOT the
slave.
|
When you reach the final question of the interactive flow answer y or
yes to indicate that the new user will be used for a process e.g.
Is this new user going to be used for one AS process to connect to another AS process e.g. slave domain controller? yes/no? y To represent the user add the following to the server-identities definition <secret value="cE3EBEkE=" />
Make a note of the XML Element output as that is going to be required within the slave configuration.
10.2. Host Controller Configuration
Once the domain controller is configured correctly you can proceed with any host that should join the domain. The host controller configuration requires three steps:
-
The logical host name (within the domain) needs to be distinct
-
The host controller needs to know the domain controller IP address
Provide a distinct, logical name for the host. In the following example we simply name it "slave":
<host xmlns="urn:jboss:domain:3.0"
name="slave">
[...]
</host>~(See domain/configuration/host.xml)~
If the name attribute is not set, the default name for the host will
be the value of the jboss.host.name system property. If that is not
set, the value of the HOSTNAME or COMPUTERNAME environment variable
will be used, one of which will be set on most operating systems. If
neither is set the name will be the value of
InetAddress.getLocalHost().getHostName().
A security realm needs to be defined to hold the identity of the slave. Since it is performing a specific purpose I would suggest a new realm is defined although it is possible to combine this with an existing realm.
<security-realm name="SlaveRealm">
<server-identities>
<secret value="cE3EBEkE=" />
</server-identities>
</security-realm>The <secret /> element here is the one output from add-user
previously. To create the <secret /> element yourself the value
needs to be the password encoded using Base64.
Tell it how to find the domain controller so it can register itself with the domain:
<domain-controller>
<remote protocol="remote" host="192.168.0.101" port="9999" username="slave" security-realm="SlaveRealm"/>
</domain-controller>Since we have also exposed the HTTP management interface we could also use :
<domain-controller>
<remote protocol="http-remoting" host="192.168.0.101" port="9990" username="slave" security-realm="SlaveRealm"/>
</domain-controller>~(See domain/configuration/host.xml)~
The username attribute here is optional, if it is omitted then the name of the host will be used instead, in this example that was already set to name.
| The name of each host needs to be unique when registering with the domain controller, however the username does not - using the username attribute allows the same account to be used by multiple hosts if this makes sense in your environment. |
The <remote /> element is also associated with the security realm
SlaveRealm, this is how it picks up the password from the <secret />
element.
10.2.1. Ignoring domain wide resources
WildFly 10 and later make it easy for slave host controllers to "ignore" parts of the domain wide configuration. What does the mean and why is it useful?
One of the responsibilities of the Domain Controller is ensuring that
all running Host Controllers have a consistent local copy of the domain
wide configuration (i.e. those resources whose address does not begin
with /host=*, i.e. those that are persisted in domain.xml. Having
that local copy allows a user to do the following things:
-
Ask the slave to launch its already configured servers, even if the Domain Controller is not running.
-
Configured new servers, using different server groups from those current running, and ask the slave to launch them, even if the Domain Controller is not running.
-
Reconfigure the slave to act as the Domain Controller, allowing it to take over as the master if the previous master has failed or been shut down.
However, of these three things only the latter two require that the slave maintain a complete copy of the domain wide configuration. The first only requires the slave to have the portion of the domain wide configuration that is relevant to its current servers. And the first use case is the most common one. A slave that is only meant to support the first use case can safely "ignore" portions of the domain wide configuration. And there are benefits to ignoring some resources:
-
If a server group is ignored, and the deployments mapped to that server group aren’t mapped to other non-ignored groups, then the slave does not need to pull down a copy of the deployment content from the master. That can save disk space on the slave, improve the speed of starting new hosts and reduce network traffic.
-
WildFly supports "mixed domains" where a later version Domain Controller can manage slaves running previous versions. But those "legacy" slaves cannot understand configuration resources, attributes and operations introduced in newer versions. So any attempt to use newer things in the domain wide configuration will fail unless the legacy slaves are ignoring the relevant resources. But ignoring resources will allow the legacy slaves to work fine managing servers using profiles without new concepts, while other hosts can run servers with profiles that take advantage of the latest features.
Prior to WildFly 10, a slave could be configured to ignore some resources, but the mechanism was not particularly user friendly:
-
The resources to be ignored had to be listed in a fair amount of detail in each host’s configuration.
-
If a new resource is added and needs to be ignored, then each host that needs to ignore that must be updated to record that.
Starting with WildFly 10, this kind of detailed configuration is no
longer required. Instead, with the standard versions of host.xml, the
slave will behave as follows:
-
If the slave was started with the
--backupcommand line parameter, the behavior will be the same as releases prior to 10; i.e. only resources specifically configured to be ignored will be ignored. -
Otherwise, the slave will "ignore unused resources".
What does "ignoring unused resources" mean?
-
Any server-group that is not referenced by one of the host’s server-config resources is ignored.
-
Any profile that is not referenced by a non-ignored server-group, either directly or indirectly via the profile resource’s 'include' attribute, is ignored
-
Any socket-binding-group that is not directly referenced by one of the host’s server-config resources, or referenced by a non-ignored server-group, is ignored
-
Extension resources will not be automatically ignored, even if no non-ignored profile uses the extension. Ignoring an extension requires explicit configuration. Perhaps in a future release extensions will be explicitly ignored.
-
If a change is made to the slave host’s configuration or to the domain wide configuration that reduces the set of ignored resources, then as part of handling that change the slave will contact the master to pull down the missing pieces of configuration and will integrate those pieces in its local copy of the management model. Examples of such changes include adding a new server-config that references a previously ignored server-group or socket-binding-group, changing the server-group or socket-binding-group assigned to a server-config, changing the profile or socket-binding-group assigned to a non-ignored server-group, or adding a profile or socket-binding-group to the set of those included directly or indirectly by a non-ignored profile or socket-binding-group.
The default behavior can be changed, either to always ignore unused
resources, even if --backup is used, or to not ignore unused
resources, by updating the domain-controller element in the host-xml
file and setting the ignore-unused-configuration attribute:
<domain-controller>
<remote security-realm="ManagementRealm" ignore-unused-configuration="false">
<discovery-options>
<static-discovery name="primary" protocol="${jboss.domain.master.protocol:remote}" host="${jboss.domain.master.address}" port="${jboss.domain.master.port:9999}"/>
</discovery-options>
</remote>
</domain-controller>The "ignore unused resources" behavior can be used in combination with the pre-WildFly 10 detailed specification of what to ignore. If that is done both the unused resources and the explicitly declared resources will be ignored. Here’s an example of such a configuration, one where the slave cannot use the "org.example.foo" extension that has been installed on the Domain Controller and on some slaves, but not this one:
<domain-controller>
<remote security-realm="ManagementRealm" ignore-unused-configuration="true">
<ignored-resources type="extension">
<instance name="org.example.foo"/>
</ignored-resources>
<discovery-options>
<static-discovery name="primary" protocol="${jboss.domain.master.protocol:remote}" host="${jboss.domain.master.address}" port="${jboss.domain.master.port:9999}"/>
</discovery-options>
</remote>
</domain-controller>10.3. Server groups
The domain controller defines one or more server groups and associates each of these with a profile and a socket binding group, and also :
<server-groups>
<server-group name="main-server-group" profile="default">
<jvm name="default">
<heap size="64m" max-size="512m"/>
<permgen size="128m" max-size="128m"/>
</jvm>
<socket-binding-group ref="standard-sockets"/>
</server-group>
<server-group name="other-server-group" profile="bigger">
<jvm name="default">
<heap size="64m" max-size="512m"/>
</jvm>
<socket-binding-group ref="bigger-sockets"/>
</server-group>
</server-groups>~(See domain/configuration/domain.xml)~
The domain controller also defines the socket binding groups and the profiles. The socket binding groups define the default socket bindings that are used:
<socket-binding-groups>
<socket-binding-group name="standard-sockets" default-interface="public">
<socket-binding name="http" port="8080"/>
[...]
</socket-binding-group>
<socket-binding-group name="bigger-sockets" include="standard-sockets" default-interface="public">
<socket-binding name="unique-to-bigger" port="8123"/>
</socket-binding-group>
</socket-binding-groups>~(See domain/configuration/domain.xml)~
In this example the bigger-sockets group includes all the socket
bindings defined in the standard-sockets groups and then defines an
extra socket binding of its own.
A profile is a collection of subsystems, and these subsystems are what implement the functionality people expect of an application server.
<profiles>
<profile name="default">
<subsystem xmlns="urn:jboss:domain:web:1.0">
<connector name="http" scheme="http" protocol="HTTP/1.1" socket-binding="http"/>
[...]
</subsystem>
<\!-\- The rest of the subsystems here \-->
[...]
</profile>
<profile name="bigger">
<subsystem xmlns="urn:jboss:domain:web:1.0">
<connector name="http" scheme="http" protocol="HTTP/1.1" socket-binding="http"/>
[...]
</subsystem>
<\!-\- The same subsystems as defined by 'default' here \-->
[...]
<subsystem xmlns="urn:jboss:domain:fictional-example:1.0">
<socket-to-use name="unique-to-bigger"/>
</subsystem>
</profile>
</profiles>~(See domain/configuration/domain.xml)~
Here we have two profiles. The bigger profile contains all the same
subsystems as the default profile (athough the parameters for the
various subsystems could be different in each profile), and adds the
fictional-example subsystem which references the unique-to-bigger
socket binding.
10.4. Servers
The host controller defines one or more servers:
<servers>
<server name="server-one" group="main-server-group">
<\!-\- server-one inherits the default socket-group declared in the server-group \-->
<jvm name="default"/>
</server>
<server name="server-two" group="main-server-group" auto-start="true">
<socket-binding-group ref="standard-sockets" port-offset="150"/>
<jvm name="default">
<heap size="64m" max-size="256m"/>
</jvm>
</server>
<server name="server-three" group="other-server-group" auto-start="false">
<socket-binding-group ref="bigger-sockets" port-offset="250"/>
</server>
</servers>~(See domain/configuration/host.xml)~
server-one and server-two both are associated with
main-server-group so that means they both run the subsystems defined
by the default profile, and have the socket bindings defined by the
standard-sockets socket binding group. Since all the servers defined
by a host will be run on the same physical host we would get port
conflicts unless we used
<socket-binding-group ref="standard-sockets" port-offset="150"/> for
server-two. This means that server-two will use the socket bindings
defined by standard-sockets but it will add 150 to each port number
defined, so the value used for http will be 8230 for server-two.
server-three will not be started due to its auto-start="false". The
default value if no auto-start is given is true so both server-one
and server-two will be started when the host controller is started.
server-three belongs to other-server-group, so if its auto-start
were changed to true it would start up using the subsystems from the
bigger profile, and it would use the bigger-sockets socket binding
group.
10.4.1. JVM
The host controller contains the main jvm definitions with arguments:
<jvms>
<jvm name="default">
<heap size="64m" max-size="128m"/>
</jvm>
</jvms>~(See domain/configuration/host.xml)~
From the preceeding examples we can see that we also had a jvm
reference at server group level in the domain controller. The jvm’s name
must match one of the definitions in the host controller. The values
supplied at domain controller and host controller level are combined,
with the host controller taking precedence if the same parameter is
given in both places.
Finally, as seen, we can also override the jvm at server level. Again,
the jvm’s name must match one of the definitions in the host
controller. The values are combined with the ones coming in from domain
controller and host controller level, this time the server definition
takes precedence if the same parameter is given in all places.
Following these rules the jvm parameters to start each server would be
| Server | JVM parameters |
|---|---|
server-one |
-Xms64m -Xmx128m |
server-two |
-Xms64m -Xmx256m |
server-three |
-Xms64m -Xmx128m |
11. Management tasks
11.1. Command line parameters
To start up a WildFly managed domain, execute the
$JBOSS_HOME/bin/domain.sh script. To start up a standalone server,
execute the $JBOSS_HOME/bin/standalone.sh. With no arguments, the
default configuration is used. You can override the default
configuration by providing arguments on the command line, or in your
calling script.
11.1.1. System properties
To set a system property, pass its new value using the standard jvm
-Dkey=value options:
$JBOSS_HOME/bin/standalone.sh -Djboss.home.dir=some/location/wildFly \
-Djboss.server.config.dir=some/location/wildFly/custom-standaloneThis command starts up a standalone server instance using a non-standard AS home directory and a custom configuration directory. For specific information about system properties, refer to the definitions below.
Instead of passing the parameters directly, you can put them into a properties file, and pass the properties file to the script, as in the two examples below.
$JBOSS_HOME/bin/domain.sh --properties=/some/location/jboss.properties
$JBOSS_HOME/bin/domain.sh -P=/some/location/jboss.propertiesNote however, that properties set this way are not processed as part of JVM launch. They are processed early in the boot process, but this mechanism should not be used for setting properties that control JVM behavior (e.g. java.net.perferIPv4Stack) or the behavior of the JBoss Modules classloading system.
The syntax for passing in parameters and properties files is the same
regardless of whether you are running the domain.sh, standalone.sh,
or the Microsoft Windows scripts domain.bat or standalone.bat.
The properties file is a standard Java property file containing
key=value pairs:
jboss.home.dir=/some/location/wildFly
jboss.domain.config.dir=/some/location/wildFly/custom-domainSystem properties can also be set via the xml configuration files. Note however that for a standalone server properties set this way will not be set until the xml configuration is parsed and the commands created by the parser have been executed. So this mechanism should not be used for setting properties whose value needs to be set before this point.
Controlling filesystem locations with system properties
The standalone and the managed domain modes each use a default configuration which expects various files and writable directories to exist in standard locations. Each of these standard locations is associated with a system property, which has a default value. To override a system property, pass its new value using the one of the mechanisms above. The locations which can be controlled via system property are:
Standalone
| Property name | Usage | Default value |
|---|---|---|
java.ext.dirs |
The JDK extension directory paths |
null |
jboss.home.dir |
The root directory of the WildFly installation. |
Set by standalone.sh to $JBOSS_HOME |
jboss.server.base.dir |
The base directory for server content. |
jboss.home.dir/standalone |
jboss.server.config.dir |
The base configuration directory. |
jboss.server.base.dir/configuration |
jboss.server.data.dir |
The directory used for persistent data file storage. |
jboss.server.base.dir/data |
jboss.server.log.dir |
The directory containing the server.log file. |
jboss.server.base.dir/log |
jboss.server.temp.dir |
The directory used for temporary file storage. |
jboss.server.base.dir/tmp |
jboss.server.deploy.dir |
The directory used to store deployed content |
jboss.server.data.dir/content |
Managed Domain
| Property name | Usage | Default value |
|---|---|---|
jboss.home.dir |
The root directory of the WildFly installation. |
Set by domain.sh to $JBOSS_HOME |
jboss.domain.base.dir |
The base directory for domain content. |
jboss.home.dir/domain |
jboss.domain.config.dir |
The base configuration directory |
jboss.domain.base.dir/configuration |
jboss.domain.data.dir |
The directory used for persistent data file storage. |
jboss.domain.base.dir/data |
jboss.domain.log.dir |
The directory containing the host-controller.log and process-controller.log files |
jboss.domain.base.dir/log |
jboss.domain.temp.dir |
The directory used for temporary file storage |
jboss.domain.base.dir/tmp |
jboss.domain.deployment.dir |
The directory used to store deployed content |
jboss.domain.base.dir/content |
jboss.domain.servers.dir |
The directory containing the output for the managed server instances |
jboss.domain.base.dir/servers |
11.1.2. Other command line parameters
The first acceptable format for command line arguments to the WildFly launch scripts is
--name=value
For example:
$JBOSS_HOME/bin/standalone.sh --server-config=standalone-ha.xmlIf the parameter name is a single character, it is prefixed by a single '-' instead of two. Some parameters have both a long and short option.
-x=value
For example:
$JBOSS_HOME/bin/standalone.sh -P=/some/location/jboss.propertiesFor some command line arguments frequently used in previous major releases of WildFly, replacing the "=" in the above examples with a space is supported, for compatibility.
-b 192.168.100.10
If possible, use the -x=value syntax. New parameters will always
support this syntax.
The sections below describe the command line parameter names that are available in standalone and domain mode.
Standalone
| Name | Default if absent | Value |
|---|---|---|
--admin-only |
- |
Set the server’s running type to ADMIN_ONLY causing it to open administrative interfaces and accept management requests but not start other runtime services oraccept end user requests. |
--server-config -c |
standalone.xml |
A relative path which is interpreted to be relative to jboss.server.config.dir. The name of the configuration file to use. |
--read-only-server-config |
- |
A relative path which is interpreted to be relative to jboss.server.config.dir. This is similar to --server-config but if this alternative is specified the server willnot overwrite the file when the management model is changed. However a full versioned history is maintained of the file. |
--git-repo |
- |
remote Git repository URL to use for configuration directory and content repository content or |
--git-branch |
master |
The Git branch or tag to be used. If a |
--git-auth |
- |
A URL to an Elytron configuration file containing the credentials to be used for connecting to the Git repository. |
Managed Domain
| Name | Default if absent | Value |
|---|---|---|
--admin-only |
- |
Set the server’s running type to ADMIN_ONLY causing it to open administrative interfaces and accept management requests but not start servers or, if this host controlleris the master for the domain, accept incoming connections from slave host controllers. |
--domain-config -c |
domain.xml |
A relative path which is interpreted to be relative to jboss.domain.config.dir. The name of the domain wide configuration file to use. |
--read-only-domain-config |
- |
A relative path which is interpreted to be relative to jboss.domain.config.dir. This is similar to --domain-config but if this alternative is specified the host controllerwill not overwrite the file when the management model is changed. However a full versioned history is maintained of the file. |
--host-config |
host.xml |
A relative path which is interpreted to be relative to jboss.domain.config.dir. The name of the host-specific configuration file to use. |
--read-only-host-config |
- |
A relative path which is interpreted to be relative to jboss.domain.config.dir. This is similar to --host-config but if this alternative is specified the host controller willnot overwrite the file when the management model is changed. However a full versioned history is maintained of the file. |
The following parameters take no value and are only usable on slave host
controllers (i.e. hosts configured to connect to a remote domain
controller.)
| Name | Function |
|---|---|
--backup |
Causes the slave host controller to create and maintain a local copy (domain.cached-remote.xml) of the domain configuration. If ignore-unused-configuration is unset in host.xml,a complete copy of the domain configuration will be stored locally, otherwise the configured value of ignore-unused-configuration in host.xml will be used. (See ignore-unused-configuration for more details.) |
--cached-dc |
If the slave host controller is unable to contact the master domain controller to get its configuration at boot, this option will allow the slave host controller to boot and becomeoperational using a previously cached copy of the domain configuration (domain.cached-remote.xml.) If the cached configuration is not present, this boot will fail. This file is created using using one ofthe following methods:- A previously successful connection to the master domain controller using --backup or --cached-dc.- Copying the domain configuration from an alternative host to domain/configuration/domain.cached-remote.xml.The unavailable master domain controller will be polled periodically for availability, and once becoming available, the slave host controller will reconnect to the master host controller and synchronize the domainconfiguration. During the interval the master domain controller is unavailable, the slave host controller will not be able make any modifications to the domain configuration, but it may launch servers and handlerequests to deployed applications etc. |
Common parameters
These parameters apply in both standalone or managed domain mode:
| Name | Function |
|---|---|
-b=<value> |
Sets system property jboss.bind.address to <value>. See Controlling the Bind Address with -b for further details. |
-b<name>=<value> |
Sets system property jboss.bind.address.<name> to <value> where name can vary. See Controlling the Bind Address with -b for further details. |
-u=<value> |
Sets system property jboss.default.multicast.address to <value>. See Controlling the Default Multicast Address with -u for further details. |
--version -v -V |
Prints the version of WildFly to standard output and exits the JVM. |
--help-h |
Prints a help message explaining the options and exits the JVM. |
11.1.3. Controlling the Bind Address with -b
WildFly binds sockets to the IP addresses and interfaces contained in
the <interfaces> elements in standalone.xml, domain.xml and
host.xml. (See
Interfaces
and
Socket
Bindings for further information on these elements.) The standard
configurations that ship with WildFly includes two interface
configurations:
<interfaces>
<interface name="management">
<inet-address value="${jboss.bind.address.management:127.0.0.1}"/>
</interface>
<interface name="public">
<inet-address value="${jboss.bind.address:127.0.0.1}"/>
</interface>
</interfaces>Those configurations use the values of system properties
jboss.bind.address.management and jboss.bind.address if they are
set. If they are not set, 127.0.0.1 is used for each value.
As noted in
Common
Parameters, the AS supports the -b and -b<name> command line
switches. The only function of these switches is to set system
properties jboss.bind.address and jboss.bind.address.<name>
respectively. However, because of the way the standard WildFly
configuration files are set up, using the -b switches can indirectly
control how the AS binds sockets.
If your interface configurations match those shown above, using this
as your launch command causes all sockets associated with interface
named "public" to be bound to 192.168.100.10.
$JBOSS_HOME/bin/standalone.sh -b=192.168.100.10In the standard config files, public interfaces are those not associated with server management. Public interfaces handle normal end-user requests.
| The interface named "public" is not inherently special. It is provided as a convenience. You can name your interfaces to suit your environment. |
To bind the public interfaces to all IPv4 addresses (the IPv4 wildcard address), use the following syntax:
$JBOSS_HOME/bin/standalone.sh -b=0.0.0.0
You can also bind the management interfaces, as follows:
$JBOSS_HOME/bin/standalone.sh -bmanagement=192.168.100.10
In the standard config files, management interfaces are those sockets associated with server management, such as the socket used by the CLI, the HTTP socket used by the admin console, and the JMX connector socket.
The -b switch only controls the interface bindings because the
standard config files that ship with WildFly sets things up that way. If
you change the <interfaces> section in your configuration to no longer
use the system properties controlled by -b, then setting -b in your
launch command will have no effect.
|
For example, this perfectly valid setting for the "public" interface
causes -b to have no effect on the "public" interface:
<interface name="public">
<nic name="eth0"/>
</interface>The key point is the contents of the configuration files determine the
configuration. Settings like -b are not overrides of the
configuration files. They only provide a shorter syntax for setting a
system properties that may or may not be referenced in the configuration
files. They are provided as a convenience, and you can choose to modify
your configuration to ignore them.
11.1.4. Controlling the Default Multicast Address with -u
WildFly may use multicast communication for some services, particularly
those involving high availability clustering. The multicast addresses
and ports used are configured using the socket-binding elements in
standalone.xml and domain.xml. (See
Socket
Bindings for further information on these elements.) The standard HA
configurations that ship with WildFly include two socket binding
configurations that use a default multicast address:
<socket-binding name="jgroups-mping" port="0" multicast-address="${jboss.default.multicast.address:230.0.0.4}" multicast-port="45700"/>
<socket-binding name="jgroups-udp" port="55200" multicast-address="${jboss.default.multicast.address:230.0.0.4}" multicast-port="45688"/>Those configurations use the values of system property
jboss.default.multicast.address if it is set. If it is not set,
230.0.0.4 is used for each value. (The configuration may include other
socket bindings for multicast-based services that are not meant to use
the default multicast address; e.g. a binding the mod-cluster services
use to communicate on a separate address/port with Apache httpd
servers.)
As noted in
Common Parameters, the AS supports the -u command line switch. The only
function of this switch is to set system property jboss.default.multicast.address. However, because of the way the
standard AS configuration files are set up, using the -u switches can indirectly control how the AS uses multicast.
If your socket binding configurations match those shown above, using
this as your launch command causes the service using those sockets
configurations to be communicate over multicast address 230.0.1.2.
$JBOSS_HOME/bin/standalone.sh -u=230.0.1.2
Be Careful
As with the -b switch, the -u switch only controls the multicast
address used because the standard config files that ship with WildFly
sets things up that way. If you change the <socket-binding> sections
in your configuration to no longer use the system properties controlled
by -u, then setting -u in your launch command will have no effect.
|
11.2. Suspend, Resume and Graceful shutdown
11.2.1. Core Concepts
WildFly introduces the ability to suspend and resume servers. This can be combined with shutdown to enable the server to gracefully finish processing all active requests and then shut down. When a server is suspended it will immediately stop accepting new requests, but wait for existing requests to complete. A suspended server can be resumed at any point, and will begin processing requests immediately. Suspending and resuming has no effect on deployment state (e.g. if a server is suspended singleton EJB’s will not be destroyed). As of WildFly 11 it is also possible to start a server in suspended mode which means it will not accept requests until it has been resumed. Servers will also be suspended during the boot process, so no requests will be accepted until the startup process is 100% complete.
Suspend/Resume has no effect on management operations; management operations can still be performed while a server is suspended. If you wish to perform a management operation that will affect the operation of the server you can suspend the server, perform the operation, and then resume the server. This allows all requests to finish, and makes sure that no requests are running while the management changes are taking place.
|
If you perform a management operation while the server is suspended,
and the response to that operation includes the
|
When a server is suspending it goes through four different states:
-
RUNNING - The normal state, the server is accepting requests and running normally
-
PRE_SUSPEND - In PRE_SUSPEND the server will notify external parties that it is about to suspend, for example mod_cluster will notify the load balancer that the deployment is suspending. Requests are still accepted in this phase.
-
SUSPENDING - All new requests are rejected, and the server is waiting for all active requests to finish. If there are no active requests at suspend time this phase will be skipped.
-
SUSPENDED - All requests have completed, and the server is suspended.
11.2.2. Starting Suspended
In order to start into suspended mode when using a standalone server you need to add --start-mode=suspend to the command line. It is also possible to specify the start-mode in the reload operation to cause the server to reload into suspended mode (other possible values for start-mode are normal and admin-only).
In domain mode servers can be started in suspended mode by passing the suspend=true parameter to any command that causes a server to start, restart or reload (e.g. :start-servers(suspend=true)).
11.2.3. The Request Controller Subsystem
WildFly introduces a new subsystem called the Request Controller Subsystem. This optional subsystem tracks all requests at their entry point, which is how the graceful shutdown mechanism knows when all requests are done. (It also allows you to provide a global limit on the total number of running requests).
If this subsystem is not present suspend/resume will be limited. In general things that happen in the PRE_SUSPEND phase will work as normal (stopping message delivery, notifying the load balancer); however the server will not wait for all requests to complete and instead will move straight to SUSPENDED mode.
There is a small performance penalty associated with the request controller subsystem (about on par with enabling statistics), so if you do not require the suspend/resume functionality this subsystem can be removed to get a small performance boost.
11.2.4. Subsystem Integrations
Suspend/Resume is a service provided by the WildFly platform that any subsystem may choose to integrate with. Some subsystems integrate directly with the suspend controller, while others integrate through the request controller subsystem.
The following subsystems support graceful shutdown. Note that only subsystems that provide an external entry point to the server need graceful shutdown support. For example the JAX-RS subsystem does not require suspend/resume support as all access to JAX-RS is through the web connector.
-
Undertow - Undertow will wait for all requests to finish.
-
mod_cluster - The mod_cluster subsystem will notify the load balancer that the server is suspending in the PRE_SUSPEND phase.
-
EJB - EJB will wait for all remote EJB requests and MDB message deliveries to finish. Delivery to MDB’s is stopped in the PRE_SUSPEND phase. EJB timers are suspended, and missed timers will be activated when the server is resumed.
-
Batch - Batch jobs will be stopped at a checkpoint while the server is suspending. They will be restarted from that checkpoint when the server returns to running mode.
-
EE Concurrency - The server will wait for all active jobs to finish. All jobs that have already been queued will be skipped.
-
Transactions - The transaction subsystem waits for all running transactions to finish while the server is suspending. During that time the server refuses to start any new transaction. But any in-flight transaction will be serviced - e.g. the server will accept any incoming remote call which carries the context of a transaction already started at the suspending server.
Transactions and EJBs
When you work with EJBs you have to enable the graceful shutdown
functionality by setting the attribute enable-graceful-txn-shutdown to
true. For example, in the ejb3 subsystem section of standalone.xml:
<enable-graceful-txn-shutdown value="false"/>By default graceful shutdown is disabled for the ejb subsystem.
The reason for this is that the behavior might be unwelcome in cluster
environments, as the server notifies remote clients that the node is no
longer available for remote calls only after the transactions are
finished. During that brief window of time, the client of a cluster may
send a new request to a node that is shutting down and it will refuse the
request because it is not related to an existing transaction.
If this attribute enable-graceful-txn-shutdown is set to false, we
disable the graceful behavior and EJB clients will not attempt to invoke
the node when it suspends, regardless of active transactions.
11.2.5. Standalone Mode
Suspend/Resume can be controlled via the following CLI operations and commands in standalone mode:
:suspend(suspend-timeout=x)
Suspends the server. If the timeout is specified it will wait in the SUSPENDING phase up to the specified number of seconds for all requests to finish. If there is no timeout specified or the value is less than zero it will wait indefinitely.
:resume
Resumes a previously suspended server. The server should be able to begin serving requests immediately.
:read-attribute(name=suspend-state)
Returns the current suspend state of the server.
shutdown --suspend-timeout=x
If a timeout parameter is passed to the shutdown command then a graceful shutdown will be performed. The server will be suspended, and will wait in SUSPENDING state up to the specified number of seconds for all requests to finish before shutting down. A timeout value of less than zero means it will wait indefinitely.
11.2.6. Domain Mode
Domain mode has similar operations as standalone mode, however they can be applied at global, server group, server and host levels:
Whole Domain
:suspend-servers(suspend-timeout=x)
:resume-servers
:stop-servers(suspend-timeout=x)
Server Group
/server-group=main-server-group:suspend-servers(suspend-timeout=x)
/server-group=main-server-group:resume-servers
/server-group=main-server-group:stop-servers(suspend-timeout=x)
Server
/host=master/server-config=server-one:suspend(suspend-timeout=x)
/host=master/server-config=server-one:resume
/host=master/server-config=server-one:stop(suspend-timeout=x)
Host level
/host=master:suspend-servers(suspend-timeout=x)
/host=master:resume-servers
/host=master:shutdown(suspend-timeout=x)
Note that even though the host controller itself is being shut down, the suspend-timeout attribute for the shutdown operation at host level is applied to the servers only and not to the host controller itself.
11.2.7. Graceful Shutdown via an OS Signal
If you use an OS signal like TERM to shut down your WildFly standalone server
process, e.g. via kill -15 <pid>, the WildFly server will shut down gracefully.
By default, the behavior will be analogous to a CLI shutdown --suspend-timeout=0 command;
that is the process will not wait in SUSPENDING state for in-flight requests to
complete before proceeding to SUSPENDED state and then shutting down. A different
timeout can be configured by setting the org.wildfly.sigterm.suspend.timeout
system property. The value of the property should be an integer indicating the maximum
number of seconds to wait for in-flight requests to complete. A value of -1 means
the server should wait indefinitely.
Graceful shutdown via an OS signal will not work if the server JVM is configured
to disable signal handling (i.e. with the -Xrs argument to java). It also won’t
work if the method used to terminate the process doesn’t result in a signal the
JVM can respond to (e.g. kill -9).
In a managed domain, Process Controller and Host Controller processes will not attempt any sort of graceful shutdown in response to a signal. A domain mode server may, but the proper way to control the lifecycle of a domain mode server process is via the management API and its managing Host Controller, not via direct signals to the server process.
[[Starting_&_stopping_Servers_in_a_Managed_Domain]] = Starting & stopping Servers in a Managed Domain
Starting a standalone server is done through the bin/standalone.sh
script. However in a managed domain server instances are managed by the
domain controller and need to be started through the management layer:
First of all, get to know which servers are configured on a particular
host:
[domain@localhost:9990 /] :read-children-names(child-type=host)
{
"outcome" => "success",
"result" => ["local"]
}
[domain@localhost:9990 /] /host=local:read-children-names(child-type=server-config)
{
"outcome" => "success",
"result" => [
"my-server",
"server-one",
"server-three"
]
}Now that we know, that there are two servers configured on host "
local", we can go ahead and check their status:
[domain@localhost:9990 /] /host=local/server-config=server-one:read-resource(include-runtime=true)
{
"outcome" => "success",
"result" => {
"auto-start" => true,
"group" => "main-server-group",
"interface" => undefined,
"name" => "server-one",
"path" => undefined,
"socket-binding-group" => undefined,
"socket-binding-port-offset" => undefined,
"status" => "STARTED",
"system-property" => undefined,
"jvm" => {"default" => undefined}
}
}You can change the server state through the " start" and " stop" operations
[domain@localhost:9990 /] /host=local/server-config=server-one:stop
{
"outcome" => "success",
"result" => "STOPPING"
}| Navigating through the domain topology is much more simple when you use the web interface. |
11.3. JVM settings
Configuration of the JVM settings is different for a managed domain and a standalone server. In a managed domain, the domain controller components are responsible for starting and stoping server processes and hence determine the JVM settings. For a standalone server, it’s the responsibility of the process that started the server (e.g. passing them as command line arguments).
11.3.1. Managed Domain
In a managed domain the JVM settings can be declared at different scopes: For a specific server group, for a host or for a particular server. If not declared, the settings are inherited from the parent scope. This allows you to customize or extend the JVM settings within every layer.
Let’s take a look at the JVM declaration for a server group:
<server-groups>
<server-group name="main-server-group" profile="default">
<jvm name="default">
<heap size="64m" max-size="512m"/>
</jvm>
<socket-binding-group ref="standard-sockets"/>
</server-group>
<server-group name="other-server-group" profile="default">
<jvm name="default">
<heap size="64m" max-size="512m"/>
</jvm>
<socket-binding-group ref="standard-sockets"/>
</server-group>
</server-groups>(See domain/configuration/domain.xml )
In this example the server group "main-server-group" declares a heap
size of 64m and a maximum heap size of 512m. Any server that belongs
to this group will inherit these settings. You can change these settings
for the group as a whole, or a specific server or host:
<servers>
<server name="server-one" group="main-server-group" auto-start="true">
<jvm name="default"/>
</server>
<server name="server-two" group="main-server-group" auto-start="true">
<jvm name="default">
<heap size="64m" max-size="256m"/>
</jvm>
<socket-binding-group ref="standard-sockets" port-offset="150"/>
</server>
<server name="server-three" group="other-server-group" auto-start="false">
<socket-binding-group ref="standard-sockets" port-offset="250"/>
</server>
</servers>~(See domain/configuration/host.xml)~
In this case, server-two, belongs to the main-server-group and inherits the JVM settings named default, but declares a lower maximum heap size.
[domain@localhost:9999 /] /host=local/server-config=server-two/jvm=default:read-resource
{
"outcome" => "success",
"result" => {
"heap-size" => "64m",
"max-heap-size" => "256m",
}
}11.3.2. Standalone Server
For a standalone sever you have to pass in the JVM settings either as
command line arguments when executing the
$JBOSS_HOME/bin/standalone.sh script, or by declaring them in
$JBOSS_HOME/bin/standalone.conf. (For Windows users, the script to
execute is %JBOSS_HOME%/bin/standalone.bat while the JVM settings can
be declared in %JBOSS_HOME%/bin/standalone.conf.bat.)
11.4. Audit logging
WildFly comes with audit logging built in for management operations affecting the management model. By default it is turned off. The information is output as JSON records.
The default configuration of audit logging in standalone.xml looks as follows:
<management>
<security-realms>
...
</security-realms>
<audit-log>
<formatters>
<json-formatter name="json-formatter"/>
</formatters>
<handlers>
<file-handler name="file" formatter="json-formatter" path="audit-log.log" relative-to="jboss.server.data.dir"/>
</handlers>
<logger log-boot="true" log-read-only="true" enabled="false">
<handlers>
<handler name="file"/>
</handlers>
</logger>
</audit-log>
...Looking at this via the CLI it looks like
[standalone@localhost:9990 /] /core-service=management/access=audit:read-resource(recursive=true)
{
"outcome" => "success",
"result" => {
"file-handler" => {"file" => {
"formatter" => "json-formatter",
"max-failure-count" => 10,
"path" => "audit-log.log",
"relative-to" => "jboss.server.data.dir"
}},
"json-formatter" => {"json-formatter" => {
"compact" => false,
"date-format" => "yyyy-MM-dd HH:mm:ss",
"date-separator" => " - ",
"escape-control-characters" => false,
"escape-new-line" => false,
"include-date" => true
}},
"logger" => {"audit-log" => {
"enabled" => false,
"log-boot" => true,
"log-read-only" => false,
"handler" => {"file" => {}}
}},
"syslog-handler" => undefined
}
}To enable it via CLI you need just
[standalone@localhost:9990 /] /core-service=management/access=audit/logger=audit-log:write-attribute(name=enabled,value=true)
{"outcome" => "success"}Audit data are stored in standalone/data/audit-log.log.
The audit logging subsystem has a lot of internal dependencies, and it
logs operations changing, enabling and disabling its components. When
configuring or changing things at runtime it is a good idea to make
these changes as part of a CLI batch. For example if you are adding a
syslog handler you need to add the handler and its information as one
step. Similarly if you are using a file handler, and want to change its
path and relative-to attributes, that needs to happen as one step.
|
11.4.1. JSON Formatter
The first thing that needs configuring is the formatter, we currently support outputting log records as JSON. You can define several formatters, for use with different handlers. A log record has the following format, and it is the formatter’s job to format the data presented:
2013-08-12 11:01:12 - {
"type" : "core",
"r/o" : false,
"booting" : false,
"version" : "8.0.0.Alpha4",
"user" : "$local",
"domainUUID" : null,
"access" : "NATIVE",
"remote-address" : "127.0.0.1/127.0.0.1",
"success" : true,
"ops" : [JMX|WFLY8:JMX subsystem configuration],
"operation" : "write-attribute",
"name" : "enabled",
"value" : true,
"operation-headers" : {"caller-type" : "user"}
}]
}It includes an optional timestamp and then the following information in the json record
| Field name | Description |
|---|---|
type |
This can have the values core, meaning it is a management operation, or jmx meaning it comes from the jmx subsystem (see the jmx subsystem for configuration of the jmx subsystem’s audit logging) |
r/o |
true if the operation does not change the management model, false otherwise |
booting |
true if the operation was executed during the bootup process, false if it was executed once the server is up and running |
version |
The version number of the WildFly instance |
user |
The username of the authenticated user. In this case the operation has been logged via the CLI on the same machine as the running server, so the special $local user is used |
domainUUID |
An ID to link together all operations as they are propagated from the Doman Controller to it servers, slave Host Controllers, and slave Host Controller servers |
access |
This can have one of the following values:*NATIVE - The operation came in through the native management interface, for example the CLI*HTTP - The operation came in through the domain HTTP interface, for example the admin console*JMX - The operation came in through the JMX subsystem. See JMX for how to configure audit logging for JMX. |
remote-address |
The address of the client executing this operation |
success |
true if the operation succeeded, false if it was rolled back |
ops |
The operations being executed. This is a list of the operations serialized to JSON. At boot this will be all the operations resulting from parsing the xml. Once booted the list will typically just contain a single entry |
The json formatter resource has the following attributes:
| Attribute | Description |
|---|---|
include-date |
Boolan toggling whether or not to include the timestamp in the formatted log records |
date-separator |
A string containing characters to separate the date and the rest of the formatted log message. Will be ignored if include-date=false |
date-format |
The date format to use for the timestamp as understood by java.text.SimpleDateFormat. Will be ignored if include-date=false |
compact |
If true will format the JSON on one line. There may still be values containing new lines, so if having the whole record on one line is important, set escape-new-line or escape-control-characters to true |
escape-control-characters |
If true it will escape all control characters (ascii entries with a decimal value < 32) with the ascii code in octal, e.g. a new line becomes '#012'. If this is true, it will override escape-new-line=false |
escape-new-line |
If true it will escape all new lines with the ascii code in octal, e.g. "#012". |
11.4.2. Handlers
A handler is responsible for taking the formatted data and logging it to a location. There are currently two types of handlers, File and Syslog. You can configure several of each type of handler and use them to log information.
File handler
The file handlers log the audit log records to a file on the server. The attributes for the file handler are
| Attribute | Description | Read Only |
|---|---|---|
formatter |
The name of a JSON formatter to use to format the log records |
false |
path |
The path of the audit log file |
false |
relative-to |
The name of another previously named path, or of one of the standard paths provided by the system. If relative-to is provided, the value of the path attribute is treated as relative to the path specified by this attribute |
false |
failure-count |
The number of logging failures since the handler was initialized |
true |
max-failure-count |
The maximum number of logging failures before disabling this handler |
false |
disabled-due-to-failure |
true if this handler was disabled due to logging failures |
true |
In our standard configuration path=audit-log.log and
relative-to=jboss.server.data.dir, typically this will be
$JBOSS_HOME/standalone/data/audit-log.log
Syslog handler
The default configuration does not have syslog audit logging set up. Syslog is a better choice for audit logging since you can log to a remote syslog server, and secure the authentication to happen over TLS with client certificate authentication. Syslog servers vary a lot in their capabilities so not all settings in this section apply to all syslog servers. We have tested with rsyslog.
The address for the syslog handler is
/core-service=management/access=audit/syslog-handler=* and just like
file handlers you can add as many syslog entries as you like. The syslog
handler resources reference the main RFC’s for syslog a fair bit, for
reference they can be found at:
* http://www.ietf.org/rfc/rfc3164.txt
* http://www.ietf.org/rfc/rfc5424.txt
* http://www.ietf.org/rfc/rfc6587.txt
The syslog handler resource has the following attributes:
| formatter | The name of a JSON formatter to use to format the log records | false |
|---|---|---|
failure-count |
The number of logging failures since the handler was initialized |
true |
max-failure-count |
The maximum number of logging failures before disabling this handler |
false |
disabled-due-to-failure |
true if this handler was disabled due to logging failures |
true |
syslog-format |
Whether to set the syslog format to the one specified in RFC-5424 or RFC-3164 |
false |
max-length |
The maximum length in bytes a log message, including the header, is allowed to be. If undefined, it will default to 1024 bytes if the syslog-format is RFC3164, or 2048 bytes if the syslog-format is RFC5424. |
false |
truncate |
Whether or not a message, including the header, should truncate the message if the length in bytes is greater than the maximum length. If set to false messages will be split and sent with the same header values |
false |
When adding a syslog handler you also need to add the protocol it will
use to communicate with the syslog server. The valid choices for
protocol are UDP, TCP and TLS. The protocol must be added at the
same time as you add the syslog handler, or it will fail. Also, you can
only add one protocol for the handler.
UDP
Configures the handler to use UDP to communicate with the syslog server.
The address of the UDP resource is
/core-service=management/access=audit/syslog-handler=*/protocol=udp.
The attributes of the UDP resource are:
| Attribute | Description |
|---|---|
host |
The host of the syslog server for the udp requests |
port |
The port of the syslog server listening for the udp requests |
TCP
Configures the handler to use TCP to communicate with the syslog server.
The address of the TCP resource is
/core-service=management/access=audit/syslog-handler=*/protocol=tcp.
The attributes of the TCP resource are:
| Attribute | Description |
|---|---|
host |
The host of the syslog server for the tcp requests |
port |
The port of the syslog server listening for the tcp requests |
message-transfer |
The message transfer setting as described in section 3.4 of RFC-6587. This can either be OCTET_COUNTING as described in section 3.4.1 of RFC-6587, or NON_TRANSPARENT_FRAMING as described in section 3.4.1 of RFC-6587 |
TLS
Configures the handler to use TLC to communicate securely with the
syslog server. The address of the TLS resource is
/core-service=management/access=audit/syslog-handler=*/protocol=tls.
The attributes of the TLS resource are the same as for TCP:
| Attribute | Description |
|---|---|
host |
The host of the syslog server for the tls requests |
port |
The port of the syslog server listening for the tls requests |
message-transfer |
The message transfer setting as described in section 3.4 of RFC-6587. This can either be OCTET_COUNTING as described in section 3.4.1 of RFC-6587, or NON_TRANSPARENT_FRAMING as described in section 3.4.1 of RFC-6587 |
If the syslog server’s TLS certificate is not signed by a certificate
signing authority, you will need to set up a truststore to trust the
certificate. The resource for the trust store is a child of the TLS
resource, and the full address is
/core-service=management/access=audit/syslog-handler=*/protocol=tls/authentication=truststore.
The attributes of the truststore resource are:
| Attribute | Description |
|---|---|
keystore-password |
The password for the truststore |
keystore-path |
The path of the truststore |
keystore-relative-to |
The name of another previously named path, or of one of the standard paths provided by the system. If keystore-relative-to is provided, the value of the keystore-path attribute is treated as relative to the path specified by this attribute |
If you have set up the syslog server to require client certificate
authentication, when creating your handler you will also need to set up
a client certificate store containing the certificate to be presented to
the syslog server. The address of the client certificate store resource
is
/core-service=management/access=audit/syslog-handler=*/protocol=tls/authentication=client-certificate-store
and its attributes are:
| Attribute | Description |
|---|---|
keystore-password |
The password for the keystore |
key-password |
The password for the keystore key |
keystore-path |
The path of the keystore |
keystore-relative-to |
The name of another previously named path, or of one of the standard paths provided by the system. If keystore-relative-to is provided, the value of the keystore-path attribute is treated as relative to the path specified by this attribute |
11.4.3. Logger configuration
The final part that needs configuring is the logger for the management
operations. This references one or more handlers and is configured at
/core-service=management/access=audit/logger=audit-log. The attributes
for this resource are:
| Attribute | Description |
|---|---|
enabled |
true to enable logging of the management operations |
log-boot |
true to log the management operations when booting the server, false otherwise |
log-read-only |
If true all operations will be audit logged, if false only operations that change the model will be logged |
Then which handlers are used to log the management operations are
configured as handler=* children of the logger.
11.4.4. Domain Mode (host specific configuration)
In domain mode audit logging is configured for each host in its
host.xml file. This means that when connecting to the DC, the
configuration of the audit logging is under the host’s entry, e.g. here
is the default configuration:
[domain@localhost:9990 /] /host=master/core-service=management/access=audit:read-resource(recursive=true)
{
"outcome" => "success",
"result" => {
"file-handler" => {
"host-file" => {
"formatter" => "json-formatter",
"max-failure-count" => 10,
"path" => "audit-log.log",
"relative-to" => "jboss.domain.data.dir"
},
"server-file" => {
"formatter" => "json-formatter",
"max-failure-count" => 10,
"path" => "audit-log.log",
"relative-to" => "jboss.server.data.dir"
}
},
"json-formatter" => {"json-formatter" => {
"compact" => false,
"date-format" => "yyyy-MM-dd HH:mm:ss",
"date-separator" => " - ",
"escape-control-characters" => false,
"escape-new-line" => false,
"include-date" => true
}},
"logger" => {"audit-log" => {
"enabled" => false,
"log-boot" => true,
"log-read-only" => false,
"handler" => {"host-file" => {}}
}},
"server-logger" => {"audit-log" => {
"enabled" => false,
"log-boot" => true,
"log-read-only" => false,
"handler" => {"server-file" => {}}
}},
"syslog-handler" => undefined
}
}We now have two file handlers, one called host-file used to configure
the file to log management operations on the host, and one called
server-file used to log management operations executed on the servers.
Then logger=audit-log is used to configure the logger for the host
controller, referencing the host-file handler.
server-logger=audit-log is used to configure the logger for the
managed servers, referencing the server-file handler. The attributes
for server-logger=audit-log are the same as for
server-logger=audit-log in the previous section. Having the host
controller and server loggers configured independently means we can
control audit logging for managed servers and the host controller
independently.
11.5. Canceling Management Operations
WildFly includes the ability to use the CLI to cancel management requests that are not proceeding normally.
11.5.1. The cancel-non-progressing-operation operation
The cancel-non-progressing-operation operation instructs the target
process to find any operation that isn’t proceeding normally and cancel
it.
On a standalone server:
[standalone@localhost:9990 /] /core-service=management/service=management-operations:cancel-non-progressing-operation
{
"outcome" => "success",
"result" => "-1155777943"
}The result value is an internal identification number for the operation that was cancelled.
On a managed domain host controller, the equivalent resource is in the host=<hostname> portion of the management resource tree:
[domain@localhost:9990 /] /host=host-a/core-service=management/service=management-operations:cancel-non-progressing-operation
{
"outcome" => "success",
"result" => "2156877946"
}An operation can be cancelled on an individual managed domain server as well:
[domain@localhost:9990 /] /host=host-a/server=server-one/core-service=management/service=management-operations:cancel-non-progressing-operation
{
"outcome" => "success",
"result" => "6497786512"
}An operation is considered to be not proceeding normally if it has been executing with the exclusive operation lock held for longer than 15 seconds. Read-only operations do not acquire the exclusive operation lock, so this operation will not cancel read-only operations. Operations blocking waiting for another operation to release the exclusive lock will also not be cancelled.
If there isn’t any operation that is failing to proceed normally, there will be a failure response:
[standalone@localhost:9990 /] /core-service=management/service=management-operations:cancel-non-progressing-operation
{
"outcome" => "failed",
"failure-description" => "WFLYDM0089: No operation was found that has been holding the operation execution write lock for long than [15] seconds",
"rolled-back" => true
}11.5.2. The find-non-progressing-operation operation
To simply learn the id of an operation that isn’t proceeding normally,
but not cancel it, use the find-non-progressing-operation operation:
[standalone@localhost:9990 /] /core-service=management/service=management-operations:find-non-progressing-operation
{
"outcome" => "success",
"result" => "-1155777943"
}If there is no non-progressing operation, the outcome will still be
success but the result will be undefined.
Once the id of the operation is known, the management resource for the operation can be examined to learn more about its status.
11.5.3. Examining the status of an active operation
There is a management resource for any currently executing operation that can be queried:
[standalone@localhost:9990 /] /core-service=management/service=management-operations/active-operation=-1155777943:read-resource(include-runtime=true)
{
"outcome" => "success",
"result" => {
"access-mechanism" => "undefined",
"address" => [
("deployment" => "example")
],
"caller-thread" => "management-handler-thread - 24",
"cancelled" => false,
"exclusive-running-time" => 101918273645L,
"execution-status" => "awaiting-stability",
"operation" => "deploy",
"running-time" => 101918279999L
}
}The response includes the following attributes:
| Field | Meaning |
|---|---|
access-mechanism |
The mechanism used to submit a request to the server. NATIVE, JMX, HTTP |
address |
The address of the resource targeted by the operation. The value in the final element of the address will be '<hidden>' if the caller is not authorized to address the operation’s target resource. |
caller-thread |
The name of the thread that is executing the operation. |
cancelled |
Whether the operation has been cancelled. |
|
Amount of time in nanoseconds the operation has been executing with the exclusive operation execution lock held, or -1 if the operation does not hold the exclusive execution lock. |
execution-status |
The current activity of the operation. See below for details. |
operation |
The name of the operation, or '<hidden>' if the caller is not authorized to address the operation’s target resource. |
running-time |
Amount of time the operation has been executing, in nanoseconds. |
The following are the values for the exclusive-running-time attribute:
| Value | Meaning |
|---|---|
executing |
The caller thread is actively executing |
awaiting-other-operation |
The caller thread is blocking waiting for another operation to release the exclusive execution lock |
awaiting-stability |
The caller thread has made changes to the service container and is waiting for the service container to stabilize |
completing |
The operation is committed and is completing execution |
rolling-back |
The operation is rolling back |
All currently executing operations can be viewed in one request using
the read-children-resources operation:
[standalone@localhost:9990 /] /core-service=management/service=management-operations:read-children-resources(child-type=active-operation)
{
"outcome" => "success",
"result" => {"-1155777943" => {
"access-mechanism" => "undefined",
"address" => [
("deployment" => "example")
],
"caller-thread" => "management-handler-thread - 24",
"cancelled" => false,
"exclusive-running-time" => 101918273645L,
"execution-status" => "awaiting-stability",
"operation" => "deploy",
"running-time" => 101918279999L
},
{"-1246693202" => {
"access-mechanism" => "undefined",
"address" => [
("core-service" => "management"),
("service" => "management-operations")
],
"caller-thread" => "management-handler-thread - 30",
"cancelled" => false,
"exclusive-running-time" => -1L,
"execution-status" => "executing",
"operation" => "read-children-resources",
"running-time" => 3356000L
}}
}11.5.4. Canceling a specific operation
The cancel-non-progressing-operation operation is a convenience
operation for identifying and canceling an operation. However, an
administrator can examine the active-operation resources to identify any
operation, and then directly cancel it by invoking the cancel
operation on the resource for the desired operation.
[standalone@localhost:9990 /] /core-service=management/service=management-operations/active-operation=-1155777943:cancel
{
"outcome" => "success",
"result" => undefined
}11.5.5. Controlling operation blocking time
As an operation executes, the execution thread may block at various points, particularly while waiting for the service container to stabilize following any changes. Since an operation may be holding the exclusive execution lock while blocking, in WildFly execution behavior was changed to ensure that blocking will eventually time out, resulting in roll back of the operation.
The default blocking timeout is 300 seconds. This is intentionally long, as the idea is to only trigger a timeout when something has definitely gone wrong with the operation, without any false positives.
An administrator can control the blocking timeout for an individual
operation by using the blocking-timeout operation header. For example,
if a particular deployment is known to take an extremely long time to
deploy, the default 300 second timeout could be increased:
[standalone@localhost:9990 /] deploy /tmp/mega.war --headers={blocking-timeout=450}Note the blocking timeout is not a guaranteed maximum execution time for an operation. If it only a timeout that will be enforced at various points during operation execution.
11.6. Configuration file history
The management operations may modify the model. When this occurs the xml backing the model is written out again reflecting the latest changes. In addition a full history of the file is maintained. The history of the file goes in a separate directory under the configuration directory.
As mentioned in Command line parameters the default
configuration file can be selected using a command-line parameter. For a
standalone server instance the history of the active standalone.xml is
kept in jboss.server.config.dir/standalone_xml_history (See
Command line parameters#standalone_system_properties
for more details). For a domain the active domain.xml and host.xml
histories are kept in jboss.domain.config.dir/domain_xml_history and
jboss.domain.config.dir/host_xml_history.
The rest of this section will only discuss the history for
standalone.xml. The concepts are exactly the same for domain.xml and
host.xml.
Within standalone_xml_history itself following a successful first time
boot we end up with three new files:
-
standalone.initial.xml- This contains the original configuration that was used the first time we successfully booted. This file will never be overwritten. You may of course delete the history directory and any files in it at any stage. -
standalone.boot.xml- This contains the original configuration that was used for the last successful boot of the server. This gets overwritten every time we boot the server successfully. -
standalone.last.xml- At this stage the contents will be identical tostandalone.boot.xml. This file gets overwritten each time the server successfully writes the configuration, if there was an unexpected failure writing the configuration this file is the last known successful write.
standalone_xml_history contains a directory called current which
should be empty. Now if we execute a management operation that modifies
the model, for example adding a new system property using the CLI:
[standalone@localhost:9990 /] /system-property=test:add(value="test123")
{"outcome" => "success"}What happens is:
-
The original configuration file is backed up to
standalone_xml_history/current/standalone.v1.xml. The next change to the model would result in a file calledstandalone.v2.xmletc. The 100 most recent of these files are kept. -
The change is applied to the original configuration file
-
The changed original configuration file is copied to
standalone.last.xml
When restarting the server, any existing
standalone_xml_history/current directory is moved to a new timestamped
folder within the standalone_xml_history, and a new current folder
is created. These timestamped folders are kept for 30 days.
11.6.1. Snapshots
In addition to the backups taken by the server as described above you
can manually take take snapshots which will be stored in the snapshot
folder under the _xml_history folder, the automatic backups described
above are subject to automatic house keeping so will eventually be
automatically removed, the snapshots on the other hand can be entirely
managed by the administrator.
You may also take your own snapshots using the CLI:
[standalone@localhost:9990 /] :take-snapshot
{
"outcome" => "success",
"result" => {"name" => "/Users/kabir/wildfly/standalone/configuration/standalone_xml_history/snapshot/20110630-172258657standalone.xml"}
}You can also use the CLI to list all the snapshots
[standalone@localhost:9990 /] :list-snapshots
{
"outcome" => "success",
"result" => {
"directory" => "/Users/kabir/wildfly/standalone/configuration/standalone_xml_history/snapshot",
"names" => [
"20110630-165714239standalone.xml",
"20110630-165821795standalone.xml",
"20110630-170113581standalone.xml",
"20110630-171411463standalone.xml",
"20110630-171908397standalone.xml",
"20110630-172258657standalone.xml"
]
}
}To delete a particular snapshot:
[standalone@localhost:9990 /] :delete-snapshot(name="20110630-165714239standalone.xml")
{"outcome" => "success"}and to delete all snapshots:
[standalone@localhost:9990 /] :delete-snapshot(name="all")
{"outcome" => "success"}In domain mode executing the snapshot operations against the root node will work against the domain model. To do this for a host model you need to navigate to the host in question:
[domain@localhost:9990 /] /host=master:list-snapshots
{
"outcome" => "success",
"result" => {
"domain-results" => {"step-1" => {
"directory" => "/Users/kabir/wildfly/domain/configuration/host_xml_history/snapshot",
"names" => [
"20110630-141129571host.xml",
"20110630-172522225host.xml"
]
}},
"server-operations" => undefined
}
}11.6.2. Subsequent Starts
For subsequent server starts it may be desirable to take the state of the server back to one of the previously known states, for a number of items an abbreviated reverence to the file can be used:
| Abreviation | Parameter | Description |
|---|---|---|
initial |
--server-config=initial |
This will start the server using the initial configuration first used to start the server. |
boot |
--server-config=boot |
This will use the configuration from the last successful boot of the server. |
last |
--server-config=last |
This will start the server using the configuration backed up from the last successful save. |
v? |
--server-config=v? |
This will server the _xml_history/current folder for the configuration where ? is the number of the backup to use. |
-? |
--server-config=-? |
The server will be started after searching the snapshot folder for the configuration which matches this prefix. |
In addition to this the --server-config parameter can always be used
to specify a configuration relative to the jboss.server.config.dir and
finally if no matching configuration is found an attempt to locate the
configuration as an absolute path will be made.
11.7. Git Configuration file history
To enhance the initial configuration file history we have now a native Git support to manage the configuration history. This feature goes a little farther than the initial configuration file history in that it also manages content repository content and all the configuration files (such as properties). This feature only work for standalone servers using the default directory layout.
As mentioned in Command line parameters we support the usage of a remote Git repository to pull the configuration from or create or use a local Git repository.
In fact if a .git directory exists under jboss.server.base.dir then using Git for managing configuration files will be automatically activated.
Each modification of the content or the configuration will result in a new commit when the operation is successful and there are changes to commit. If there is an authenticated user then it will be stored as the author of the commit.
Please note that this is a real Git repository so using a native Git client you can manipulate it.
Now if we execute a management operation that modifies the model, for example adding a new system property using the CLI:
[standalone@localhost:9990 /] /system-property=test:add(value="test123")
{"outcome" => "success"}What happens is:
-
The change is applied to the configuration file.
-
The configuration file is added to a new commit.
11.7.1. Local Git Repository
Starting the server with the option --git-repo=local will initiate a Git repository if none exists or use the current Git repository. When initiating the local Git repository a .gitignore file will be created and added to the initial commit.
If a --git-branch parameter is added then the repository will be checked out on the supplied branch. Please note that the branch will not be automatically created and must exist in the repository already. By default, if no parameter is specified, the branch master will be used.
11.7.2. Remote Git Repository
If a remote Git repository is provided then the server will try to pull from it at boot. If this is the first time we are pulling then local files will be deleted to avoid the pull to fail because of the need to overwrite those existing files.
The parameter for --git-repo can be a URL or a remote alias provided you have manually added it to the local git configuration.
If a --git-branch parameter is added then the branch will be pulled, otherwise it will default to master.
For example this is an elytron configuration file that you could use to connect to Github via the --git-auth parameter:
<?xml version="1.0" encoding="UTF-8"?>
<configuration>
<authentication-client xmlns="urn:elytron:1.0">
<authentication-rules>
<rule use-configuration="test-login">
</rule>
</authentication-rules>
<authentication-configurations>
<configuration name="test-login">
<sasl-mechanism-selector selector="BASIC" />
<set-user-name name="ehsavoie" />
<credentials>
<clear-password password="my_api_key" />
</credentials>
<set-mechanism-realm name="testRealm" />
</configuration>
</authentication-configurations>
</authentication-client>
</configuration>Sample command line to start the server using the standalone-full.xml file pulled from Github and being authenticated via the Elytron configuration file github-wildfly-config.xml:
./standalone.sh --git-repo=https://github.com/wildfly/wildfly-config.git --git-auth=file:///home/ehsavoie/tmp/github-wildfly-config.xml -c standalone-full.xml11.7.3. Snapshots
In addition to the commits taken by the server as described above you
can manually take snapshots which will be stored as tags in the Git repository.
You can choose the tag name and the commit message attached to this tag.
You may also take your own snapshots using the CLI:
[standalone@localhost:9990 /] :take-snapshot(name="snapshot", comment="1st snapshot")
{
"outcome" => "success",
"result" => "1st snapshot"
}You can also use the CLI to list all the snapshots
[standalone@localhost:9990 /] :list-snapshots
{
"outcome" => "success",
"result" => {
"directory" => "",
"names" => [
"snapshot : 1st snapshot",
"refs/tags/snapshot",
"snapshot2 : 2nd snapshot",
"refs/tags/snapshot2"
]
}
}To delete a particular snapshot:
[standalone@localhost:9990 /] :delete-snapshot(name="snapshot2")
{"outcome" => "success"}11.7.4. Remote push
You may need to push your repository changes to a remote repository so you can share them.
[standalone@localhost:9990 /] :publish-configuration(location="origin")
{"outcome" => "success"}12. Provisioning WildFly with Galleon
With the WildFly server being internally built using the Galleon project, WildFly benefits
from Galleon’s provisioning capabilities. One of the main features that Galleon brings to WildFly is the ability
to install a complete or customized WildFly server using Galleon tooling.
More information on Galleon features and tooling can be found in the Galleon docs.
12.1. WildFly Galleon feature-packs
WildFly provides a Galleon feature-pack maven artifact (a zipped file that contains installation content). This feature-pack, as well as the feature-packs on which its depends (core and servlet feature-packs), are deployed in public maven repositories.
When Galleon is used to install WildFly, WildFly feature-packs are retrieved and their content is assembled to create an installation.
12.2. Installing WildFly using Galleon
The Galleon maven plugin or Galleon CLI are used to install WildFly. The latest CLI and documentation can be downloaded from the Galleon releases page.
To install the latest final version of WildFly into the directory my-wildfly-server call:
galleon.sh install wildfly:current --dir=my-wildfly-serverOnce installed, the directory my-wildfly-server contains all that is expected to run a complete WildFly server. By default, all standalone and domain configurations are installed.
|
Append the release version to install an identified release, for example: Use wildfly-core:current to only install a core server, for example: galleon.sh install wildfly-core:current --dir=my-core-server Use wildfly-servlet:current to only install a servlet server, for example: galleon.sh install wildfly-servlet:current --dir=my-servlet-server |
12.3. Selecting the configurations to install
Galleon allows you to specify only a subset of the default configurations to be installed.
To only install the standalone.xml configuration call:
galleon.sh install wildfly:current --dir=my-wildfly-server --default-configs=standalone/standalone.xmlTo install multiple configurations, a comma separated list of default configurations can be provided, for example:
galleon.sh install wildfly:current --dir=my-wildfly-server --default-configs=standalone/standalone.xml,domain/domain.xml|
A default configuration is identified by <configuration model>/<configuration name>. WildFly defines standalone and domain models. The configuration name is the XML configuration file name (e.g.: standalone.xml, domain.xml, standalone-ha.xml). |
12.4. WildFly Galleon layers
WildFly Galleon feature-packs expose some Galleon layers. A layer identifies one or more server capabilities that can be installed on its own or in combination with other layers. For example, if your application (e.g.: microservice) is only making use of jaxrs and cdi server capabilities, you can choose to only install the jaxrs and cdi layers. The standalone.xml configuration would then only contain the required subsystems and their dependencies.
The benefit to installing WildFly using Galleon layers, in addition to configuration trim down, is that Galleon only installs the needed content (JBoss Modules modules, scripts, etc.).
To install a server only configured with jaxrs and cdi capabilities call:
galleon.sh install wildfly:current --dir=my-wildfly-server --layers=cdi,jaxrsOnce installed, the directory my-wildfly-server contains all that is expected to deploy an application that depends on jaxrs and cdi.
|
12.4.1. Defined Galleon layers
Note on layers and feature-pack dependencies
When installing a feature-pack, its own defined layers as well as the layers present in its dependencies can be combined to build a custom configuration. This means that core and servlet defined layers can be combined with WildFly defined layers to assemble a custom configuration. Galleon CLI recipes contains examples of such combination of layers.
WildFly layers
Basic layers:
-
microprofile-fault-tolerance: Support for MicroProfile Fault Tolerance.
-
microprofile-jwt: Support for MicroProfile JWT.
-
microprofile-openapi: Support for MicroProfile OpenAPI.
WildFly EE layers
Basic layers:
-
bean-validation: Support for Jakarta Bean Validation. Optionally depends on cdi.
-
cdi: Support for CDI.
-
datasources: Support for datasources.
-
ee-security: Support for EE Security. Depends on cdi.
-
jaxrs: Support for JAXRS. Depends on web-server (defined in the WildFly servlet feature-pack).
-
jms-activemq: Support for connections to a remote JMS broker.
-
jpa: Support for JPA (using the latest WildFly supported Hibernate release).
-
microprofile-config: Support for MicroProfile Config.
-
microprofile-metrics: Support for MicroProfile Metrics.
-
microprofile-health: Support for MicroProfile Health.
-
open-tracing: Support for MicroProfile OpenTracing.
-
resource-adapters: Support for deployment of JCA adapters.
-
h2-driver: Support for the H2 JDBC driver.
-
h2-datasource: Support for an H2 datasource. Depends on h2-driver.
-
h2-default-datasource: Support for h2 datasource set as the ee subsystem default datasource. Depends on h2-datasource.
Aggregation layers:
-
cloud-profile, an aggregation of the basic layers (except h2-* layers) and a web-server .
Use-cases tailored server layers:
|
The following layers depend on core-server and core-tools (layers defined in WildFly core feature-pack). The security is handled by elytron. Undertow subsystem is configured with other application-security-domain that references Elytron ApplicationDomain security domain. |
-
datasources-web-server: A servlet container (web-server layer) with an optional dependency on datasources layer.
-
jaxrs-server: An extension of datasources-web-server layer with optional dependencies on jaxrs, cdi, bean-validation and jpa layers.
-
cloud-server: An extension of jaxrs-server with optional dependencies on ee-security, jms-activemq, observability and resource-adapters.
Decorator layers:
Layers that you combine with "use-case tailored" layers to extend the capabilities of the provisioned server.
-
web-clustering: Infinispan-based web session clustering.
-
observability: Support for MicroProfile monitoring and configuration features. Includes Health support (optional), microprofile-config (optional), microprofile-metrics (optional) and open-tracing (optional).
WildFly servlet layers
Basic layers:
-
ee: Support for common functionality in the Jakarta EE platform.
-
legacy-security: Support for legacy Picketbox-based web security.
-
naming: Support for JNDI.
-
undertow: Support for the Undertow HTTP server.
-
undertow-legacy-https: Support for the Undertow HTTPS server secured using the legacy security ApplicationRealm.
-
undertow-load-balancer: Support for Undertow configured as a load balancer.
-
vault: Support for Picketbox security vaults.
Servlet support layer:
-
web-server: A servlet container composed of ee, naming, deployment-scanner (from WildFly core feature-pack) and undertow configured as a servlet container.
WildFly core layers
Basic layers:
-
base-server: Empty runnable server.
-
core-management: Support for server management services.
-
core-security-realms: Support for core Application and Management realms.
-
deployment-scanner: Support for deployment directory scanning.
-
discovery: Support for discovery.
-
elytron: Support for Elytron security.
-
io: Support for XNIO workers and buffer pools.
-
jmx: Support for registration of Management Model MBeans.
-
jmx-remoting: Support for registration of Management Model MBeans and a JMX remoting connector.
-
logging: Support for the logging subsystem.
-
legacy-management: Support for remote access to management interfaces secured with the core ManagementRealm.
-
management: Support for remote access to management interfaces (unsecured).
-
remoting: Support for inbound and outbound JBoss Remoting connections.
-
request-controller: Support for request management.
-
secure-management: Support for remote access to management interfaces secured using Elytron.
-
security-management: Support for security manager.
Aggregation layers:
-
core-server: Aggregation of layers that compose a typical core server: core-security-realms, secure-management, jmx-remoting, logging, core-management, request-controller and security-manager.
Tools layers:
-
core-tools: Support for jboss-cli, add-user, elytron-tool launch scripts and configuration files.
12.4.2. Galleon CLI recipes
Installation of a cloud-profile with main core functionalities and management tools
galleon.sh install wildfly:current --dir=my-wildfly-server --layers=cloud-profile,core-server,core-toolsInstallation of a cloud-profile with support for https (using legacy core ApplicationRealm)
galleon.sh install wildfly:current --dir=my-wildfly-server --layers=cloud-profile,undertow-legacy-httpsInstallation of jaxrs, cdi, elytron and logging
galleon.sh install wildfly:current --dir=my-wildfly-server --layers=jaxrs,cdi,elytron,loggingInstallation of a servlet container with main core functionalities
galleon.sh install wildfly:current --dir=my-wildfly-server --layers=web-server,core-serverInstallation of a servlet container with support for https (using legacy core ApplicationRealm)
galleon.sh install wildfly:current --dir=my-wildfly-server --layers=web-server,undertow-legacy-httpsInstallation of an Undertow http server with logging
galleon.sh install wildfly:current --dir=my-wildfly-server --layers=undertow,loggingInstallation of an Undertow https server (using legacy core ApplicationRealm)
galleon.sh install wildfly:current --dir=my-wildfly-server --layers=undertow-legacy-httpsInstallation of a core server
galleon.sh install wildfly:current --dir=my-wildfly-server --layers=core-server13. Management API reference
This section is an in depth reference to the WildFly management API. Readers are encouraged to read the Management clients and Core management concepts sections for fundamental background information, as well as the Management tasks and Domain setup sections for key task oriented information. This section is meant as an in depth reference to delve into some of the key details.
13.1. Global operations
The WildFly management API includes a number of operations that apply to every resource.
13.1.1. The read-resource operation
Reads a management resource’s attribute values along with either basic or complete information about any child resources. Supports the following parameters, none of which are required:
-
recursive– (boolean, default isfalse) – whether to include complete information about child resources, recursively. -
recursive-depth– (int) – The depth to which information about child resources should be included ifrecursiveistrue. If not set, the depth will be unlimited; i.e. all descendant resources will be included. -
proxies– (boolean, default isfalse) – whether to include remote resources in a recursive query (i.e. host level resources from slave Host Controllers in a query of the Domain Controller; running server resources in a query of a host). -
include-runtime– (boolean, default isfalse) – whether to include runtime attributes (i.e. those whose value does not come from the persistent configuration) in the response. -
include-defaults– (boolean, default istrue) – whether to include in the result default values not set by users. Many attributes have a default value that will be used in the runtime if the users have not provided an explicit value. If this parameter isfalsethe value for such attributes in the result will beundefined. Iftruethe result will include the default value for such parameters.
13.1.2. The read-attribute operation
Reads the value of an individual attribute. Takes a single, required, parameter:
-
name– (string) – the name of the attribute to read. -
include-defaults– (boolean, default istrue) – whether to include in the result default values not set by users. Many attributes have a default value that will be used in the runtime if the users have not provided an explicit value. If this parameter isfalsethe value for such attributes in the result will beundefined. Iftruethe result will include the default value for such parameters.
13.1.3. The write-attribute operation
Writes the value of an individual attribute. Takes two required parameters:
-
name– (string) – the name of the attribute to write. -
value– (type depends on the attribute being written) – the new value.
13.1.4. The undefine-attribute operation
Sets the value of an individual attribute to the undefined value, if
such a value is allowed for the attribute. The operation will fail if
the undefined value is not allowed. Takes a single required parameter:
-
name– (string) – the name of the attribute to write.
13.1.5. The list-add operation
Adds an element to the value of a list attribute, adding the element to
the end of the list unless the optional attribute index is passed:
-
name– (string) – the name of the list attribute to add new value to. -
value– (type depends on the element being written) – the new element to be added to the attribute value. -
index– (int, optional) – index where in the list to add the new element. By default it isundefinedmeaning add at the end. Index is zero based.
This operation will fail if the specified attribute is not a list.
13.1.6. The list-remove operation
Removes an element from the value of a list attribute, either the
element at a specified index, or the first element whose value matches
a specified value:
-
name– (string) – the name of the list attribute to add new value to. -
value– (type depends on the element being written, optional) – the element to be removed. Optional and ignored ifindexis specified. -
index– (int, optional) – index in the list whose element should be removed. By default it isundefined, meaningvalueshould be specified.
This operation will fail if the specified attribute is not a list.
13.1.7. The list-get operation
Gets one element from a list attribute by its index
-
name– (string) – the name of the list attribute -
index– (int, required) – index of element to get from list
This operation will fail if the specified attribute is not a list.
13.1.8. The list-clear operation
Empties the list attribute. It is different from :undefine-attribute
as it results in attribute of type list with 0 elements, whereas
:undefine-attribute results in an undefined value for the attribute
-
name– (string) – the name of the list attribute
This operation will fail if the specified attribute is not a list.
13.1.9. The map-put operation
Adds an key/value pair entry to the value of a map attribute:
-
name– (string) – the name of the map attribute to add the new entry to. -
key– (string) – the key of the new entry to be added. -
value– (type depends on the entry being written) – the value of the new entry to be added to the attribute value.
This operation will fail if the specified attribute is not a map.
13.1.10. The map-remove operation
Removes an entry from the value of a map attribute:
-
name– (string) – the name of the map attribute to remove the new entry from. -
key– (string) – the key of the entry to be removed.
This operation will fail if the specified attribute is not a map.
13.1.11. The map-get operation
Gets the value of one entry from a map attribute
-
name– (string) – the name of the map attribute -
key– (string) – the key of the entry.
This operation will fail if the specified attribute is not a map.
13.1.12. The map-clear operation
Empties the map attribute. It is different from :undefine-attribute as
it results in attribute of type map with 0 entries, whereas
:undefine-attribute results in an undefined value for the attribute
-
name– (string) – the name of the map attribute
This operation will fail if the specified attribute is not a map.
13.1.13. The read-resource-description operation
Returns the description of a resource’s attributes, types of children
and, optionally, operations. Supports the
following parameters, none of which are required:
-
recursive– (boolean, default isfalse) – whether to include information about child resources, recursively. -
proxies– (boolean, default isfalse) – whether to include remote resources in a recursive query (i.e. host level resources from slave Host Controllers in a query of the Domain Controller; running server resources in a query of a host) -
operations– (boolean, default isfalse) – whether to include descriptions of the resource’s operations -
inherited– (boolean, default istrue) – ifoperationsistrue, whether to include descriptions of operations inherited from higher level resources. The global operations described in this section are themselves inherited from the root resource, so the primary effect of settinginheritedtofalseis to exclude the descriptions of the global operations from the output.
See Description of the Management Model for details on the result of this operation.
13.1.14. The read-operation-names operation
Returns a list of the names of all the operations the resource supports. Takes no parameters.
13.1.15. The read-operation-description operation
Returns the description of an operation, along with details of its parameter types and its return value. Takes a single, required, parameter:
-
name– (string) – the name of the operation
See Description of the Management Model for details on the result of this operation.
13.1.16. The read-children-types operation
Returns a list of the types of child resources the resource supports. Takes two optional parameters:
-
include-aliases– (boolean, default isfalse) – whether to include alias children (i.e. those which are aliases of other sub-resources) in the response. -
include-singletons– (boolean, default isfalse) – whether to include singleton children (i.e. those are children that acts as resource aggregate and are registered with a wildcard name) in the response wildfly-dev discussion around this topic.
13.1.17. The read-children-names operation
Returns a list of the names of all child resources of a given type. Takes a single, required, parameter:
-
child-type– (string) – the name of the type
13.1.18. The read-children-resources operation
Returns information about all of a resource’s children that are of a
given type.
For each child resource, the returned information is equivalent to
executing the read-resource operation on that resource. Takes the
following parameters, of which only \{{child-type} is required:
-
child-type– (string) – the name of the type of child resource -
recursive– (boolean, default isfalse) – whether to include complete information about child resources, recursively. -
recursive-depth– (int) – The depth to which information about child resources should be included ifrecursiveis \{{true}. If not set, the depth will be unlimited; i.e. all descendant resources will be included. -
proxies– (boolean, default isfalse) – whether to include remote resources in a recursive query (i.e. host level resources from slave Host Controllers in a query of the Domain Controller; running server resources in a query of a host) -
include-runtime– (boolean, default isfalse) – whether to include runtime attributes (i.e. those whose value does not come from the persistent configuration) in the response. -
include-defaults– (boolean, default istrue) – whether to include in the result default values not set by users. Many attributes have a default value that will be used in the runtime if the users have not provided an explicit value. If this parameter isfalsethe value for such attributes in the result will beundefined. Iftruethe result will include the default value for such parameters.
13.1.19. The read-attribute-group operation
Returns a list of attributes of a
type for a given attribute group name. For each attribute the returned
information is equivalent to executing the read-attribute operation of
that resource. Takes the following parameters, of which only \{{name}
is required:
-
name– (string) – the name of the attribute group to read. -
include-defaults– (boolean, default istrue) – whether to include in the result default values not set by users. Many attributes have a default value that will be used in the runtime if the users have not provided an explicit value. If this parameter isfalsethe value for such attributes in the result will beundefined. Iftruethe result will include the default value for such parameters. -
include-runtime– (boolean, default isfalse) – whether to include runtime attributes (i.e. those whose value does not come from the persistent configuration) in the response. -
include-aliases– (boolean, default isfalse) – whether to include alias attributes (i.e. those which are alias of other attributes) in the response.
13.1.20. The read-attribute-group-names operation
Returns a list of attribute groups names for a given type. Takes no parameters.
13.1.21. Standard Operations
Besides the global operations described above, by convention nearly
every resource should expose an add operation and a remove
operation. Exceptions to this convention are the root resource, and
resources that do not store persistent configuration and are created
dynamically at runtime (e.g. resources representing the JVM’s platform
mbeans or resources representing aspects of the running state of a
deployment.)
The add operation
The operation that creates a new resource must be named add. The
operation may take zero or more parameters; what those parameters are
depends on the resource being created.
The remove operation
The operation that removes an existing resource must be named remove.
The operation should take no parameters.
13.2. Detyped management and the jboss-dmr library
The management model exposed by WildFly is very large and complex. There are dozens, probably hundreds of logical concepts involved – hosts, server groups, servers, subsystems, datasources, web connectors, and on and on – each of which in a classic objected oriented API design could be represented by a Java type (i.e. a Java class or interface.) However, a primary goal in the development of WildFly’s native management API was to ensure that clients built to use the API had as few compile-time and run-time dependencies on JBoss-provided classes as possible, and that the API exposed by those libraries be powerful but also simple and stable. A management client running with the management libraries created for an earlier version of WildFly should still work if used to manage a later version domain. The management client libraries needed to be forward compatible.
It is highly unlikely that an API that consists of hundreds of Java types could be kept forward compatible. Instead, the WildFly management API is a detyped API. A detyped API is like decaffeinated coffee – it still has a little bit of caffeine, but not enough to keep you awake at night. WildFly’s management API still has a few Java types in it (it’s impossible for a Java library to have no types!) but not enough to keep you (or us) up at night worrying that your management clients won’t be forward compatible.
A detyped API works by making it possible to build up arbitrarily
complex data structures using a small number of Java types. All of the
parameter values and return values in the API are expressed using those
few types. Ideally, most of the types are basic JDK types, like
java.lang.String, java.lang.Integer, etc. In addition to the basic
JDK types, WildFly’s detyped management API uses a small library called
jboss-dmr. The purpose of this section is to provide a basic overview
of the jboss-dmr library.
Even if you don’t use jboss-dmr directly (probably the case for all but
a few users), some of the information in this section may be useful.
When you invoke operations using the application server’s Command Line
Interface, the return values are just the text representation of of a
jboss-dmr ModelNode. If your CLI commands require complex parameter
values, you may yourself end up writing the text representation of a
ModelNode. And if you use the HTTP management API, all response bodies
as well as the request body for any POST will be a JSON representation
of a ModelNode.
The source code for jboss-dmr is available on
Github. The maven coordinates for
a jboss-dmr release are org.jboss.jboss-dmr:jboss-dmr.
13.2.1. ModelNode and ModelType
The public API exposed by jboss-dmr is very simple: just three classes, one of which is an enum!
The primary class is org.jboss.dmr.ModelNode. A ModelNode is
essentially just a wrapper around some value; the value is typically
some basic JDK type. A ModelNode exposes a getType() method. This
method returns a value of type org.jboss.dmr.ModelType, which is an
enum of all the valid types of values. And that’s 95% of the public API;
a class and an enum. (We’ll get to the third class, Property, below.)
Basic ModelNode manipulation
To illustrate how to work with ModelNode s, we’ll use the
Beanshell scripting library. We won’t get into
many details of beanshell here; it’s a simple and intuitive tool and
hopefully the following examples are as well.
We’ll start by launching a beanshell interpreter, with the jboss-dmr library available on the classpath. Then we’ll tell beanshell to import all the jboss-dmr classes so they are available for use:
$ java -cp bsh-2.0b4.jar:jboss-dmr-1.0.0.Final.jar bsh.Interpreter
BeanShell 2.0b4 - by Pat Niemeyer (pat@pat.net)
bsh % import org.jboss.dmr.*;
bsh %Next, create a ModelNode and use the beanshell print function to
output what type it is:
bsh % ModelNode node = new ModelNode();
bsh % print(node.getType());
UNDEFINEDA new ModelNode has no value stored, so its type is
ModelType.UNDEFINED.
Use one of the overloaded set method variants to assign a node’s
value:
bsh % node.set(1);
bsh % print(node.getType());
INT
bsh % node.set(true);
bsh % print(node.getType());
BOOLEAN
bsh % node.set("Hello, world");
bsh % print(node.getType());
STRINGUse one of the asXXX() methods to retrieve the value:
bsh % node.set(2);
bsh % print(node.asInt());
2
bsh % node.set("A string");
bsh % print(node.asString());
A stringModelNode will attempt to perform type conversions when you invoke the
asXXX methods:
bsh % node.set(1);
bsh % print(node.asString());
1
bsh % print(node.asBoolean());
true
bsh % node.set(0);
bsh % print(node.asBoolean());
false
bsh % node.set("true");
bsh % print(node.asBoolean());
trueNot all type conversions are possible:
bsh % node.set("A string");
bsh % print(node.asInt());
// Error: // Uncaught Exception: Method Invocation node.asInt : at Line: 20 : in file: <unknown file> : node .asInt ( )
Target exception: java.lang.NumberFormatException: For input string: "A string"
java.lang.NumberFormatException: For input string: "A string"
at java.lang.NumberFormatException.forInputString(NumberFormatException.java:48)
at java.lang.Integer.parseInt(Integer.java:449)
at java.lang.Integer.parseInt(Integer.java:499)
at org.jboss.dmr.StringModelValue.asInt(StringModelValue.java:61)
at org.jboss.dmr.ModelNode.asInt(ModelNode.java:117)
....The ModelNode.getType() method can be used to ensure a node has an
expected value type before attempting a type conversion.
One set variant takes another ModelNode as its argument. The value
of the passed in node is copied, so there is no shared state between the
two model nodes:
bsh % node.set("A string");
bsh % ModelNode another = new ModelNode();
bsh % another.set(node);
bsh % print(another.asString());
A string
bsh % node.set("changed");
bsh % print(node.asString());
changed
bsh % print(another.asString());
A stringA ModelNode can be cloned. Again, there is no shared state between the
original node and its clone:
bsh % ModelNode clone = another.clone();
bsh % print(clone.asString());
A string
bsh % another.set(42);
bsh % print(another.asString());
42
bsh % print(clone.asString());
A stringUse the protect() method to make a ModelNode immutable:
bsh % clone.protect();
bsh % clone.set("A different string");
// Error: // Uncaught Exception: Method Invocation clone.set : at Line: 15 : in file: <unknown file> : clone .set ( "A different string" )
Target exception: java.lang.UnsupportedOperationException
java.lang.UnsupportedOperationException
at org.jboss.dmr.ModelNode.checkProtect(ModelNode.java:1441)
at org.jboss.dmr.ModelNode.set(ModelNode.java:351)
....Lists
The above examples aren’t particularly interesting; if all we can do
with a ModelNode is wrap a simple Java primitive, what use is that?
However, a ModelNode’s value can be more complex than a simple
primitive, and using these more complex types we can build complex data
structures. The first more complex type is `ModelType.LIST.
Use the add methods to initialize a node’s value as a list and add to
the list:
bsh % ModelNode list = new ModelNode();
bsh % list.add(5);
bsh % list.add(10);
bsh % print(list.getType());
LISTUse asInt() to find the size of the list:
bsh % print(list.asInt());
2Use the overloaded get method variant that takes an int param to
retrieve an item. The item is returned as a ModelNode:
bsh % ModelNode child = list.get(1);
bsh % print(child.asInt());
10Elements in a list need not all be of the same type:
bsh % list.add("A string");
bsh % print(list.get(1).getType());
INT
bsh % print(list.get(2).getType());
STRINGHere’s one of the trickiest things about jboss-dmr: The get
methods actually mutate state; they are not "read-only". For example,
calling get with an index that does not exist yet in the list will
actually create a child of type ModelType.UNDEFINED at that index (and
will create UNDEFINED children for any intervening indices.)
bsh % ModelNode four = list.get(4);
bsh % print(four.getType());
UNDEFINED
bsh % print(list.asInt());
6Since the get call always returns a ModelNode and never null it is
safe to manipulate the return value:
bsh % list.get(5).set(30);
bsh % print(list.get(5).asInt());
30That’s not so interesting in the above example, but later on with node
of type ModelType.OBJECT we’ll see how that kind of method chaining
can let you build up fairly complex data structures with a minimum of
code.
Use the asList() method to get a List<ModelNode> of the children:
bsh % for (ModelNode element : list.asList()) {
print(element.getType());
}
INT
INT
STRING
UNDEFINED
UNDEFINED
INTThe asString() and toString() methods provide slightly differently
formatted text representations of a ModelType.LIST node:
bsh % print(list.asString());
[5,10,"A string",undefined,undefined,30]
bsh % print(list.toString());
[
5,
10,
"A string",
undefined,
undefined,
30
]Finally, if you’ve previously used set to assign a node’s value to
some non-list type, you cannot use the add method:
bsh % node.add(5);
// Error: // Uncaught Exception: Method Invocation node.add : at Line: 18 : in file: <unknown file> : node .add ( 5 )
Target exception: java.lang.IllegalArgumentException
java.lang.IllegalArgumentException
at org.jboss.dmr.ModelValue.addChild(ModelValue.java:120)
at org.jboss.dmr.ModelNode.add(ModelNode.java:1007)
at org.jboss.dmr.ModelNode.add(ModelNode.java:761)
...You can, however, use the setEmptyList() method to change the node’s
type, and then use add:
bsh % node.setEmptyList();
bsh % node.add(5);
bsh % print(node.toString());
[5]Properties
The third public class in the jboss-dmr library is
org.jboss.dmr.Property. A Property is a String ⇒ ModelNode tuple.
bsh % Property prop = new Property("stuff", list);
bsh % print(prop.toString());
org.jboss.dmr.Property@79a5f739
bsh % print(prop.getName());
stuff
bsh % print(prop.getValue());
[
5,
10,
"A string",
undefined,
undefined,
30
]The property can be passed to ModelNode.set:
bsh % node.set(prop);
bsh % print(node.getType());
PROPERTYThe text format for a node of ModelType.PROPERTY is:
bsh % print(node.toString());
("stuff" => [
5,
10,
"A string",
undefined,
undefined,
30
])Directly instantiating a Property via its constructor is not common.
More typically one of the two argument ModelNode.add or
ModelNode.set variants is used. The first argument is the property
name:
bsh % ModelNode simpleProp = new ModelNode();
bsh % simpleProp.set("enabled", true);
bsh % print(simpleProp.toString());
("enabled" => true)
bsh % print(simpleProp.getType());
PROPERTY
bsh % ModelNode propList = new ModelNode();
bsh % propList.add("min", 1);
bsh % propList.add("max", 10);
bsh % print(propList.toString());
[
("min" => 1),
("max" => 10)
]
bsh % print(propList.getType());
LIST
bsh % print(propList.get(0).getType());
PROPERTYThe asPropertyList() method provides easy access to a
List<Property>:
bsh % for (Property prop : propList.asPropertyList()) {
print(prop.getName() + " = " + prop.getValue());
}
min = 1
max = 10ModelType.OBJECT
The most powerful and most commonly used complex value type in jboss-dmr
is ModelType.OBJECT. A ModelNode whose value is ModelType.OBJECT
internally maintains a Map<String, ModelNode.
Use the get method variant that takes a string argument to add an
entry to the map. If no entry exists under the given name, a new entry
is added with a the value being a ModelType.UNDEFINED node. The node
is returned:
bsh % ModelNode range = new ModelNode();
bsh % ModelNode min = range.get("min");
bsh % print(range.toString());
{"min" => undefined}
bsh % min.set(2);
bsh % print(range.toString());
{"min" => 2}Again it is important to remember that the get operation may mutate
the state of a model node by adding a new entry. It is not a read-only
operation.
Since get will never return null, a common pattern is to use method
chaining to create the key/value pair:
bsh % range.get("max").set(10);
bsh % print(range.toString());
{
"min" => 2,
"max" => 10
}A call to get passing an already existing key will of course return
the same model node as was returned the first time get was called with
that key:
bsh % print(min == range.get("min"));
trueMultiple parameters can be passed to get. This is a simple way to
traverse a tree made up of ModelType.OBJECT nodes. Again, get may
mutate the node on which it is invoked; e.g. it will actually create the
tree if nodes do not exist. This next example uses a workaround to get
beanshell to handle the overloaded get method that takes a variable
number of arguments:
bsh % String[] varargs = { "US", "Missouri", "St. Louis" };
bsh % salesTerritories.get(varargs).set("Brian");
bsh % print(salesTerritories.toString());
{"US" => {"Missouri" => {"St. Louis" => "Brian"}}}The normal syntax would be:
salesTerritories.get("US", "Missouri", "St. Louis").set("Brian");
The key/value pairs in the map can be accessed as a List<Property:
bsh % for (Property prop : range.asPropertyList()) {
print(prop.getName() + " = " + prop.getValue());
}
min = 2The semantics of the backing map in a node of ModelType.OBJECT are
those of a LinkedHashMap. The map remembers the order in which
key/value pairs are added. This is relevant when iterating over the
pairs after calling asPropertyList() and for controlling the order in
which key/value pairs appear in the output from toString().
Since the get method will actually mutate the state of a node if the
given key does not exist, ModelNode provides a couple methods to let
you check whether the entry is there. The has method simply does that:
bsh % print(range.has("unit"));
false
bsh % print(range.has("min"));
trueVery often, the need is to not only know whether the key/value pair
exists, but whether the value is defined (i.e. not
ModelType.UNDEFINED. This kind of check is analogous to checking
whether a field in a Java class has a null value. The hasDefined lets
you do this:
bsh % print(range.hasDefined("unit"));
false
bsh % // Establish an undefined child 'unit';
bsh % range.get("unit");
bsh % print(range.toString());
{
"min" => 2,
"max" => 10,
"unit" => undefined
}
bsh % print(range.hasDefined("unit"));
false
bsh % range.get("unit").set("meters");
bsh % print(range.hasDefined("unit"));
trueModelType.EXPRESSION
A value of type ModelType.EXPRESSION is stored as a string, but can
later be resolved to different value. The string has a special syntax
that should be familiar to those who have used the system property
substitution feature in previous JBoss AS releases.
[<prefix>][${<system-property-name>[:<default-value>]}][<suffix>]*For example:
${queue.length}
http://${host}
http://${host:localhost}:${port:8080}/index.html
Use the setExpression method to set a node’s value to type expression:
bsh % ModelNode expression = new ModelNode();
bsh % expression.setExpression("${queue.length}");
bsh % print(expression.getType());
EXPRESSIONCalling asString() returns the same string that was input:
bsh % print(expression.asString());
${queue.length}However, calling toString() tells you that this node’s value is not of
ModelType.STRING:
bsh % print(expression.toString());
expression "${queue.length}"When the resolve operation is called, the string is parsed and any
embedded system properties are resolved against the JVM’s current system
property values. A new ModelNode is returned whose value is the
resolved string:
bsh % System.setProperty("queue.length", "10");
bsh % ModelNode resolved = expression.resolve();
bsh % print(resolved.asInt());
10Note that the type of the ModelNode returned by resolve() is
ModelType.STRING:
bsh % print(resolved.getType());
STRINGThe resolved.asInt() call in the previous example only worked because
the string "10" happens to be convertible into the int 10.
Calling resolve() has no effect on the value of the node on which the
method is invoked:
bsh % resolved = expression.resolve();
bsh % print(resolved.toString());
"10"
bsh % print(expression.toString());
expression "${queue.length}"If an expression cannot be resolved, resolve just uses the original
string. The string can include more than one system property
substitution:
bsh % expression.setExpression("http://${host}:${port}/index.html");
bsh % resolved = expression.resolve();
bsh % print(resolved.asString());
http://${host}:${port}/index.htmlThe expression can optionally include a default value, separated from the name of the system property by a colon:
bsh % expression.setExpression("http://${host:localhost}:${port:8080}/index.html");
bsh % resolved = expression.resolve();
bsh % print(resolved.asString());
http://localhost:8080/index.htmlActually including a system property substitution in the expression is not required:
bsh % expression.setExpression("no system property");
bsh % resolved = expression.resolve();
bsh % print(resolved.asString());
no system property
bsh % print(expression.toString());
expression "no system property"The resolve method works on nodes of other types as well; it returns a
copy without attempting any real resolution:
bsh % ModelNode basic = new ModelNode();
bsh % basic.set(10);
bsh % resolved = basic.resolve();
bsh % print(resolved.getType());
INT
bsh % resolved.set(5);
bsh % print(resolved.asInt());
5
bsh % print(basic.asInt());
10ModelType.TYPE
You can also pass one of the values of the ModelType enum to set:
bsh % ModelNode type = new ModelNode();
bsh % type.set(ModelType.LIST);
bsh % print(type.getType());
TYPE
bsh % print(type.toString());
LISTThis is useful when using a ModelNode data structure to describe
another ModelNode data structure.
Full list of ModelNode types
BIG_DECIMAL
BIG_INTEGER
BOOLEAN
BYTES
DOUBLE
EXPRESSION
INT
LIST
LONG
OBJECT
PROPERTY
STRING
TYPE
UNDEFINED
Text representation of a ModelNode
TODO – document the grammar
JSON representation of a ModelNode
TODO – document the grammar
13.3. Description of the Management Model
A detailed description of the resources, attributes and operations that
make up the management model provided by an individual WildFly instance
or by any Domain Controller or slave Host Controller process can be
queried using the read-resource-description, read-operation-names,
read-operation-description and read-child-types operations described
in the Global operations section. In this
section we provide details on what’s included in those descriptions.
13.3.1. Description of the WildFly Managed Resources
All portions of the management model exposed by WildFly are addressable via an ordered list of key/value pairs. For each addressable Management Resource, the following descriptive information will be available:
-
description– String – text description of this portion of the model -
min-occurs– int, either 0 or 1 – Minimum number of resources of this type that must exist in a valid model. If not present, the default value is 0. -
max-occurs– int – Maximum number of resources of this type that may exist in a valid model. If not present, the default value depends upon the value of the final key/value pair in the address of the described resource. If this value is '*', the default value is Integer.MAX_VALUE, i.e. there is no limit. If this value is some other string, the default value is 1. -
attributes– Map of String (the attribute name) to complex structure – the configuration attributes available in this portion of the model. See the Description of an Attribute section for the representation of each attribute. -
operations– Map of String (the operation name) to complex structure – the operations that can be targeted at this address. See the Description of an Operation section for the representation of each operation. -
children– Map of String (the type of child) to complex structure – the relationship of this portion of the model to other addressable portions of the model. See the Description of Parent/Child Relationships section for the representation of each child relationship. -
head-comment-allowed– boolean – This description key is for possible future use. -
tail-comment-allowed– boolean – This description key is for possible future use.
For example:
{
"description => "A manageable resource",
"tail-comment-allowed" => false,
"attributes" => {
"foo" => {
.... details of attribute foo
}
},
"operations" => {
"start" => {
.... details of the start operation
}
},
"children" => {
"bar" => {
.... details of the relationship with children of type "bar"
}
}
}Description of an Attribute
An attribute is a portion of the management model that is not directly addressable. Instead, it is conceptually a property of an addressable management resource. For each attribute in the model, the following descriptive information will be available:
-
description– String – text description of the attribute -
type–org.jboss.dmr.ModelType– the type of the attribute value. One of the enum values BIG_DECIMAL, BIG_INTEGER, BOOLEAN, BYTES, DOUBLE, INT, LIST, LONG, OBJECT, PROPERTY, STRING. Most of these are self-explanatory. An OBJECT will be represented in the detyped model as a map of string keys to values of some other legal type, conceptually similar to ajavax.management.openmbean.CompositeData. A PROPERTY is a single key/value pair, where the key is a string, and the value is of some other legal type. -
value-type– ModelType or complex structure – Only present if type is LIST or OBJECT. If all elements in the LIST or all the values of the OBJECT type are of the same type, this will be one of the ModelType enums BIG_DECIMAL, BIG_INTEGER, BOOLEAN, BYTES, DOUBLE, INT, LONG, STRING. Otherwise,value-typewill detail the structure of the attribute value, enumerating the value’s fields and the type of their value. So, an attribute with atypeof LIST and avalue-typevalue ofModelType.STRINGis analogous to a JavaList<String>, while one with avalue-typevalue ofModelType.INTis analogous to a JavaList<Integer>. An attribute with atypeof OBJECT and avalue-typevalue ofModelType.STRINGis analogous to a JavaMap<String, String>. An attribute with atypeof OBJECT and avalue-typewhose value is not of typeModelTyperepresents a fully-defined complex object, with the object’s legal fields and their values described. -
expressions-allowed– boolean – indicates whether the value of the attribute may be of typeModelType.EXPRESSION, instead of its standard type (seetypeandvalue-typeabove for discussion of an attribute’s standard type.) A value of ModelType.EXPRESSION contains a system-property substitution expression that the server will resolve against the server-side system property map before using the value. For example, an attribute named max-threads may have an expression value of${example.pool.max-threads:10} instead of just 10. Default value if not present is false. -
required– boolean – true if the attribute must have a defined value in a representation of its portion of the model unless another attribute included in a list ofalternativesis defined; false if it may be undefined (implying a null value) even in the absence of alternatives. If not present, true is the default. -
nillable– boolean – true if the attribute might not have a defined value in a representation of its portion of the model. A nillable attribute may
be undefined either because it is notrequiredor because it is required but hasalternativesand one of the alternatives is defined. -
storage– String – Either "configuration" or "runtime". If "configuration", the attribute’s value is stored as part of the persistent configuration (e.g. in domain.xml, host.xml or standalone.xml.) If "runtime" the attribute’s value is not stored in the persistent configuration; the value only exists as long as the resource is running. -
access-type– String – One of "read-only", "read-write" or "metric". Whether an attribute value can be written, or can only read. A "metric" is a read-only attribute whose value is not stored in the persistent configuration, and whose value may change due to activity on the server. If an attribute is "read-write", the resource will expose an operation named "write-attribute" whose "name" parameter will accept this attribute’s name and whose "value" parameter will accept a valid value for this attribute. That operation will be the standard means of updating this attribute’s value. -
restart-required– String – One of "no-services", "all-services", "resource-services" or "jvm". Only relevant to attributes whose access-type is read-write. Indicates whether execution of a write-attribute operation whose name parameter specifies this attribute requires a restart of services (or an entire JVM) in order for the change to take effect in the runtime . See the discussion of Applying Updates to Runtime Services below. Default value is "no-services". -
default– the default value for the attribute that will be used in runtime services if the attribute is not explicitly defined and no other attributes listed asalternativesare defined. -
alternatives– List of string – Indicates an exclusive relationship between attributes. If this attribute is defined, the other attributes listed in this descriptor’s value should be undefined, even if theirrequireddescriptor says true; i.e. the presence of this attribute satisfies the requirement. Note that an attribute that is not explicitly configured but has adefaultvalue is still regarded as not being defined for purposes of checking whether the exclusive relationship has been violated. Default is undefined; i.e. this does not apply to most attributes. -
requires– List of string – Indicates that if this attribute has a value (other than undefined), the other attributes listed in this descriptor’s value must also have a value, even if their required descriptor says false. This would typically be used in conjunction with alternatives. For example, attributes "a" and "b" are required, but are alternatives to each other; "c" and "d" are optional. But "b" requires "c" and "d", so if "b" is used, "c" and "d" must also be defined. Default is undefined; i.e. this does not apply to most attributes. -
capability-reference– string – if defined indicates that this attribute’s value specifies the dynamic portion of the name of the specified capability provided by another resource. This indicates the attribute is a reference to another area of the management model. (Note that at present some attributes that reference other areas of the model may not provide this information.) -
head-comment-allowed– boolean – This description key is for possible future use. -
tail-comment-allowed– boolean – This description key is for possible future use. -
arbitrary key/value pairs that further describe the attribute value, e.g. "max" ⇒ 2. See the Arbitrary Descriptors section.
Some examples:
"foo" => {
"description" => "The foo",
"type" => INT,
"max" => 2
}"bar" => {
"description" => "The bar",
"type" => OBJECT,
"value-type" => {
"size" => INT,
"color" => STRING
}
}Description of an Operation
A management resource may have operations associated with it. The description of an operation will include the following information:
-
operation-name– String – the name of the operation -
description– String – text description of the operation -
request-properties– Map of String to complex structure – description of the parameters of the operation. Keys are the names of the parameters, values are descriptions of the parameter value types. See below for details on the description of parameter value types. -
reply-properties– complex structure, or empty – description of the return value of the operation, with an empty node meaning void. See below for details on the description of operation return value types. -
restart-required– String – One of "no-services", "all-services", "resource-services" or "jvm". Indicates whether the operation makes a configuration change that requires a restart of services (or an entire JVM) in order for the change to take effect in the runtime. See the discussion of Applying Updates to Runtime Services below. Default value is "no-services".
Description of an Operation Parameter or Return Value
-
description– String – text description of the parameter or return value -
type–org.jboss.dmr.ModelType– the type of the parameter or return value. One of the enum values BIG_DECIMAL, BIG_INTEGER, BOOLEAN, BYTES, DOUBLE, INT, LIST, LONG, OBJECT, PROPERTY, STRING. -
value-type–ModelTypeor complex structure – Only present if type is LIST or OBJECT. If all elements in the LIST or all the values of the OBJECT type are of the same type, this will be one of the ModelType enums BIG_DECIMAL, BIG_INTEGER, BOOLEAN, BYTES, DOUBLE, INT, LIST, LONG, PROPERTY, STRING. Otherwise, value-type will detail the structure of the attribute value, enumerating the value’s fields and the type of their value.So, a parameter with atypeof LIST and avalue-typevalue ofModelType.STRINGis analogous to a JavaList<String>, while one with avalue-typevalue ofModelType.INTis analogous to a JavaList<Integer>. A parameter with atypeof OBJECT and avalue-typevalue ofModelType.STRINGis analogous to a JavaMap<String, String>. A parameter with atypeof OBJECT and avalue-typewhose value is not of typeModelTyperepresents a fully-defined complex object, with the object’s legal fields and their values described. -
expressions-allowed– boolean – indicates whether the value of the the parameter or return value may be of typeModelType.EXPRESSION, instead its standard type (see type and value-type above for discussion of the standard type.) A value of ModelType.EXPRESSION contains a system-property substitution expression that the server will resolve against the server-side system property map before using the value. For example, a parameter named max-threads may have an expression value of${example.pool.max-threads:10} instead of just 10. Default value if not present is false. -
required– boolean – true if the parameter or return value must have a defined value in the operation or response unless another item included in a list ofalternativesis defined; false if it may be undefined (implying a null value) even in the absence of alternatives. If not present, true is the default. -
nillable– boolean – true if the parameter or return value might not have a defined value in a representation of its portion of the model. A nillable parameter or return value may be undefined either because it is notrequiredor because it is required but hasalternativesand one of the alternatives is defined. -
default– the default value for the parameter that will be used in runtime services if the parameter is not explicitly defined and no other parameters listed asalternativesare defined. -
restart-required– String – One of "no-services", "all-services", "resource-services" or "jvm". Only relevant to attributes whose access-type is read-write. Indicates whether execution of a write-attribute operation whose name parameter specifies this attribute requires a restart of services (or an entire JVM) in order for the change to take effect in the runtime . See the discussion of Applying Updates to Runtime Services below. Default value is "no-services". -
alternatives– List of string – Indicates an exclusive relationship between parameters. If this attribute is defined, the other parameters listed in this descriptor’s value should be undefined, even if their required descriptor says true; i.e. the presence of this parameter satisfies the requirement. Note that an parameer that is not explicitly configured but has adefaultvalue is still regarded as not being defined for purposes of checking whether the exclusive relationship has been violated. Default is undefined; i.e. this does not apply to most parameters. -
requires– List of string – Indicates that if this parameter has a value (other than undefined), the other parameters listed in this descriptor’s value must also have a value, even if their required descriptor says false. This would typically be used in conjunction with alternatives. For example, parameters "a" and "b" are required, but are alternatives to each other; "c" and "d" are optional. But "b" requires "c" and "d", so if "b" is used, "c" and "d" must also be defined. Default is undefined; i.e. this does not apply to most parameters. -
arbitrary key/value pairs that further describe the attribute value, e.g. "max" ⇒2. See the Arbitrary Descriptors section.
Arbitrary Descriptors
The description of an attribute, operation parameter or operation return value type can include arbitrary key/value pairs that provide extra information. Whether a particular key/value pair is present depends on the context, e.g. a pair with key "max" would probably only occur as part of the description of some numeric type.
Following are standard keys and their expected value type. If descriptor authors want to add an arbitrary key/value pair to some descriptor and the semantic matches the meaning of one of the following items, the standard key/value type must be used.
-
min– int – the minimum value of some numeric type. The absence of this item implies there is no minimum value. -
max– int – the maximum value of some numeric type. The absence of this item implies there is no maximum value. -
min-length– int – the minimum length of some string, list or byte[] type. The absence of this item implies a minimum length of zero. -
max-length– int – the maximum length of some string, list or byte[]. The absence of this item implies there is no maximum value. -
allowed– List – a list of legal values. The type of the elements in the list should match the type of the attribute. -
unit- The unit of the value, if one is applicable - e.g. ns, ms, s, m, h, KB, MB, TB. See theorg.jboss.as.controller.client.helpers.MeasurementUnitin the org.jboss.as:jboss-as-controller-client artifact for a listing of legal measurement units.. -
filesystem-path– boolean – a flag to indicate that the attribute is a path on the filesystem. -
attached-streams– boolean – a flag to indicate that the attribute is a stream id to an attached stream. -
relative-to– boolean – a flag to indicate that the attribute is a relative path. -
feature-reference– boolean – a flag to indicate that the attribute is a reference to a provisioning feature via a capability.
Some examples:
{
"operation-name" => "incrementFoo",
"description" => "Increase the value of the 'foo' attribute by the given amount",
"request-properties" => {
"increment" => {
"type" => INT,
"description" => "The amount to increment",
"required" => true
}},
"reply-properties" => {
"type" => INT,
"description" => "The new value",
}
}{
"operation-name" => "start",
"description" => "Starts the thing",
"request-properties" => {},
"reply-properties" => {}
}Description of Parent/Child Relationships
The address used to target an addressable portion of the model must be an ordered list of key value pairs. The effect of this requirement is the addressable portions of the model naturally form a tree structure, with parent nodes in the tree defining what the valid keys are and the children defining what the valid values are. The parent node also defines the cardinality of the relationship. The description of the parent node includes a children element that describes these relationships:
{
....
"children" => {
"connector" => {
.... description of the relationship with children of type "connector"
},
"virtual-host" => {
.... description of the relationship with children of type "virtual-host"
}
}The description of each relationship will include the following elements:
-
description– String – text description of the relationship -
model-description– either "undefined" or a complex structure – This is a node of ModelType.OBJECT, the keys of which are legal values for the value portion of the address of a resource of this type, with the special character '*' indicating the value portion can have an arbitrary value. The values in the node are the full description of the particular child resource (its text description, attributes, operations, children) as detailed above. Thismodel-descriptionmay also be "undefined", i.e. a null value, if the query that asked for the parent node’s description did not include the "recursive" param set to true.
Example with if the recursive flag was set to true:
{
"description" => "The connectors used to handle client connections",
"model-description" => {
"*" => {
"description" => "Handles client connections",
"min-occurs" => 1,
"attributes => {
... details of children as documented above
},
"operations" => {
.... details of operations as documented above
},
"children" => {
.... details of the children's children
}
}
}
}If the recursive flag was false:
{
"description" => "The connectors used to handle client connections",
"model-description" => undefined
}Applying Updates to Runtime Services
An attribute or operation description may include a restart-required
descriptor; this section is an explanation of the
meaning of that descriptor.
An operation that changes a management resource’s persistent
configuration usually can also also affect a runtime service associated
with the resource. For example, there is a runtime service associated
with any host.xml or standalone.xml <interface> element; other
services in the runtime depend on that service to provide the
InetAddress associated with the interface. In many cases, an update to
a resource’s persistent configuration can be immediately applied to the
associated runtime service. The runtime service’s state is updated to
reflect the new value(s).
However, in many cases the runtime service’s state cannot be updated without restarting the service. Restarting a service can have broad effects. A restart of a service A will trigger a restart of other services B, C and D that depend on A, triggering a restart of services that depend on B, C and D, etc. Those service restarts may very well disrupt handling of end-user requests.
Because restarting a service can be disruptive to end-user request
handling, the handlers for management operations will not restart any
service without some form of explicit instruction from the end user
indicating a service restart is desired. In a few cases, simply
executing the operation is an indication the user wants services to
restart (e.g. a /host=master/server-config=server-one:restart
operation in a managed domain, or a /:reload operation on a standalone
server.) For all other cases, if an operation (or attribute write)
cannot be performed without restarting a service, the metadata
describing the operation or attribute will include a restart-required
descriptor whose value indicates what is necessary
for the operation to affect the runtime:
-
no-services– Applying the operation to the runtime does not require the restart of any services. This value is the default if the restart-required descriptor is not present. -
all-services– The operation can only immediately update the persistent configuration; applying the operation to the runtime will require a subsequent restart of all services in the affected VM. Executing the operation will put the server into areload-requiredstate. Until a restart of all services is performed the response to this operation and to any subsequent operation will include a response header"process-state" ⇒ "reload-required". For a standalone server, a restart of all services can be accomplished by executing thereloadCLI command. For a server in a managed domain, restarting all services is done via a reload operation targeting the particular server (e.g./host=master/server=server-one:reload). -
jvm--The operation can only immediately update the persistent configuration; applying the operation to the runtime will require a full process restart (i.e. stop the JVM and launch a new JVM). Executing the operation will put the server into arestart-requiredstate. Until a restart is performed the response to this operation and to any subsequent operation will include a response header"process-state" ⇒ "restart-required". For a standalone server, a full process restart requires first stopping the server via OS-level operations (Ctrl-C, kill) or via theshutdownCLI command, and then starting the server again from the command line. For a server in a managed domain, restarting a server requires executing the/host=<host>/server-config=<server>:restartoperation. -
resource-services– The operation can only immediately update the persistent configuration; applying the operation to the runtime will require a subsequent restart of some services associated with the resource. If the operation includes the request header"allow-resource-service-restart" ⇒ true, the handler for the operation will go ahead and restart the runtime service. Otherwise executing the operation will put the server into areload-requiredstate. (See the discussion ofall-servicesabove for more on thereload-requiredstate.)
13.4. The HTTP management API
13.4.1. Introduction
The Management API in WildFly is accessible through multiple channels, one of them being HTTP and JSON.
Even if you haven’t used a curl command line you might already have used this channel since it is how the web console interact with the Management API.
WildFly is distributed secured by default, the default security mechanism is username / password based making use of HTTP Digest for the authentication process.
Thus you need to create a user with the add-user.sh script.
13.4.2. Interacting with the model
Since we must be authenticated , the client will have to support HTTP Digest authentication.
For example this can be activated in curl using the --digest option.
The WildFly HTTP Management API adheres to the REST principles so the GET operations must be idempotent.
This means that using a request with method GET can be used to read the model but you won’t be able to change it.
You must use POST to change the model or read it. A POST request may contain the operation either in DMR or in JSON format as its body.
You have to define the Content-Type=application/json header in the request to specify that you are using some JSON.
If you want to submit DMR in the request body then the Content-Type or the Accept header should be "application/dmr-encoded".
13.4.3. GET for Reading
While you can do everything with POST, some operations can be called through a 'classical' GET request.
These are the supported operations for a GET :
-
attribute : for a read-attribute operation
-
resource : for a read-resource operation
-
resource-description : for a read-resource-description operation
-
snapshots : for the list-snapshots operation
-
operation-description : for a read-operation-description operation
-
operation-names : for ad read-operation-names operation
The URL format is the following one : http://server:9990/management/ <path_to_resource>?operation=<operation_name>&operation_parameter=<value>…
path_to_resource is the path to the wanted resource replacing all '=' with '/' : thus for example subsystem=undertow/server=default-server becomes subsystem/undertow/server/default-server.
So to read the server-state :
http://localhost:9990/management?operation=attribute&name=server-state&json.pretty=1
13.4.4. Let’s read some resource
-
This is simple operation that is equivalent of running :read-attribute(name=server-state) with CLI in root directory
-
Using GET
http://localhost:9990/management?operation=attribute&name=server-state&json.pretty=1
-
Using POST
$ curl --digest -L -D - http://localhost:9990/management --header "Content-Type: application/json" -d '{"operation":"read-attribute","name":"server-state","json.pretty":1}' -u admin Enter host password for user 'admin': HTTP/1.1 401 Unauthorized Connection: keep-alive WWW-Authenticate: Digest realm="ManagementRealm",domain="/management",nonce="P80WU3BANtQNMTQwNjg5Mzc5MDQ2MlpjmRaZ+Vlp1OVeNEGBeXg=",opaque="00000000000000000000000000000000",algorithm=MD5 Content-Length: 77 Content-Type: text/html Date: Fri, 01 Aug 2014 11:49:50 GMT HTTP/1.1 200 OK Connection: keep-alive Authentication-Info: nextnonce="M+h9aADejeINMTQwNjg5Mzc5MDQ2OPQbHKdAS8pRE8BbGEDY5uI=" Content-Type: application/json; charset=utf-8 Content-Length: 55 Date: Fri, 01 Aug 2014 11:49:50 GMT { "outcome" : "success", "result" : "running" }
-
-
Here’s an example of an operation on a resource with a nested address and passed parameters. This is same as if you would run /host=master/server=server-01:read-attribute(name=server-state)
$ curl --digest -L -D - http://localhost:9990/management --header "Content-Type: application/json" -d '{"operation":"read-attribute","address":[{"host":"master"},{"server":"server-01"}],"name":"server-state","json.pretty":1}'
HTTP/1.1 200 OK
Transfer-encoding: chunked
Content-type: application/json
Date: Tue, 17 Apr 2012 04:02:24 GMT
{
"outcome" : "success",
"result" : "running"
}-
Following example will get us information from http connection in undertow subsystem including run-time attributes
This is the same as running /subsystem=undertow/server=default-server:read-resource(include-runtime=true,recursive=true) in CLI-
Using GET
http://localhost:9990/management/subsystem/undertow/server/default-server?operation=resource&recursive=true&json.pretty=1 { "default-host" : "default-host", "servlet-container" : "default", "ajp-listener" : null, "host" : {"default-host" : { "alias" : ["localhost"], "default-web-module" : "ROOT.war", "filter-ref" : { "server-header" : {"predicate" : null}, "x-powered-by-header" : {"predicate" : null} }, "location" : {"/" : { "handler" : "welcome-content", "filter-ref" : null }}, "setting" : null }}, "http-listener" : {"default" : { "allow-encoded-slash" : false, "allow-equals-in-cookie-value" : false, "always-set-keep-alive" : true, "buffer-pipelined-data" : true, "buffer-pool" : "default", "certificate-forwarding" : false, "decode-url" : true, "enabled" : true, "max-buffered-request-size" : 16384, "max-cookies" : 200, "max-header-size" : 51200, "max-headers" : 200, "max-parameters" : 1000, "max-post-size" : 10485760, "proxy-address-forwarding" : false, "read-timeout" : null, "receive-buffer" : null, "record-request-start-time" : false, "redirect-socket" : "https", "send-buffer" : null, "socket-binding" : "http", "tcp-backlog" : null, "tcp-keep-alive" : null, "url-charset" : "UTF-8", "worker" : "default", "write-timeout" : null }}, "https-listener" : null } -
Using POST
$ curl --digest -D - http://localhost:9990/management --header "Content-Type: application/json" -d '{"operation":"read-resource", "include-runtime":"true" , "recursive":"true", "address":["subsystem","undertow","server","default-server"], "json.pretty":1}' -u admin:admin HTTP/1.1 401 Unauthorized Connection: keep-alive WWW-Authenticate: Digest realm="ManagementRealm",domain="/management",nonce="a3paQ9E0/l8NMTQwNjg5OTU0NDk4OKjmim2lopZNc5zCevjYWpk=",opaque="00000000000000000000000000000000",algorithm=MD5 Content-Length: 77 Content-Type: text/html Date: Fri, 01 Aug 2014 13:25:44 GMT HTTP/1.1 200 OK Connection: keep-alive Authentication-Info: nextnonce="nTOSJd3ufO4NMTQwNjg5OTU0NDk5MeUsRw5rKXUT4Qvk1nbrG5c=" Content-Type: application/json; charset=utf-8 Content-Length: 1729 Date: Fri, 01 Aug 2014 13:25:45 GMT { "outcome" : "success", "result" : { "default-host" : "default-host", "servlet-container" : "default", "ajp-listener" : null, "host" : {"default-host" : { "alias" : ["localhost"], "default-web-module" : "ROOT.war", "filter-ref" : { "server-header" : {"predicate" : null}, "x-powered-by-header" : {"predicate" : null} }, "location" : {"/" : { "handler" : "welcome-content", "filter-ref" : null }}, "setting" : null }}, "http-listener" : {"default" : { "allow-encoded-slash" : false, "allow-equals-in-cookie-value" : false, "always-set-keep-alive" : true, "buffer-pipelined-data" : true, "buffer-pool" : "default", "certificate-forwarding" : false, "decode-url" : true, "enabled" : true, "max-buffered-request-size" : 16384, "max-cookies" : 200, "max-header-size" : 51200, "max-headers" : 200, "max-parameters" : 1000, "max-post-size" : 10485760, "proxy-address-forwarding" : false, "read-timeout" : null, "receive-buffer" : null, "record-request-start-time" : false, "redirect-socket" : "https", "send-buffer" : null, "socket-binding" : "http", "tcp-backlog" : null, "tcp-keep-alive" : null, "url-charset" : "UTF-8", "worker" : "default", "write-timeout" : null }}, "https-listener" : null } }
-
-
You may also used some encoded DMR but the result won’t be human readable
curl --digest -u admin:admin --header "Content-Type: application/dmr-encoded" -d bwAAAAMACW9wZXJhdGlvbnMADXJlYWQtcmVzb3VyY2UAB2FkZHJlc3NsAAAAAAAHcmVjdXJzZVoB http://localhost:9990/management -
You can deploy applications on the server
-
First upload the file which will create a managed content. You will have to use http://localhost:9990/management/add-content
curl --digest -u admin:admin --form file=@tiny-webapp.war http://localhost:9990/management/add-content {"outcome" : "success", "result" : { "BYTES_VALUE" : "+QJlHTDrogO9pm/57GkT/vxWNz0=" }} -
Now let’s deploy the application
curl --digest -u admin:admin -L --header "Content-Type: application/json" -d '{"content":[{"hash": {"BYTES_VALUE" : "+QJlHTDrogO9pm/57GkT/vxWNz0="}}], "address": [{"deployment":"tiny-webapp.war"}], "operation":"add", "enabled":"true"}' http://localhost:9990/management {"outcome" : "success"}
-
13.4.5. Using some JAX-RS code
HttpAuthenticationFeature feature = HttpAuthenticationFeature.digest("admin", "admin");
Client client = ClientBuilder.newClient();
client.register(feature);
Entity<SimpleOperation> operation = Entity.entity(
new SimpleOperation("read-resource", true, "subsystem", "undertow", "server", "default-server"),
MediaType.APPLICATION_JSON_TYPE);
WebTarget managementResource = client.target("http://localhost:9990/management");
String response = managementResource.request(MediaType.APPLICATION_JSON_TYPE)
.header("Content-type", MediaType.APPLICATION_JSON)
.post(operation, String.class);
System.out.println(response);
{"outcome" : "success", "result" : {"default-host" : "default-host", "servlet-container" : "default", "ajp-listener" : null, "host" : {"default-host" : {"alias" : ["localhost"], "default-web-module" : "ROOT.war", "filter-ref" : {"server-header" : {"predicate" : null}, "x-powered-by-header" : {"predicate" : null}}, "location" : {"/" : {"handler" : "welcome-content", "filter-ref" : null}}, "setting" : null}}, "http-listener" : {"default" : {"allow-encoded-slash" : false, "allow-equals-in-cookie-value" : false, "always-set-keep-alive" : true, "buffer-pipelined-data" : true, "buffer-pool" : "default", "certificate-forwarding" : false, "decode-url" : true, "enabled" : true, "max-buffered-request-size" : 16384, "max-cookies" : 200, "max-header-size" : 51200, "max-headers" : 200, "max-parameters" : 1000, "max-post-size" : 10485760, "proxy-address-forwarding" : false, "read-timeout" : null, "receive-buffer" : null, "record-request-start-time" : false, "redirect-socket" : "https", "send-buffer" : null, "socket-binding" : "http", "tcp-backlog" : null, "tcp-keep-alive" : null, "url-charset" : "UTF-8", "worker" : "default", "write-timeout" : null}}, "https-listener" : null}}13.5. The native management API
A standalone WildFly process, or a managed domain Domain Controller or slave Host Controller process can be configured to listen for remote management requests using its "native management interface":
<native-interface interface="management" port="9999" security-realm="ManagementRealm"/>~(See standalone/configuration/standalone.xml or domain/configuration/host.xml)~
The CLI tool that comes with the application server uses this interface, and user can develop custom clients that use it as well. In this section we’ll cover the basics on how to develop such a client. We’ll also cover details on the format of low-level management operation requests and responses – information that should prove useful for users of the CLI tool as well.
13.5.1. Native Management Client Dependencies
The native management interface uses an open protocol based on the JBoss Remoting library. JBoss Remoting is used to establish a communication channel from the client to the process being managed. Once the communication channel is established the primary traffic over the channel is management requests initiated by the client and asynchronous responses from the target process.
A custom Java-based client should have the maven artifact
org.jboss.as:jboss-as-controller-client and its dependencies on the
classpath. The other dependencies are:
| Maven Artifact | Purpose |
|---|---|
org.jboss.remoting:jboss-remoting |
Remote communication |
org.jboss:jboss-dmr |
Detyped representation of the management model |
org.jboss.as:jboss-as-protocol |
Wire protocol for remote WildFly management |
org.jboss.sasl:jboss-sasl |
SASL authentication |
org.jboss.xnio:xnio-api |
Non-blocking IO |
org.jboss.xnio:xnio-nio |
Non-blocking IO |
org.jboss.logging:jboss-logging |
Logging |
org.jboss.threads:jboss-threads |
Thread management |
org.jboss.marshalling:jboss-marshalling |
Marshalling and unmarshalling data to/from streams |
The client API is entirely within the
org.jboss.as:jboss-as-controller-client artifact; the other
dependencies are part of the internal implementation of
org.jboss.as:jboss-as-controller-client and are not compile-time
dependencies of any custom client based on it.
The management protocol is an open protocol, so a completely custom client could be developed without using these libraries (e.g. using Python or some other language.)
13.5.2. Working with a ModelControllerClient
The org.jboss.as.controller.client.ModelControllerClient class is the
main class a custom client would use to manage a WildFly server instance
or a Domain Controller or slave Host Controller.
The custom client must have maven artifact
org.jboss.as:jboss-as-controller-client and its dependencies on the
classpath.
Creating the ModelControllerClient
To create a management client that can connect to your target process’s native management socket, simply:
ModelControllerClient client = ModelControllerClient.Factory.create(InetAddress.getByName("localhost"), 9999);
The address and port are what is configured in the target process'
<management><management-interfaces><native-interface…/> element.
Typically, however, the native management interface will be secured,
requiring clients to authenticate. On the client side, the custom client
will need to provide the user’s authentication credentials, obtained in
whatever manner is appropriate for the client (e.g. from a dialog box in
a GUI-based client.) Access to these credentials is provided by passing
in an implementation of the
javax.security.auth.callback.CallbackHandler interface. For example:
static ModelControllerClient createClient(final InetAddress host, final int port,
final String username, final char[] password, final String securityRealmName) {
final CallbackHandler callbackHandler = new CallbackHandler() {
public void handle(Callback[] callbacks) throws IOException, UnsupportedCallbackException {
for (Callback current : callbacks) {
if (current instanceof NameCallback) {
NameCallback ncb = (NameCallback) current;
ncb.setName(username);
} else if (current instanceof PasswordCallback) {
PasswordCallback pcb = (PasswordCallback) current;
pcb.setPassword(password.toCharArray());
} else if (current instanceof RealmCallback) {
RealmCallback rcb = (RealmCallback) current;
rcb.setText(rcb.getDefaultText());
} else {
throw new UnsupportedCallbackException(current);
}
}
}
};
return ModelControllerClient.Factory.create(host, port, callbackHandler);
}Creating an operation request object
Management requests are formulated using the org.jboss.dmr.ModelNode
class from the jboss-dmr library. The jboss-dmr library allows the
complete WildFly management model to be expressed using a very small
number of Java types. See
Detyped
management and the jboss-dmr library for full details on using this
library.
Let’s show an example of creating an operation request object that can be used to read the resource description for the web subsystem’s HTTP connector:
ModelNode op = new ModelNode();
op.get("operation").set("read-resource-description");
ModelNode address = op.get("address");
address.add("subsystem", "web");
address.add("connector", "http");
op.get("recursive").set(true);
op.get("operations").set(true);What we’ve done here is created a ModelNode of type ModelType.OBJECT
with the following fields:
-
operation– the name of the operation to invoke. All operation requests must include this field and its value must be a String. -
address– the address of the resource to invoke the operation against. This field’s must be ofModelType.LISTwith each element in the list being aModelType.PROPERTY. If this field is omitted the operation will target the root resource. The operation can be targeted at any address in the management model; here we are targeting it at the resource for the web subsystem’s http connector.
In this case, the request includes two optional parameters:
-
recursive– true means you want the description of child resources under this resource. Default is false -
operations– true means you want the description of operations exposed by the resource to be included. Default is false.
Different operations take different parameters, and some take no parameters at all.
See Format of a Detyped Operation Request for full details on the structure of a ModelNode that will represent an operation request.
The example above produces an operation request ModelNode equivalent to what the CLI produces internally when it parses and executes the following low-level CLI command:
[localhost:9999 /] /subsystem=web/connector=http:read-resource-description(recursive=true,operations=true)Execute the operation and manipulate the result:
The execute method sends the operation request ModelNode to the
process being managed and returns a ModelNode the contains the process'
response:
ModelNode returnVal = client.execute(op);
System.out.println(returnVal.get("result").toString());See Format of a Detyped Operation Response for general details on the structure of the "returnVal" ModelNode.
The execute operation shown above will block the calling thread until
the response is received from the process being managed.
ModelControllerClient also exposes and API allowing asynchronous
invocation:
Future<ModelNode> future = client.executeAsync(op);
. . . // do other stuff
ModelNode returnVal = future.get();
System.out.println(returnVal.get("result").toString());Close the ModelControllerClient
A ModelControllerClient can be reused for multiple requests. Creating
a new ModelControllerClient for each request is an anti-pattern.
However, when the ModelControllerClient is no longer needed, it should
always be explicitly closed, allowing it to close down any connections
to the process it was managing and release other resources:
client.close();13.5.3. Format of a Detyped Operation Request
The basic method a user of the WildFly 19.1 programmatic management API would use is very simple:
ModelNode execute(ModelNode operation) throws IOException;where the return value is the detyped representation of the response,
and operation is the detyped representation of the operation being
invoked.
The purpose of this section is to document the structure of operation.
See Format of a Detyped Operation Response for a discussion of the format of the response.
Simple Operations
A text representation of simple operation would look like this:
{
"operation" => "write-attribute",
"address" => [
("profile" => "production"),
("subsystem" => "threads"),
("bounded-queue-thread-pool" => "pool1")
],
"name" => "count",
"value" => 20
}Java code to produce that output would be:
ModelNode op = new ModelNode();
op.get("operation").set("write-attribute");
ModelNode addr = op.get("address");
addr.add("profile", "production");
addr.add("subsystem", "threads");
addr.add("bounded-queue-thread-pool", "pool1");
op.get("name").set("count");
op.get("value").set(20);
System.out.println(op);The order in which the outermost elements appear in the request is not relevant. The required elements are:
-
operation– String – The name of the operation being invoked. -
address– the address of the managed resource against which the request should be executed. If not set, the address is the root resource. The address is an ordered list of key-value pairs describing where the resource resides in the overall management resource tree. Management resources are organized in a tree, so the order in which elements in the address occur is important.
The other key/value pairs are parameter names and their values. The names and values should match what is specified in the operation’s description.
Parameters may have any name, except for the reserved words operation,
address and operation-headers.
Operation Headers
Besides the special operation and address values discussed above,
operation requests can also include special "header" values that help
control how the operation executes. These headers are created under the
special reserved word operation-headers:
ModelNode op = new ModelNode();
op.get("operation").set("write-attribute");
ModelNode addr = op.get("address");
addr.add("base", "domain");
addr.add("profile", "production");
addr.add("subsystem", "threads");
addr.add("bounded-queue-thread-pool", "pool1");
op.get("name").set("count");
op.get("value").set(20);
op.get("operation-headers", "rollback-on-runtime-failure").set(false);
System.out.println(op);This produces:
{
"operation" => "write-attribute",
"address" => [
("profile" => "production"),
("subsystem" => "threads"),
("bounded-queue-thread-pool" => "pool1")
],
"name" => "count",
"value" => 20,
"operation-headers" => {
"rollback-on-runtime-failure => false
}
}The following operation headers are supported:
-
rollback-on-runtime-failure– boolean, optional, defaults to true. Whether an operation that successfully updates the persistent configuration model should be reverted if it fails to apply to the runtime. Operations that affect the persistent configuration are applied in two stages – first to the configuration model and then to the actual running services. If there is an error applying to the configuration model the operation will be aborted with no configuration change and no change to running services will be attempted. However, operations are allowed to change the configuration model even if there is a failure to apply the change to the running services – if and only if thisrollback-on-runtime-failureheader is set tofalse. So, this header only deals with what happens if there is a problem applying an operation to the running state of a server (e.g. actually increasing the size of a runtime thread pool.) -
rollout-plan– only relevant to requests made to a Domain Controller or Host Controller. See " Operations with a Rollout Plan" for details. -
allow-resource-service-restart– boolean, optional, defaults to false. Whether an operation that requires restarting some runtime services in order to take effect should do so. See discussion ofresource-servicesin the "Applying Updates to Runtime Services" section of the Description of the Management Model section for further details. -
roles– String or list of strings. Name(s) of RBAC role(s) the permissions for which should be used when making access control decisions instead of those from the roles normally associated with the user invoking the operation. Only respected if the user is normally associated with a role with all permissions (i.e. SuperUser), meaning this can only be used to reduce permissions for a caller, not to increase permissions. -
blocking-timeout– int, optional, defaults to 300. Maximum time, in seconds, that the operation should block at various points waiting for completion. If this period is exceeded, the operation will roll back. Does not represent an overall maximum execution time for an operation; rather it is meant to serve as a sort of fail-safe measure to prevent problematic operations indefinitely tying up resources.
Composite Operations
The root resource for a Domain or Host Controller or an individual server will expose an operation named " `composite`". This operation executes a list of other operations as an atomic unit (although the atomicity requirement can be relaxed. The structure of the request for the " `composite`" operation has the same fundamental structure as a simple operation (i.e. operation name, address, params as key value pairs).
{
"operation" => "composite",
"address" => [],
"steps" => [
{
"operation" => "write-attribute",
"address" => [
("profile" => "production"),
("subsystem" => "threads"),
("bounded-queue-thread-pool" => "pool1")
],
"count" => "count",
"value" => 20
},
{
"operation" => "write-attribute",
"address" => [
("profile" => "production"),
("subsystem" => "threads"),
("bounded-queue-thread-pool" => "pool2")
],
"name" => "count",
"value" => 10
}
],
"operation-headers" => {
"rollback-on-runtime-failure => false
}
}The "composite" operation takes a single parameter:
-
steps– a list, where each item in the list has the same structure as a simple operation request. In the example above each of the two steps is modifying the thread pool configuration for a different pool. There need not be any particular relationship between the steps. Note that therollback-on-runtime-failureandrollout-planoperation headers are not supported for the individual steps in a composite operation.+ The `rollback-on-runtime-failure` operation header discussed above has a particular meaning when applied to a composite operation, controlling whether steps that successfully execute should be reverted if other steps fail at runtime. Note that if any steps modify the persistent configuration, and any of those steps fail, all steps will be reverted. Partial/incomplete changes to the persistent configuration are not allowed.
Operations with a Rollout Plan
Operations targeted at domain or host level resources can potentially impact multiple servers. Such operations can include a "rollout plan" detailing the sequence in which the operation should be applied to servers as well as policies for detailing whether the operation should be reverted if it fails to execute successfully on some servers.
If the operation includes a rollout plan, the structure is as follows:
{
"operation" => "write-attribute",
"address" => [
("profile" => "production"),
("subsystem" => "threads"),
("bounded-queue-thread-pool" => "pool1")
],
"name" => "count",
"value" => 20,
"operation-headers" => {
"rollout-plan" => {
"in-series" => [
{
"concurrent-groups" => {
"groupA" => {
"rolling-to-servers" => true,
"max-failure-percentage" => 20
},
"groupB" => undefined
}
},
{
"server-group" => {
"groupC" => {
"rolling-to-servers" => false,
"max-failed-servers" => 1
}
}
},
{
"concurrent-groups" => {
"groupD" => {
"rolling-to-servers" => true,
"max-failure-percentage" => 20
},
"groupE" => undefined
}
}
],
"rollback-across-groups" => true
}
}
}As you can see, the rollout plan is another structure in the operation-headers section. The root node of the structure allows two children:
-
in-series– a list – A list of activities that are to be performed in series, with each activity reaching completion before the next step is executed. Each activity involves the application of the operation to the servers in one or more server groups. See below for details on each element in the list. -
rollback-across-groups– boolean – indicates whether the need to rollback the operation on all the servers in one server group should trigger a rollback across all the server groups. This is an optional setting, and defaults tofalse.
Each element in the list under the in-series node must have one or the
other of the following structures:
-
concurrent-groups– a map of server group names to policies controlling how the operation should be applied to that server group. For each server group in the map, the operation may be applied concurrently. See below for details on the per-server-group policy configuration. -
server-group– a single key/value mapping of a server group name to a policy controlling how the operation should be applied to that server group. See below for details on the policy configuration. (Note: there is no difference in plan execution between this and a " `concurrent-groups`" map with a single entry.)
The policy controlling how the operation is applied to the servers within a server group has the following elements, each of which is optional:
-
rolling-to-servers– boolean – If true, the operation will be applied to each server in the group in series. If false or not specified, the operation will be applied to the servers in the group concurrently. -
max-failed-servers– int – Maximum number of servers in the group that can fail to apply the operation before it should be reverted on all servers in the group. The default value if not specified is zero; i.e. failure on any server triggers rollback across the group. -
max-failure-percentage– int between 0 and 100 – Maximum percentage of the total number of servers in the group that can fail to apply the operation before it should be reverted on all servers in the group. The default value if not specified is zero; i.e. failure on any server triggers rollback across the group.
If both max-failed-servers and max-failure-percentage are set,
max-failure-percentage takes precedence.
Looking at the (contrived) example above, application of the operation to the servers in the domain would be done in 3 phases. If the policy for any server group triggers a rollback of the operation across the server group, all other server groups will be rolled back as well. The 3 phases are:
-
Server groups groupA and groupB will have the operation applied concurrently. The operation will be applied to the servers in groupA in series, while all servers in groupB will handle the operation concurrently. If more than 20% of the servers in groupA fail to apply the operation, it will be rolled back across that group. If any servers in groupB fail to apply the operation it will be rolled back across that group.
-
Once all servers in groupA and groupB are complete, the operation will be applied to the servers in groupC. Those servers will handle the operation concurrently. If more than one server in groupC fails to apply the operation it will be rolled back across that group.
-
Once all servers in groupC are complete, server groups groupD and groupE will have the operation applied concurrently. The operation will be applied to the servers in groupD in series, while all servers in groupE will handle the operation concurrently. If more than 20% of the servers in groupD fail to apply the operation, it will be rolled back across that group. If any servers in groupE fail to apply the operation it will be rolled back across that group.
Default Rollout Plan
All operations that impact multiple servers will be executed with a
rollout plan. However, actually specifying the rollout plan in the
operation request is not required. If no rollout-plan operation header
is specified, a default plan will be generated. The plan will have the
following characteristics:
-
There will only be a single high level phase. All server groups affected by the operation will have the operation applied concurrently.
-
Within each server group, the operation will be applied to all servers concurrently.
-
Failure on any server in a server group will cause rollback across the group.
-
Failure of any server group will result in rollback of all other server groups.
Creating and reusing a Rollout Plan
Since a rollout plan may be quite complex, having to pass it as a header
every time can become quickly painful. So instead we can store it in the
model and then reference it when we want to use it.
To create a rollout plan you can use the operation rollout-plan add
like this :
rollout-plan add --name=simple --content={"rollout-plan" => {"in-series" => [{"server-group" => {"main-server-group" => {"rolling-to-servers" => false,"max-failed-servers" => 1}}}, {"server-group" => {"other-server-group" => {"rolling-to-servers" => true,"max-failure-percentage" => 20}}}],"rollback-across-groups" => true}}
This will create a rollout plan called simple in the content
repository.
[domain@192.168.1.20:9999 /] /management-client-content=rollout-plans/rollout-plan=simple:read-resource
{
"outcome" => "success",
"result" => {
"content" => {"rollout-plan" => {
"in-series" => [
{"server-group" => {"main-server-group" => {
"rolling-to-servers" => false,
"max-failed-servers" => 1
}}},
{"server-group" => {"other-server-group" => {
"rolling-to-servers" => true,
"max-failure-percentage" => 20
}}}
],
"rollback-across-groups" => true
}},
"hash" => bytes {
0x13, 0x12, 0x76, 0x65, 0x8a, 0x28, 0xb8, 0xbc,
0x34, 0x3c, 0xe9, 0xe6, 0x9f, 0x24, 0x05, 0xd2,
0x30, 0xff, 0xa4, 0x34
}
}
}Now you may reference the roolout plan in your command by adding a header just like this :
deploy /quickstart/ejb-in-war/target/wildfly-ejb-in-war.war --all-server-groups --headers={rollout name=simple}
13.5.4. Format of a Detyped Operation Response
As noted previously, the basic method a user of the WildFly 19.1 programmatic management API would use is very simple:
ModelNode execute(ModelNode operation) throws IOException;where the return value is the detyped representation of the response,
and operation is the detyped representation of the operating being
invoked.
The purpose of this section is to document the structure of the return value.
For the format of the request, see Format of a Detyped Operation Request.
Simple Responses
Simple responses are provided by the following types of operations:
-
Non-composite operations that target a single server. (See below for more on composite operations).
-
Non-composite operations that target a Domain Controller or slave Host Controller and don’t require the responder to apply the operation on multiple servers and aggregate their results (e.g. a simple read of a domain configuration property.)
The response will always include a simple boolean outcome field, with one of three possible values:
-
success– the operation executed successfully -
failed– the operation failed -
cancelled– the execution of the operation was cancelled. (This would be an unusual outcome for a simple operation which would generally very rapidly reach a point in its execution where it couldn’t be cancelled.)
The other fields in the response will depend on whether the operation was successful.
The response for a failed operation:
{
"outcome" => "failed",
"failure-description" => "[JBAS-12345] Some failure message"
}A response for a successful operation will include an additional field:
-
result– the return value, orundefinedfor void operations or those that return null
A non-void result:
{
"outcome" => "success",
"result" => {
"name" => "Brian",
"age" => 22
}
}A void result:
{
"outcome" => "success",
"result" => undefined
}The response for a cancelled operation has no other fields:
{
"outcome" => "cancelled"
}Response Headers
Besides the standard outcome, result and failure-description
fields described above, the response may also include various headers
that provide more information about the affect of the operation or about
the overall state of the server. The headers will be child element under
a field named response-headers. For example:
{
"outcome" => "success",
"result" => undefined,
"response-headers" => {
"operation-requires-reload" => true,
"process-state" => "reload-required"
}
}A response header is typically related to whether an operation could be applied to the targeted runtime without requiring a restart of some or all services, or even of the target process itself. Please see the "Applying Updates to Runtime Services" section of the Description of the Management Model section for a discussion of the basic concepts related to what happens if an operation requires a service restart to be applied.
The current possible response headers are:
-
operation-requires-reload– boolean – indicates that the specific operation that has generated this response requires a restart of all services in the process in order to take effect in the runtime. This would typically only have a value of 'true'; the absence of the header is the same as a value of 'false.' -
operation-requires-restart– boolean – indicates that the specific operation that has generated this response requires a full process restart in order to take effect in the runtime. This would typically only have a value of 'true'; the absence of the header is the same as a value of 'false.' -
process-state– enumeration – Provides information about the overall state of the target process. One of the following values:-
starting– the process is starting -
running– the process is in a normal running state. Theprocess-stateheader would typically not be seen with this value; the absence of the header is the same as a value of 'running'. -
reload-required– some operation (not necessarily this one) has executed that requires a restart of all services in order for a configuration change to take effect in the runtime. -
restart-required– some operation (not necessarily this one) has executed that requires a full process restart in order for a configuration change to take effect in the runtime. -
stopping– the process is stopping
-
Basic Composite Operation Responses
A composite operation is one that incorporates more than one simple operation in a list and executes them atomically. See the "Composite Operations" section for more information.
Basic composite responses are provided by the following types of operations:
-
Composite operations that target a single server.
-
Composite operations that target a Domain Controller or a slave Host Controller and don’t require the responder to apply the operation on multiple servers and aggregate their results (e.g. a list of simple reads of domain configuration properties.)
The high level format of a basic composite operation response is largely
the same as that of a simple operation response, although there is an
important semantic difference. For a composite operation, the meaning of
the outcome flag is controlled by the value of the operation request’s
rollback-on-runtime-failure header field. If that field was false
(default is true), the outcome flag will be success if all steps were
successfully applied to the persistent configuration even if none of
the composite operation’s steps was successfully applied to the runtime.
What’s distinctive about a composite operation response is the result
field. First, even if the operation was not successful, the result
field will usually be present. (It won’t be present if there was some
sort of immediate failure that prevented the responder from even
attempting to execute the individual operations.) Second, the content of
the result field will be a map. Each entry in the map will record the
result of an element in the steps parameter of the composite operation
request. The key for each item in the map will be the string " step-X`"
where "X" is the 1-based index of the step’s position in the request’s
`steps list. So each individual operation in the composite operation
will have its result recorded.
The individual operation results will have the same basic format as the
simple operation results described above. However, there are some
differences from the simple operation case when the individual
operation’s outcome flag is failed. These relate to the fact that in
a composite operation, individual operations can be rolled back or not
even attempted.
If an individual operation was not even attempted (because the overall operation was cancelled or, more likely, a prior operation failed):
{
"outcome" => "cancelled"
}An individual operation that failed and was rolled back:
{
"outcome" => "failed",
"failure-description" => "[JBAS-12345] Some failure message",
"rolled-back" => true
}An individual operation that itself succeeded but was rolled back due to failure of another operation:
{
"outcome" => "failed",
"result" => {
"name" => "Brian",
"age" => 22
},
"rolled-back" => true
}An operation that failed and was rolled back:
{
"outcome" => "failed",
"failure-description" => "[JBAS-12345] Some failure message",
"rolled-back" => true
}Here’s an example of the response for a successful 2 step composite operation:
{
"outcome" => "success",
"result" => [
{
"outcome" => "success",
"result" => {
"name" => "Brian",
"age" => 22
}
},
{
"outcome" => "success",
"result" => undefined
}
]
}And for a failed 3 step composite operation, where the first step succeeded and the second failed, triggering cancellation of the 3rd and rollback of the others:
{
"outcome" => "failed",
"failure-description" => "[JBAS-99999] Composite operation failed; see individual operation results for details",
"result" => [
{
"outcome" => "failed",
"result" => {
"name" => "Brian",
"age" => 22
},
"rolled-back" => true
},
{
"outcome" => "failed",
"failure-description" => "[JBAS-12345] Some failure message",
"rolled-back" => true
},
{
"outcome" => "cancelled"
}
]
}Multi-Server Responses
Multi-server responses are provided by operations that target a Domain Controller or slave Host Controller and require the responder to apply the operation on multiple servers and aggregate their results (e.g. nearly all domain or host configuration updates.)
Multi-server operations are executed in several stages.
First, the operation may need to be applied against the authoritative
configuration model maintained by the Domain Controller (for
domain.xml confgurations) or a Host Controller (for a host.xml
configuration). If there is a failure at this stage, the operation is
automatically rolled back, with a response like this:
{
"outcome" => "failed",
"failure-description" => {
"domain-failure-description" => "[JBAS-33333] Failed to apply X to the domain model"
}
}If the operation was addressed to the domain model, in the next stage the Domain Controller will ask each slave Host Controller to apply it to its local copy of the domain model. If any Host Controller fails to do so, the Domain Controller will tell all Host Controllers to revert the change, and it will revert the change locally as well. The response to the client will look like this:
{
"outcome" => "failed",
"failure-description" => {
"host-failure-descriptions" => {
"hostA" => "[DOM-3333] Failed to apply to the domain model",
"hostB" => "[DOM-3333] Failed to apply to the domain model"
}
}
}If the preceding stages succeed, the operation will be pushed to all affected servers. If the operation is successful on all servers, the response will look like this (this example operation has a void response, hence the result for each server is undefined):
{
"outcome" => "success",
"result" => undefined,
"server-groups" => {
"groupA" => {
"serverA-1" => {
"host" => "host1",
"response" => {
"outcome" => "success",
"result" => undefined
}
},
"serverA-2" => {
"host" => "host2",
"response" => {
"outcome" => "success",
"result" => undefined
}
}
},
"groupB" => {
"serverB-1" => {
"host" => "host1",
"response" => {
"outcome" => "success",
"result" => undefined
}
},
"serverB-2" => {
"host" => "host2",
"response" => {
"outcome" => "success",
"result" => undefined
}
}
}
}
}The operation need not succeed on all servers in order to get an
"outcome" ⇒ "success" result. All that is required is that it succeed
on at least one server without the rollback policies in the rollout plan
triggering a rollback on that server. An example response in such a
situation would look like this:
{
"outcome" => "success",
"result" => undefined,
"server-groups" => {
"groupA" => {
"serverA-1" => {
"host" => "host1",
"response" => {
"outcome" => "success",
"result" => undefined
}
},
"serverA-2" => {
"host" => "host2",
"response" => {
"outcome" => "success",
"result" => undefined
}
}
},
"groupB" => {
"serverB-1" => {
"host" => "host1",
"response" => {
"outcome" => "success",
"result" => undefined,
"rolled-back" => true
}
},
"serverB-2" => {
"host" => "host2",
"response" => {
"outcome" => "success",
"result" => undefined,
"rolled-back" => true
}
},
"serverB-3" => {
"host" => "host3",
"response" => {
"outcome" => "failed",
"failure-description" => "[DOM-4556] Something didn't work right",
"rolled-back" => true
}
}
}
}
}Finally, if the operation fails or is rolled back on all servers, an example response would look like this:
{
"outcome" => "failed",
"server-groups" => {
"groupA" => {
"serverA-1" => {
"host" => "host1",
"response" => {
"outcome" => "success",
"result" => undefined
}
},
"serverA-2" => {
"host" => "host2",
"response" => {
"outcome" => "success",
"result" => undefined
}
}
},
"groupB" => {
"serverB-1" => {
"host" => "host1",
"response" => {
"outcome" => "failed",
"result" => undefined,
"rolled-back" => true
}
},
"serverB-2" => {
"host" => "host2",
"response" => {
"outcome" => "failed",
"result" => undefined,
"rolled-back" => true
}
},
"serverB-3" => {
"host" => "host3",
"response" => {
"outcome" => "failed",
"failure-description" => "[DOM-4556] Something didn't work right",
"rolled-back" => true
}
}
}
}
}14. CLI Recipes
14.1. Properties
14.1.1. Adding, reading and removing system property using CLI
For standalone mode:
$ ./bin/jboss-cli.sh --connect controller=IP_ADDRESS
[standalone@IP_ADDRESS:9990 /] /system-property=foo:add(value=bar)
[standalone@IP_ADDRESS:9990 /] /system-property=foo:read-resource
{
"outcome" => "success",
"result" => {"value" => "bar"}
}
[standalone@IP_ADDRESS:9990 /] /system-property=foo:remove
{"outcome" => "success"}For domain mode the same commands are used, you can add/read/remove
system properties for:
All hosts and server instances in domain
[domain@IP_ADDRESS:9990 /] /system-property=foo:add(value=bar)
[domain@IP_ADDRESS:9990 /] /system-property=foo:read-resource
[domain@IP_ADDRESS:9990 /] /system-property=foo:removeHost and its server instances
[domain@IP_ADDRESS:9990 /] /host=master/system-property=foo:add(value=bar)
[domain@IP_ADDRESS:9990 /] /host=master/system-property=foo:read-resource
[domain@IP_ADDRESS:9990 /] /host=master/system-property=foo:removeJust one server instance
[domain@IP_ADDRESS:9990 /] /host=master/server-config=server-one/system-property=foo:add(value=bar)
[domain@IP_ADDRESS:9990 /] /host=master/server-config=server-one/system-property=foo:read-resource
[domain@IP_ADDRESS:9990 /] /host=master/server-config=server-one/system-property=foo:remove14.1.2. Overview of all system properties
Overview of all system properties in WildFly including OS system properties and properties specified on command line using -D, -P or --properties arguments.
Standalone
[standalone@IP_ADDRESS:9990 /] /core-service=platform-mbean/type=runtime:read-attribute(name=system-properties)Domain
[domain@IP_ADDRESS:9990 /] /host=master/core-service=platform-mbean/type=runtime:read-attribute(name=system-properties)
[domain@IP_ADDRESS:9990 /] /host=master/server=server-one/core-service=platform-mbean/type=runtime:read-attribute(name=system-properties)14.2. Configuration
14.2.1. List Subsystems
[standalone@localhost:9990 /] /:read-children-names(child-type=subsystem)
{
"outcome" => "success",
"result" => [
"batch",
"datasources",
"deployment-scanner",
"ee",
"ejb3",
"infinispan",
"io",
"jaxrs",
"jca",
"jdr",
"jmx",
"jpa",
"jsf",
"logging",
"mail",
"naming",
"pojo",
"remoting",
"resource-adapters",
"sar",
"security",
"threads",
"transactions",
"undertow",
"webservices",
"weld"
]
}14.2.2. List description of available attributes and childs
Descriptions, possible attribute type and values, permission and whether expressions ( $\{ … } ) are allowed from the underlying model are shown by the read-resource-description command.
/subsystem=datasources/data-source=ExampleDS:read-resource-description
{
"outcome" => "success",
"result" => {
"description" => "A JDBC data-source configuration",
"head-comment-allowed" => true,
"tail-comment-allowed" => true,
"attributes" => {
"connection-url" => {
"type" => STRING,
"description" => "The JDBC driver connection URL",
"expressions-allowed" => true,
"nillable" => false,
"min-length" => 1L,
"max-length" => 2147483647L,
"access-type" => "read-write",
"storage" => "configuration",
"restart-required" => "no-services"
},
"driver-class" => {
"type" => STRING,
"description" => "The fully qualified name of the JDBC driver class",
"expressions-allowed" => true,
"nillable" => true,
"min-length" => 1L,
"max-length" => 2147483647L,
"access-type" => "read-write",
"storage" => "configuration",
"restart-required" => "no-services"
},
"datasource-class" => {
"type" => STRING,
"description" => "The fully qualified name of the JDBC datasource class",
"expressions-allowed" => true,
"nillable" => true,
"min-length" => 1L,
"max-length" => 2147483647L,
"access-type" => "read-write",
"storage" => "configuration",
"restart-required" => "no-services"
},
"jndi-name" => {
"type" => STRING,
"description" => "Specifies the JNDI name for the datasource",
"expressions-allowed" => true,
"nillable" => false,
"access-type" => "read-write",
"storage" => "configuration",
"restart-required" => "no-services"
},
...14.2.3. View configuration as XML for domain model or host model
Assume you have a host that is called master
[domain@localhost:9990 /] /host=master:read-config-as-xmlJust for the domain or standalone
[domain@localhost:9990 /] :read-config-as-xml14.2.4. Take a snapshot of what the current domain is
[domain@localhost:9990 /] :take-snapshot()
{
"outcome" => "success",
"result" => {
"domain-results" => {"step-1" => {"name" => "JBOSS_HOME/domain/configuration/domain_xml_history/snapshot/20110908-165222603domain.xml"}},
"server-operations" => undefined
}
}14.2.5. Take the latest snapshot of the host.xml for a particular host
Assume you have a host that is called master
[domain@localhost:9990 /] /host=master:take-snapshot
{
"outcome" => "success",
"result" => {
"domain-results" => {"step-1" => {"name" => "JBOSS_HOME/domain/configuration/host_xml_history/snapshot/20110908-165640215host.xml"}},
"server-operations" => undefined
}
}14.2.6. How to get interface address
The attribute for interface is named "resolved-address". It’s a runtime attribute so it does not show up in :read-resource by default. You have to add the "include-runtime" parameter.
./jboss-cli.sh --connect
Connected to standalone controller at localhost:9990
[standalone@localhost:9990 /] cd interface=public
[standalone@localhost:9990 interface=public] :read-resource(include-runtime=true)
{
"outcome" => "success",
"result" => {
"any" => undefined,
"any-address" => undefined,
"any-ipv4-address" => undefined,
"any-ipv6-address" => undefined,
"criteria" => [("inet-address" => expression "${jboss.bind.address:127.0.0.1}")],
"inet-address" => expression "${jboss.bind.address:127.0.0.1}",
"link-local-address" => undefined,
"loopback" => undefined,
"loopback-address" => undefined,
"multicast" => undefined,
"name" => "public",
"nic" => undefined,
"nic-match" => undefined,
"not" => undefined,
"point-to-point" => undefined,
"public-address" => undefined,
"resolved-address" => "127.0.0.1",
"site-local-address" => undefined,
"subnet-match" => undefined,
"up" => undefined,
"virtual" => undefined
}
}
[standalone@localhost:9990 interface=public] :read-attribute(name=resolved-address)
{
"outcome" => "success",
"result" => "127.0.0.1"
}It’s similar for domain, just specify path to server instance:
[domain@localhost:9990 /] /host=master/server=server-one/interface=public:read-attribute(name=resolved-address)
{
"outcome" => "success",
"result" => "127.0.0.1"
}14.3. Runtime
14.3.1. Get all configuration and runtime details from CLI
./bin/jboss-cli.sh -c command=":read-resource(include-runtime=true, recursive=true, recursive-depth=10)"14.4. Scripting
14.4.1. Windows and "Press any key to continue …" issue
WildFly scripts for Windows end with "Press any key to continue …". This behavior is useful when script is executed by double clicking the script but not when you need to invoke several commands from custom script (e.g. 'bin/jboss-admin.bat --connect command=:shutdown').
To avoid "Press any key to continue …" message you need to specify NOPAUSE variable. Call 'set NOPAUSE=true' in command line before running any WildFly 19.1 .bat script or include it in your custom script before invoking scripts from WildFly.
14.5. Statistics
14.5.1. Read statistics of active datasources
/subsystem=datasources/data-source=ExampleDS/statistics=pool:read-resource(include-runtime=true)
/subsystem=datasources/data-source=ExampleDS/statistics=jdbc:read-resource(include-runtime=true)or
/subsystem=datasources/data-source=ExampleDS:read-resource(include-runtime=true,recursive=true)14.6. Deployment
14.6.1. CLI deployment command
In addition to the legacy deploy, undeploy and deployment-info commands, that stay un-changed, the CLI offers a deployment command that properly separates the various use cases encountered when managing deployments. This command offers a simpler interface and should be the way to go when managing deployments. New features will be added thanks to the deployment command, legacy commands will not evolve. This document contains a summary of the capabilities of this command, type help deployment to display the list of all available actions and help deployment <action> for the detailed description of an action.
Actions to deploy some content:
-
deployment deploy-file: To deploy a file located on the file system.
-
deployment deploy-url: To deploy content referenced by an URL.
-
deployment deploy-cli-achive: To deploy some content thanks to a CLI archive (.cli file) located on the file system.
Actions to enable some deployments:
-
deployment enable: To enable a given disabled deployment.
-
deployment enable-all: To enable all disabled deployments.
Actions to disable some deployments:
-
deployment disable: To disable a given enabled deployment.
-
deployment disable-all: To disable all enabled deployments.
Actions to undeploy some deployments:
-
deployment undeploy: To undeploy a given deployment and remove its content from the repository.
-
deployment undeploy-cli-archive: To undeploy some content using a CLI archive (.cli file) located on the file system.
Actions to get information on some deployments:
-
deployment info: To display information about single or multiple deployments.
-
deployment list: To display all the existing deployments.
14.6.2. Incremental deployment with the CLI
It can be desirable to incrementally create and(or) update a WildFly deployment. This chapter details how this can be achieved using the WildFly CLI tool.
Steps to create an empty deployment and add an index html file.
-
Create an empty deployment named my app:
[standalone@localhost:9990 /] /deployment=myapp:add(content=[{empty=true}]) -
Add an index.html to my app:
[standalone@localhost:9990 /] /deployment=myapp:add-content(content=[{input-stream-index=<press TAB>Then use completion to navigate to your index.html file.
-
Provide a target name for index.html inside the deployment and execute the operation:
[standalone@localhost:9990 /] /deployment=myapp:add-content(content=[{input-stream-index=./index.html, target-path=index.xhtml}] -
Your content has been added, you can browse the content of a deployment using the browse-content operation:
[standalone@localhost:9990 /] /deployment=myapp:browse-content(path=./) -
You can display (or save) the content of a deployed file using the attachement command:
attachment display --operation=/deployment=myapp:read-content(path=index.xhtml) -
You can remove content from a deployment:
/deployment=myapp:remove-content(paths=[./index.xhtml])
Tips
-
add-content operation allows you to add more than one file ( content argument is a list of complex types).
-
CLI offers completion for browse-content’s path and remove-content's paths argument.
-
You can safely use operations that are using attached streams in batch operations. In the case of batch operations, streams are attached to the composite operation.
| On Windows, path separator '\' needs to be escaped, this is a limitation of CLI handling complex types. The file path completion is automatically escaping the paths it is proposing. |
Notes for server side operation Handler implementors
In order to benefit from CLI support for attached file streams and file system completion, you need to properly structure your operation arguments. Steps to create an operation that receives a list of file streams attached to the operation:
-
Define your operation argument as a LIST of INT (The LIST value-type must be of type INT).
-
In the description of your argument, add the 2 following boolean descriptors: filesystem-path and attached-streams
When your operation is called from the CLI, file system completion will be automatically proposed for your argument. At execution time, the file system paths will be automatically converted onto the index of the attached streams.
14.7. Downloading files with the CLI
Some management resources are exposing the content of files in the matter of streams. Streams returned by a management operation are attached to the headers of the management response. The CLI command attachment (see CLI help for a detailed description of this command) allows to display or save the content of the attached streams.
-
Displaying the content of server.log file:
attachment display --operation=/subsystem=logging/log-file=server.log:read-resource(include-runtime) -
Saving locally the server.log file:
attachment save --operation=/subsystem=logging/log-file=server.log:read-resource(include-runtime) --file=./server.log -
Displaying the content of a deployed file:
attachment display --operation=/deployment=myapp:read-content(path=index.xhtml)
-
By default existing files will be preserved. Use the option --overwrite to overwrite existing file.
-
attachment can be used in batch mode.
14.8. Iteration of Collections
The command for allows to iterate the content of an operation result. As an example, this command can be used to display the content of the Manifest files present in all deployed applications. For example:
for deployed in :read-children-names(child-type=deployment)
echo $deployed Manifest content
attachment display --operation=/deployment=$deployed:read-content(path=META-INF/MANIFEST.MF)
doneWhen this for block is executed, the content of all Manifest files is displayed in the CLI console.
Tips
-
The scope of the defined variable is limited to the for block.
-
If a variable with the same name already exists, the for command will print an error.
-
If the operation doesn’t return a list, the for command will print an error.
-
for block can be discarded and not execute by adding the option --discard to done.
14.9. Security Commands
CLi offers a security command to group all security related management actions under a single command.
-
security enable-ssl-management: To enable SSL (elytron SSLContext) for the management interfaces. Type help security enable-ssl-management for a complete description of the command.
Among other ways to configure SSL, this command offers an interactive wizard to help you configure SSL by generating a self-signed certificate. Example of wizard usage:
security enable-ssl-management --interactive
Please provide required pieces of information to enable SSL:
Key-store file name (default management.keystore):
Password (blank generated):
What is your first and last name? [Unknown]:
What is the name of your organizational unit? [Unknown]:
What is the name of your organization? [Unknown]:
What is the name of your City or Locality? [Unknown]:
What is the name of your State or Province? [Unknown]:
What is the two-letter country code for this unit? [Unknown]:
Is CN=Unknown, OU=Unknown, O=Unknown, L=Unknown, ST=Unknown, C=Unknown correct y/n [y]?
Validity (in days, blank default):
Alias (blank generated):
Enable SSL Mutual Authentication y/n (blank n):n
SSL options:
key store file: management.keystore
distinguished name: CN=Unknown, OU=Unknown, O=Unknown, L=Unknown, ST=Unknown, C=Unknown
password: KRzne5s1
validity: default
alias: alias-265e6c6d-ff4e-4b8c-8f10-f015d678eb29
Server keystore file management.keystore, certificate signing request management.csr and
certificate file management.keystore.pem will be generated in server configuration directory.
Do you confirm y/n :yNB: Once the command is executed, the CLI will reload the server and reconnect to it.
This command can also obtain the certificates from the Let’s Encrypt certificate authority by use of the --lets-encrypt parameter. Besides the mentioned workflow the user will be prompted to specify more information (eg: account key store, certificate authority account) to obtain the certificate from Let’s Encrypt.
-
security disable-ssl-management: To disable SSL (elytron SSLContext) for the management interfaces. Type help security disable-ssl-management for a complete description of the command.
-
security enable-ssl-http-server: To enable SSL (elytron SSLContext) for the undertow server. The same wizard as the enable-ssl-management action is available. Type help security enable-ssl-http-server for a complete description of the command.
This command can also obtain the certificates from the Let’s Encrypt certificate authority by use of the --lets-encrypt parameter. Besides the mentioned workflow the user will be prompted to specify more information (eg: account key store, certificate authority account) to obtain the certificate from Let’s Encrypt.
-
security disable-ssl-http-server: To disable SSL (elytron SSLContext) for the undertow server. Type help security disable-ssl-http-server for a complete description of the command.
-
security enable-sasl-management: To enable SASL authentication (elytron SASL factory) for the management interfaces. Calling this command without any option will have the effect to associate the out of the box SASL factory to the http-interface. Type help security enable-sasl-management for a complete description of the command.
This command supports a subset of SASL mechanisms such as: EXTERNAL, DIGEST-MD5, JBOSS-LOCAL-USER, SCRAM-*, … The CLI completer proposes the set of mechanisms that can be properly configured using this command. Each mechanism can be associated to a property file realm, a file-system realm or a trust-store realm according to its nature.
NB: Once the command is executed, the CLI will reload the server and reconnect to it.
-
security disable-sasl-management: To disable SASL for the management interfaces. If a mechanism is provided, this mechanism will be removed from the factory, the factory will stay associated to the interface. Without mechanism, the factory is no more active on the management interface. Type help security disable-sasl-management for a complete description of the command.
-
security reorder-sasl-management: To re-order the list of SASL mechanisms present in the factory. Order of mechanisms is of importance, the first in the list is sent to the client. Type help security reorder-sasl-management for a complete description of the command.
-
security enable-http-auth-management: To enable HTTP authentication (elytron HTTP factory) for the management http-interface. Calling this command without any option will have the effect to associate the out of the box HTTP Authentication factory to the http-interface. Type help security enable-http-auth-management for a complete description of the command.
This command supports a subset of HTTP mechanisms such as: BASIC, CLIENT_CERT, DIGEST, … The CLI completer proposes the set of mechanisms that can be properly configured using this command. Each mechanism can be associated to a property file realm, a file-system realm or a trust-store realm according to its nature.
NB: Once the command is executed, the CLI will reload the server and reconnect to it.
-
security disable-http-auth-management: To disable HTTP Authentication for the http management interface. If a mechanism is provided, this mechanism will be removed from the factory, the factory will stay associated to the interface. Without mechanism, the factory is no more active on the management interface. Type help security disable-http-auth-management for a complete description of the command.
-
security enable-http-auth-http-server: To enable HTTP authentication (elytron HTTP factory) for the given undertow security domain. Type help security enable-http-auth-http-server for a complete description of the command.
This command supports a subset of HTTP mechanisms such as: BASIC, CLIENT_CERT, DIGEST, … The CLI completer proposes the set of mechanisms that can be properly configured using this command. Each mechanism can be associated to a property file realm, a file-system realm or a trust-store realm according to its nature.
NB: Once the command is executed, the CLI will reload the server and reconnect to it.
-
security disable-http-auth-http-server: To disable HTTP Authentication for the given undertow security domain. If a mechanism is provided, this mechanism will be removed from the factory, the factory will stay associated to the security domain. Without mechanism, the factory is no more active on the security-domain. Type help security disable-http-auth-http-server for a complete description of the command.